Home

 Creators
 Search
 Recent
 Random
 Posts
 DMs
 Tags
 Random
 Importer
 Import
 FAQ
 Account
 Register
 Login
 Favorites
 Keys
 Logout
 Telegram

Progress Report - March 17, 2026 (Patreon)
Content
Hello, everyone! I remembered to write Tuesday's Progress Report on Tuesday this week!
Episode 2 of Love & Degeneracy Chapter 1 is finished (on my end), Overbreed Episode 1 is finally nearing completion with its naturalization, and I've been spending the week splitting my attention between working on tools and character models.
Let's talk about all that!
As I said above, Episode 2 of L&D1 is fully finished on my end. The final 4k render completed this past Saturday, and by end of day Sunday I had the final export out of Resolve in my hands, with color correction and VFX shots in place. Well, VFX shot, and it's just a simple panning composition. But it's still VFX that had to be done!
Tonedeaf and I spoke on Monday, where we exchanged what all we had. His current soundscape for the video is absolutely phenomenal, even with the caveat he gave me that the mix wasn't final and it was "mostly just putting all the sounds in their places." He definitely cooked on this video, and I'm very excited to share it with the Early Access Patrons this week!
Speaking of, just for posterity: this Friday, Episode 1 will be released to the general public, and Episode 2 will go live for 2 weeks of Early Access. If you find yourself watching the first episode (or the second episode), and just can't wait to see how the rest of it unfolds (or just want to hear more of Baku's and Dorn's absolutely fantastic voice performances), then you can watch the full chapter draft under the 2160p Patron tier.
There really isn't much more to say in regards to Overbreed than what the one-line summary at the top of the post said. All of the Spanish and Russian has been naturalized already, and my Swiss German friend was hoping to have Mercy's naturalization done by this past Sunday. but I haven't heard from him since the Saturday before, so I don't know what the state of that is.
In regards to the model and tool work, let's start with the model work, since we've gone a bit without pictures, and model work is far more interesting to look at.
Right off the top, I finally got Suki into Source, and I am beyond ecstatic with how she's turned out. She is simply beautiful in my eyes.
To celebrate her finally making her way into Source, after over 10 months in 3dsmax (not being continuously worked on, of course), I felt it was only prudent to recreate the Bella Bellz image gallery that inspired Suki's design.
She's not completely finished yet, with a handful of little things I need to polish. The most pertinent is that I need to clean up her tattoos. Ultimately, I would like to find a 2d artist to draw wholly original versions of all her tattoos - with the exception of her left leg (the star trail), they are all clobbered together from images I found online and are meant to serve as placeholders. I did my best to clean them up and adjust them as necessary, but you can pretty clearly tell some of them were grainy and low-resolution source images.
The barbed-wire on her right arm is the worst offender, with a very obvious white trail around the wires. It is also the design where my additions - the bands capping off both ends - are most apparent, as those are the only clean and high-quality aspects of the tattoo.
But even with the low-quality tattoos marring her aesthetic, overall I am still supremely happy with how she came out. I can't help but draw special attention to her hair, and all the subtle bumps following the strands. Some may recall when I first built Suki, that I was unable to find a suitable fauxhawk that fit my vision for her - and so I built my own hair for her, entirely from scratch. Not just mesh, but wholly original textures as well.
And I am just so damn happy with how those textures came out.
With Suki finally built, I am fully intending to build her debut with Rover Wanderer Nomad Vagabond Chapter 1 in early 2027. I'd love to get to her sooner, but I already have all of 2026 not just planned out, but animated out as well. I've mentioned before how I already have L&D fully voiced and animated, Pharmmetra fully voiced and animated, Marie/Honoka fully animated, and Primordium mostly animated. With 20+ episodes between those 4, not counting the series preview, and 2 weeks between releases, that already books the rest of the year out. So 2027 is the earliest it can be.
Beyond Suki, my Saturday streams have taken on the task of building some generic Hitman Female models, as counterparts to the generic Hitman Male models I've been using for the past few years. So far, they are coming along wonderfully, and I am very excited to get them built out and usable.
I had built some generic Mass Effect Female models a few years ago, but overall I feel they came up short compared to the Hitman Male models. These Hitman Female models, by comparison, I feel are already much superior in quality and usability to the Mass Effect Female models.
One of the major reasons why I felt like the Mass Effect Female models fall short compare to the Hitman Male models is that the Hitman Male models have a wide range of visually distinct face textures, with a lot of small details in them. The Mass Effect Female faces, by contrast, are all highly similar and tend to blend into one another, with largely smooth and undetailed textures.
There is also a matter of variety. The Hitman Male models have currently 13 face textures, with upwards of 80 possible for me to pull from. The Mass Effect females, by contrast, have 5. The Hitman Female models currently have 6 textures, with 25 total face textures I could pull from (though many of them have varying degrees of baked-in shadows that would have to be cleaned up).
Finally, there is also the design ethos I am approaching the Hitman Female models with that I think makes them far more tenable than the Mass Effect Female models: predetermined bodyshapes, as opposed to entirely dynamic shapes by way of bodymorph.
I tried the full bodymorph mechanism for the Mass Effect Female models, and it just introduced too many issues. It made outfits damn near impossible to make for them, because the rigging would simply change too much between bodyshapes - mostly around the bust. The tool logic to balance them and make sure they always summed to 100% was a challenge as well, and made adjusting them by hand a real chore. And then, possibly most damning, randomizing the shapes had a tendency to make them all come out to the same sort of amorphous and shapeless form.
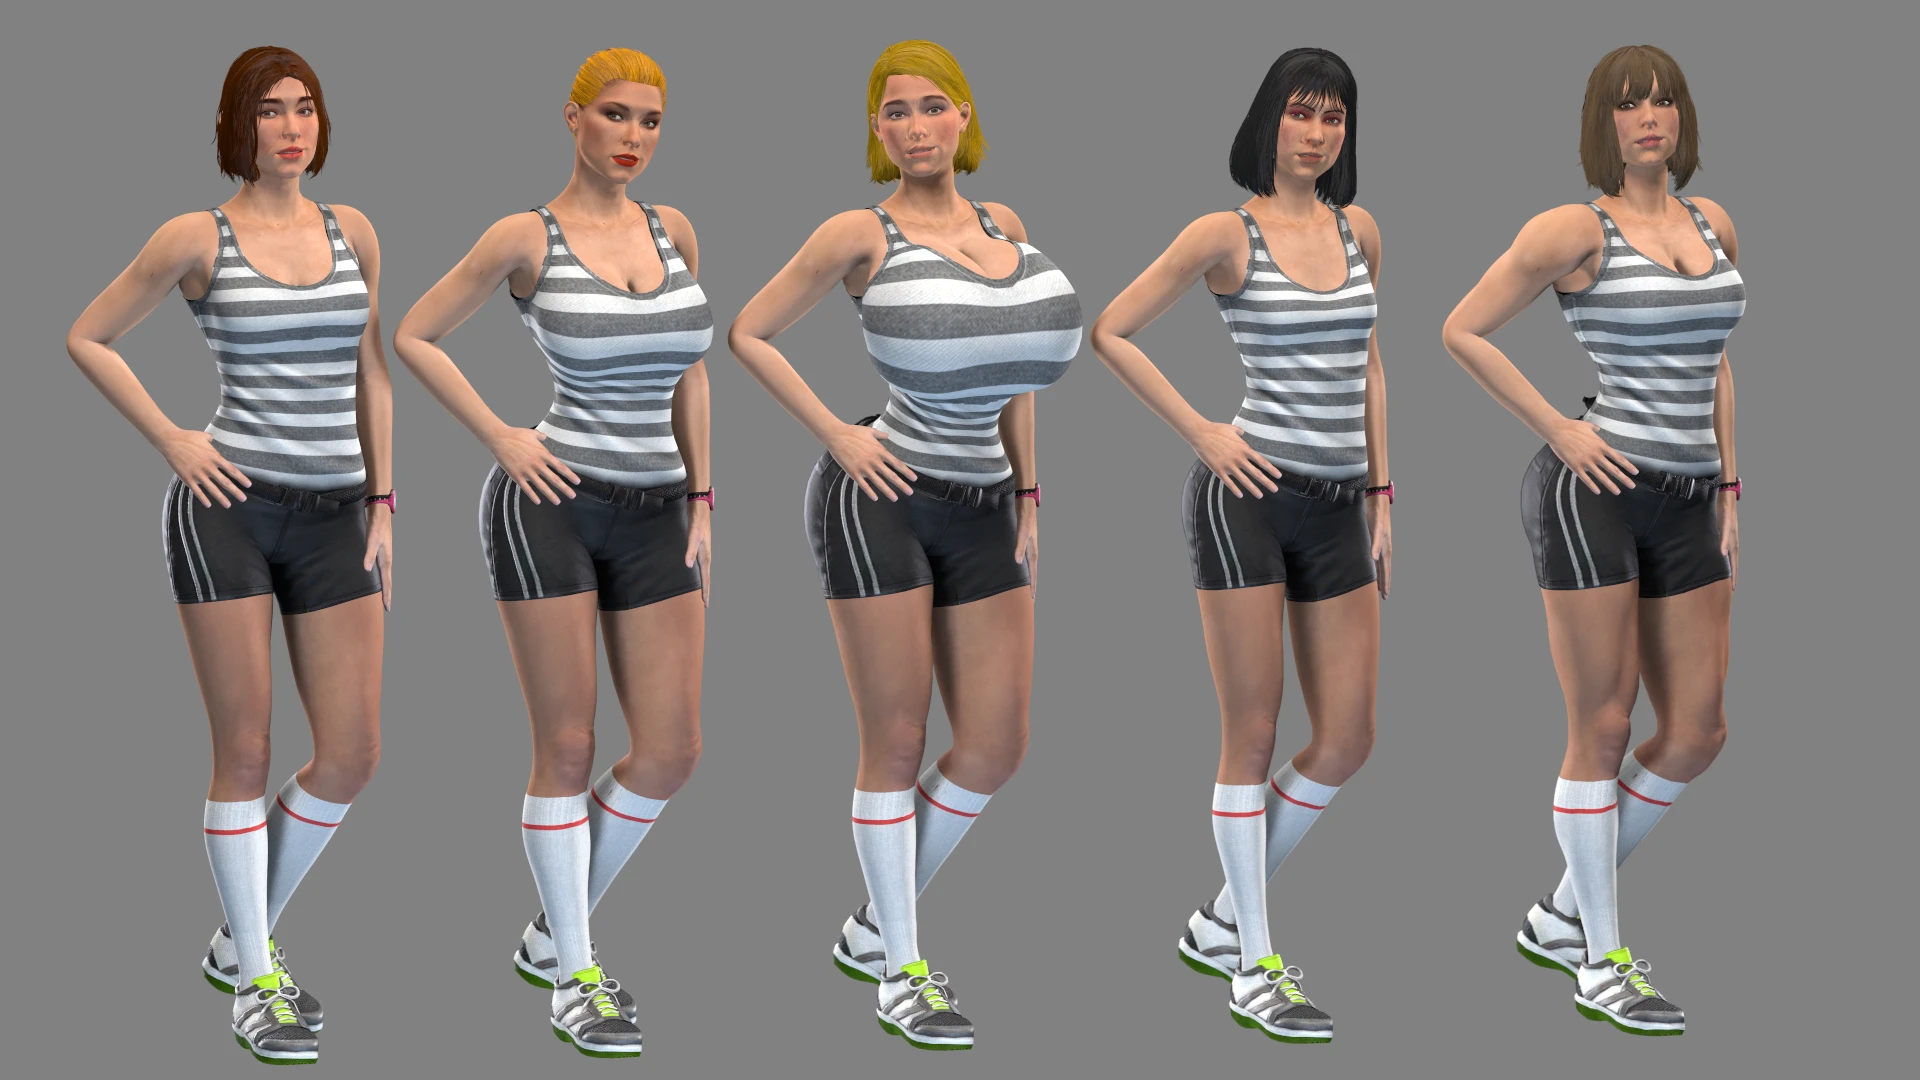
By contrast, with the Hitman Female models, I made the executive decision: discrete, distinct bodyshapes, compiled out as separate models. As of right now, there are five bodyshapes, each of them built directly off an existing model: Average (Jill R3make), Curvy (Liz), DOAFantasy (Helena / Miya), Petite (Marie), and Strong (Pharah). And I think that this decision alone, despite reducing the possibility space down to 5 from effectively infinite, has already immediately improved the variety of the models.
I think the image above has more variety in it than anything you could make with the Mass Effect Female models, and it's still very early days. I intend to add a lot of unique designs for the tanktop/shorts outfit shown here, as well as full tinting capability for even more variety. Throw in a jacket or two, and match it with a pair of pants and a skirt, and I think just this one outfit alone could give a massive amount of variety. And I plan to build more outfits than just this one, as well.
Putting together the Generic Female models now actually works really well with Suki, since she is bisexual - I have a handful of stories in mind that involve her with other ladies, sometimes in isolation, more often in threesomes (I have a suspicious amount of stories involving her getting "we saw you across the bar and really dig your vibe" 'd into swinging).
Parawhores also has a few secondary female characters written into it, that the Generic Female models can perfectly fit. Similarly, Fumates has an entire running gag of Cass fucking a gaggle of different women every evening while Viv is holed up in her room jerking off to porn.
All in all, I just have a lot of uses for generic female models.
On the tool side of things, my attention has been largely focused on updating my suite of "essential" SFM tools, as part of an ecosystem overhaul that the Animation Layer system will herald. The primary effort this past work has been put into the Control Hoister, which I teased on Bluesky on Monday.
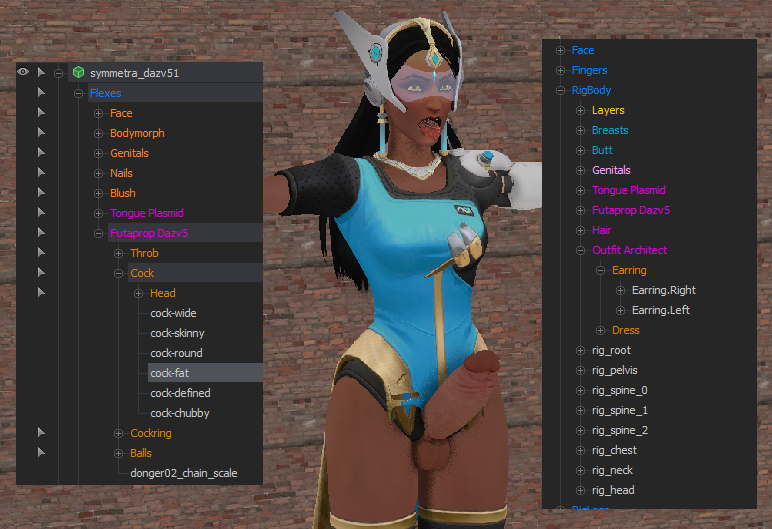
This is a utility that grabs all of the bones and controls of any models that are locked to a character, and lifts (or hoists) them directly onto the character model itself. That way the locked models - hair, outfit, tongue, cock; anything really, even a sword they're holding - can be grouped away out of sight, and you don't have to constantly jump around between several models.
This is definitely a "nice-to-have", as opposed to a "need-to-have." But man, is it a nice-to-have. It's hard to really explain just how much more pleasant it makes long animation sessions, when you can just drill down and focus on managing only one model, as opposed to having to hop around and juggle a half dozen different models.
Building this new Control Hoister required me to make some changes to both the Outfit Loader and the old DazV5 IK rig. This new Control Hoister now lives completely in the LordAardvarkShared Python module, meaning any SFM Python scripts can utilize it. It is built explicitly around being used in IK rigs, though, which means that the Outfit Loader can no longer do simple hoisting like it used to do.
Instead, now all of the hoisting is done automatically by the DazV5 IK rig (and its Animation Layers counterpart) using the new library. To make up for the Outfit Loader no longer having hoisting capabilities, I also made the hoister an independent command that you can run on any model, regardless of it is a DazV5 model or not. That means that you don't need an IK rig specially built with the hoisting functions hard-coded into it (like the previous DazV5 rig was) - you can hoist models using any IK rig. Even standard TF2 models using the vanilla Valve IK rig can be hoisted.
With the Hoister finished (sans any bugs I haven't caught anyways), I have now moved my attention to another tool to be a part of this same ecosystem overhaul: the Presetter.
This evolved from a far less ambitious intention: a more reliable Default operator in SFM.
In a nutshell, SFM has a Default operator, which can be applied on a model to restore it to its original pose. This is extremely useful when swapping from pose to pose, especially when building an entirely new pose out of an existing pose.
The problem with the Default operator is that it loses context as soon as you close the SFM session. Once that happens, applying it just causes the model to collapse into a ball. Load up a saved session file? You're out of luck, the Default operator no longer works.
I personally get around that by having a single "base pose" frame at the beginning of every project. Every time I need to revert the pose, I scrub back to that frame, then copy the pose and apply it to my current work project.
It works, but it's annoying.
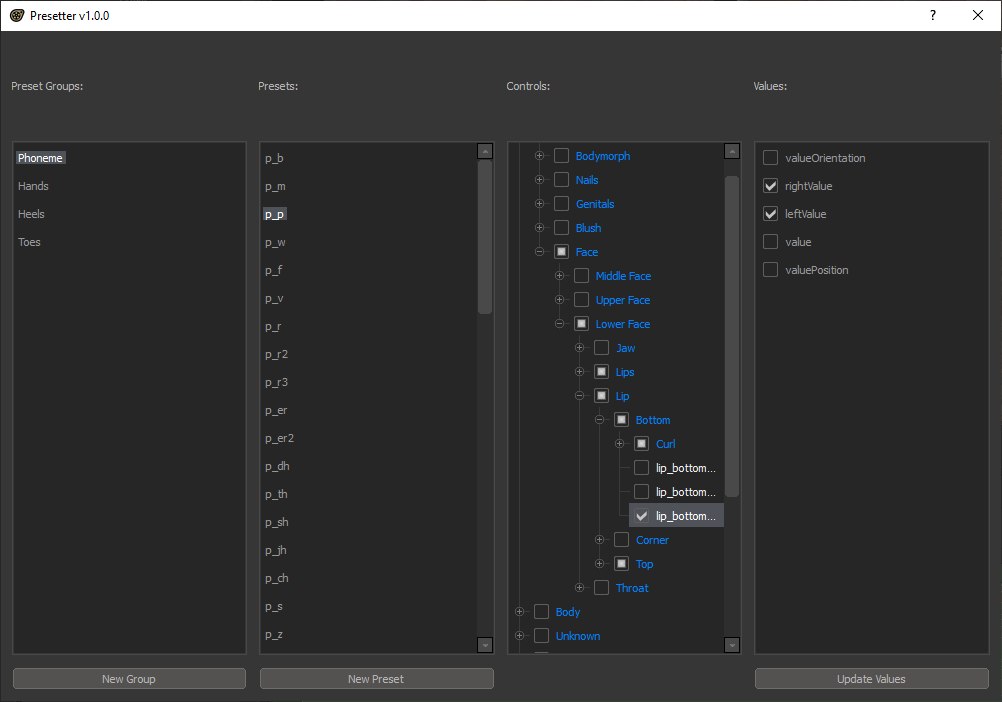
Now, enter the Preset system. Presets allow you to save any partial pose, and then apply them at any time. I use them extensively for phonemes (as you can see in the screenshot), but also for things like heel and toe poses, for shoes. And unlike the Default operator, Presets persist across sessions, and save directly within the SFM file. Meaning you can save and load a session file as much as you want, and the Presets will work correctly every time.
The idea here, then, was to leverage the Presets system in SFM to create a new Default preset: when the IK rig is loaded, it generates a "Default" preset of the current pose, and saves it onto the model. Then, instead of using a "base pose" frame and jumping around copying poses around when the Default operator loses context, you can just apply the Default preset - which will reliably always work.
From that idea, I figured it would only make sense to allow this "Default" preset function to be a standalone script, so that people can run it on any model, rather than just on DazV5 models. The same idea as the Control Hoister having its own independent script.
And then from that, the idea occurred to me that, if I am going to already lay down the foundation to generate presets from a model's current pose, I might as well make it fully functional. Enter the screenshot.
The idea is simple: select a Preset Group and a Preset, and it will automatically check all of the controls on the model that preset uses. You can change the preset by checking controls to add them to the preset, or unchecking them to remove them from the preset. Whenever you add a control to the preset, its current state is automatically saved.
You can further refine what values are saved in the right-most screen, by checking and unchecking the fields you want to save. It will operate the same way: check a field, and it will save the current state of that field (if it exists - you can't save the rotation of a flex, for example). Uncheck a field, and it is cleared from the preset. This is useful for things like finger poses, where it doesn't matter where in space the fingers are, and so you don't need to forcibly set their positions.
As of writing, all of this actually works. I can generate the Default preset on the model, and apply it. It's just, when I do, it, uhh...
I know exactly what the issue is. The question is how to fix it.
In a nutshell, the presets are generated by reading the rotation and position values reported on the control. The problem is that, this value being reported isn't always what the actual value is. So for example, a toe bone may report being rotated 90 degrees, when it is actually rotated 0 degrees.
This exact behavior is unpredictable. Sometimes, it will report the correct value. Other times, it won't. Importantly for this conversation, it isn't always correct, which means I can't rely on it, and I need to find a better way to get the correct values.
The complication comes from the fact SFM has, like, a dozen different ways to get these values. Some are easier than others. I need to go through and test them all, and find which ones provide the most consistently reliable results.
I suspect that's what the next few days of my time are going to be spent on.
Once I have this new Presetter tool built, I think I will finally be ready to release the ecosystem overhaul. New Animation Layer system, new Control Hoister, new Presetter. Hopefully it'll be ready by next Progress Report. We'll see.
At any rate, that's all for now. Until next week, everyone!
Files