Home

 Creators
 Search
 Recent
 Random
 Posts
 DMs
 Tags
 Random
 Importer
 Import
 FAQ
 Account
 Register
 Login
 Favorites
 Keys
 Logout
 Telegram

“While You Were Receiving Gifts, Atnas Was Studying the Blade” | Atnas Deep Dive Part 3 | Sword Craft Cards (Patreon)
Content
After a little break it's time to finish up this dive into the troubled individual that is Atnas. The Sword Craft cards are the final aspect that makes up Atnas's complete move set and they are one of the most ambitious pieces of monster design that Team Death have attempted pretty much ever.
The overall thematic concept of these cards is they represent an “ultimate attack” which is where the boss of a fight erupts with a dangerous level of ferocity and speed. In the case of Atnas it also represents him recalling techniques from a past that he has otherwise long forgotten. I'd speculate that this is a part of Atnas's memory which the Noble Jellyfish has attempted to not devour because it is very beneficial to the parasite if its host has such a suite of dangerous moves to rely on in tight situations.
We'll start with a general look at the system, how it is activated and what it is aiming to do then follow that up with the standard analysis of the various categories of the Sword Craft cards with single card looks at the most interesting individual ones before finishing this with my final current thoughts on Atnas as a whole.
If you want to read the previous two articles, they can be found here for part 1 and here for part 2.
The Sword Craft System
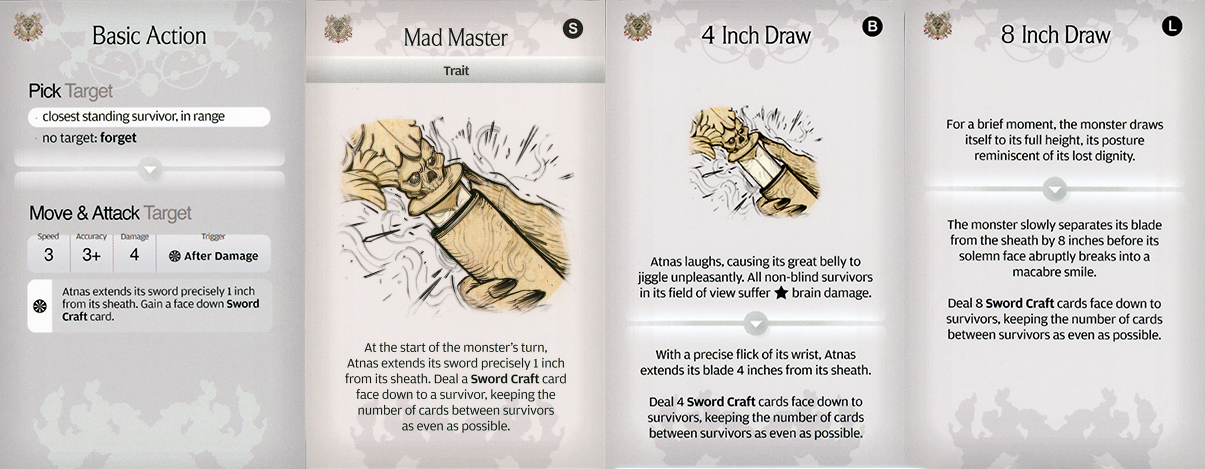
Sword Craft cards are distributed to survivors during the showdown face down. This is performed mostly via the Mad Master trait card which distributes out a Sword Craft card to each survivor in as even a distribution as possible. There are also AI cards which hand out these “gifts”, these are the 4 Inch Draw and 8 Inch Draw respectively and Atnas's basic action hands out 1 Sword Craft card to its target after damage.
Here are those card together:
Atnas has two copies of the 4 Inch Draw card in the Advanced portion of its AI pool and just 1 copy of the 8 Inch Draw which is a Legendary AI card. The AI deck cards can be pruned out of Atnas's card pool via wounds and the basic action can be negated via evasion/blocking but the trait will always provide some baseline distribution that cannot be avoided.
We also have the Atnas Moods, all of which trigger Spark of Joy under certain circumstances, I dug into those cards in Part 2, so I won't retread them here. The main goal with these moods is to avoid triggering them, though in some cases you have no control over that. Yearning for Vanity and Misery are hard to play around. Yearning for Surprise can be neutered if you attack from the blind spot and critically wound a HL that causes the discard of all Sword Craft cards.
So the distribution of these cards mostly occurs during Atnas's turn, the activation or discarding of them is designed to work during the survivor's actions (I can't strictly call it the Survivor's turn because Surge allows for survivors to trigger Sword Craft cards during flow steps). However, that is not an exclusive hard rule, we do get Sword Craft cards that are “gifted” via Hit Location cards on Wound and Reflex reactions. Likewise some Critical Wound results actually allow the survivor to discard any Sword Craft cards they have accumulated. There is also the Impervious Hit Location card “Dangling Bell” hands your Sword Craft cards to another survivor.
The card that allows these Sword Craft cards to pay off is the trait card Spark of Joy. I wrote about the artwork of this card in the past, how it depicts Atnas before he became infected by the Noble Jellyfish, so we won't retread that here. Instead we'll now take a look at the mechanics of the card.
Spark of Joy performs a hard stop to anything the survivors were in the middle of doing; which means that whenever you see a hit location card that might trigger Spark of Joy you want to resolve it last, any Hit Location cards that might cause a discard of all Sword Craft cards should be chosen just before the Spark of Joy trigger and if you might get any Sword Craft cards from others should go before that. To turn it into a list of the ordering it looks like this:
HL Gives Sword Craft Cards
HL Discards Sword Craft Cards
HL May trigger Spark of Joy (See note below as this isn't a fixed order here)
The "Dangling Bell" Indomitable hit location card's redistribution is very situational in when you want to resolve it, sometimes having the Sword Craft cards removed from one survivor, especially damage dealers that have luck based builds, is important at other times you may want to keep things spread out and therefore prioritise the card to be rolled for after potential Spark of Joys.
There are also situations where you will want to try and trigger Spark of Joy first, if the survivors currently do not have any Sword Craft cards then I would recommend switching the order up.
I think this entire mini-game of HL Card order resolution that Atnas heightens is great, there is a skill in deciding what order to roll for wounding HL Cards and it's brought to the forefront here in an engaging fashion. The stakes are high, but players do have some choices both in load out and action order to navigate through it. The most definitive trigger of Atnas's Spark of Joy is of course the trap card but like all traps we do have tools to handle this, so let us look at the set up choices which can influence things. Starting with the trait Master's Presence.
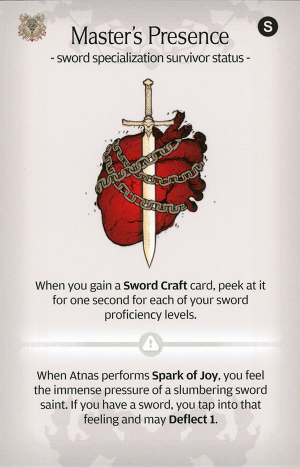
This card is one of those designs that really frustrates me in Kingdom Death and I do think should be both pushed back on and not happen in the future because it has clear accessibility issues that have not been thought through. We're being asked to peek at a Sword Craft card for a handful of seconds when a survivor with Sword Specialization receives it. In isolation this is a neat idea, but introducing time based elements to a game which is not explicitly designed as being timing related in the first place is not something one should do as it can put people in to situations that they would prefer to avoid during something which is intended to be a relaxing social activity. There are enough forms of disability both visible and non-visible which are going to struggle with mechanics like this, in addition it is doing one of the things I find pointless in games like this. Turning it into a memory game. If one has an eidetic memory you could memorise all the Sword Craft cards in this manner, but if you don't have that kind of memory then you're well within your right to take notes because KDM is not a memory test. In fact, if you can take notes there's no reason you can't photograph the card with your phone as you look at it. Which means basically there's no reason the card shouldn't just be drawn face up and kept face up for Sword Specialists.
In fact I think there was a more accessible version of that part of this card's text just sitting there right next to the design we got and I'm going to provide it right here.
“When you gain a Sword Craft card, if the total number of Sword Craft cards you have is less than your total sword proficiency levels you reveal and gain it face up (instead of gaining it face down.)”
I'm sure the wording can be cleaned up further to match KDM's lexicon, but the goal here is for Sword Specialists to be able to have X number of their Sword Craft cards face up where X is their total sword proficiency. Thereby thematically representing their recognition of the sword attack patterns that are incoming.
This iteration rewards Sword Proficiency incrementally but also doesn't require players to engage in memory games, as I have players who would find that the original version will cause frustrating and/or awkward moments where their non-visible disabilities will be a factor I'm not ever going to use the original version of the card with them. I don't want to put them in that position and I am disappointed that Kingdom Death: Monster has this kind of thing lurking in their design without also offering alternative options for players who may have issues with it. I don't often express real disappointment, but this is one area where I expect better.
With that commentary aside, I do also have thoughts in respect to the overall Sword Craft card designs. What we have here is almost one of the coolest additions to the game, having a monster attacking areas in patterns with Synchronic Attacks (hitting all survivors in the blue zones with the same dice roll) is a really interesting and engaging mechanic. It's something that Mewgenics (the latest video game from Edmund McMillan, designer of The Binding of Issac and Super Meat Boy) employs, where some bosses utilise a type attack that shows where it will hit in advance. I find it very engaging because you're trying to get as many of your cats as possible to not be hit, but you can't always get everyone clear.
Unfortunately, because KDM seeks to conceal information from players as much as possible, we don't get that experience and cool layouts like Rising Snowflake, Pentaslash, Twin Sweep, and Bull's Eye Slash just don't have the impact they could have. Instead of planning to position survivors in ways that we minimize the impact on the other survivors we have to instead follow very broad rules in respect to survivor positioning such as:
Never stand a survivor on the same row/column another survivor or in the row/columns on either side of them. (3 wide corridor).
Always stand your survivors with at least 7 spaces between them.
Deathmas Percival makes these rules chaotic
We'll get more into positioning in the next section, but one of the key difficulties here is the sheer number of Sword Craft cards that can get dumped onto survivors. If those cards are face down then players are at risk of just reaching an apathetic state in respect to what's going to happen. I often find myself just stacking Evasion and Block/Deflect as much as possible and shrugging about the rest beyond the first two rules above. I even go as far as running as many bows as possible because they can be excellent luck/deadly weapons and I can then keep all my survivors spread out as much as possible. More than once I've just been “oh who cares” about the Sword Craft cards because it's information overload.
I am going to do my best in the analysis section to write about which of these cards you want to think about the positioning for and which you can just kind of shrug about, but the basic bottom line tends to be bring Bows, bring Evasion, bring Luck/Deadly and your best armor sets. Because the current best way to handle these cards is discarding them with critical wounds and otherwise weathering the storm while ensuring that the individual cards hit as few survivors per card as possible. I'll provide an image of all the Atnas cards stacked on top of each other near the end of this so you can have a reference that shows how the patterns look when layered. It helps in working out where to leave your survivors to minimise hits.
The Sword Craft Cards
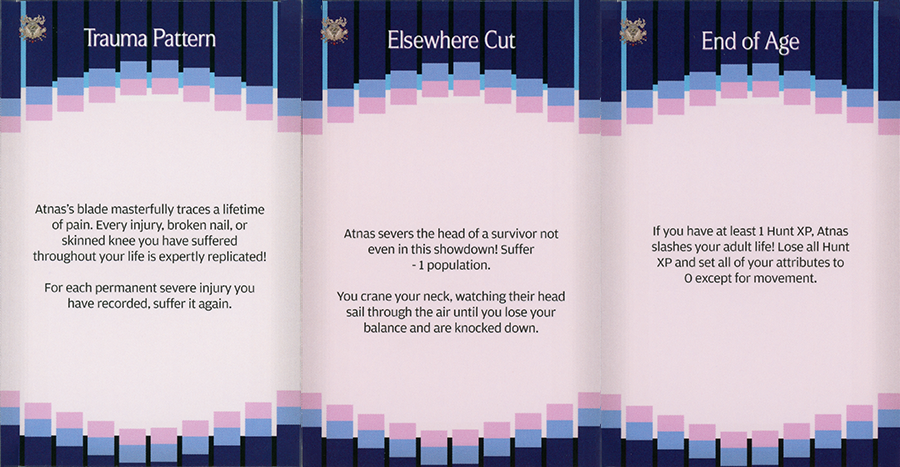
I'm going to start with the cards that do not have attack patterns on them at all, these three cards are completely unavoidable, but they are also somewhat fair in what punishment they deliver. Trauma Pattern delivers a duplicate set of severe injuries to the survivor and if they do not have any then this does not do anything. I have a general philosophy of not sending out important survivors for Nemesis showdowns to start with, but if I do, I have to be aware that this card could trigger these injuries. It's hard to mitigate this if you do have them, but the Regeneration Suit from the Gorm offers one example of how you could prepare for this. It is an accessory that will remove all permanent injuries suffered during the showdown, unlike Dried Acanthus it can treat multiple severe injuries and is not used up during the showdown. There are also things like the Eternal Will Secret Fighting Art (Manhunter) which provides bonuses for each severe injury you have.
Elsewhere Cut is an automatic death, but it is for a survivor of your choice from ones who have not departed to the showdown. Our goal where population is concerned is to have multiple disposable plebs anyway, so losing one or more of those is often reasonable. The main punishment here is for players who haven't managed to keep their population numbers north-side of 10 (Aim for 20+ people you can't go wrong). Automatic death cards can be very frustrating, but this is not one of those.
End of Age is probably the harshest of the bunch, but a lot depends on circumstances. It can be a positive if it takes an elderly survivor and slashes away their years, turning them back into a young adult again. It also resets all attributes, so even negative ones are pushed upwards. It's hard to be upset about that, but also try not to bring along survivors about to complete an essential final rank on a Philosophy. On the other hand, there are some survivors who love to have their Hunt XP reset as it offers them more time. Champion Arc Survivors for example.
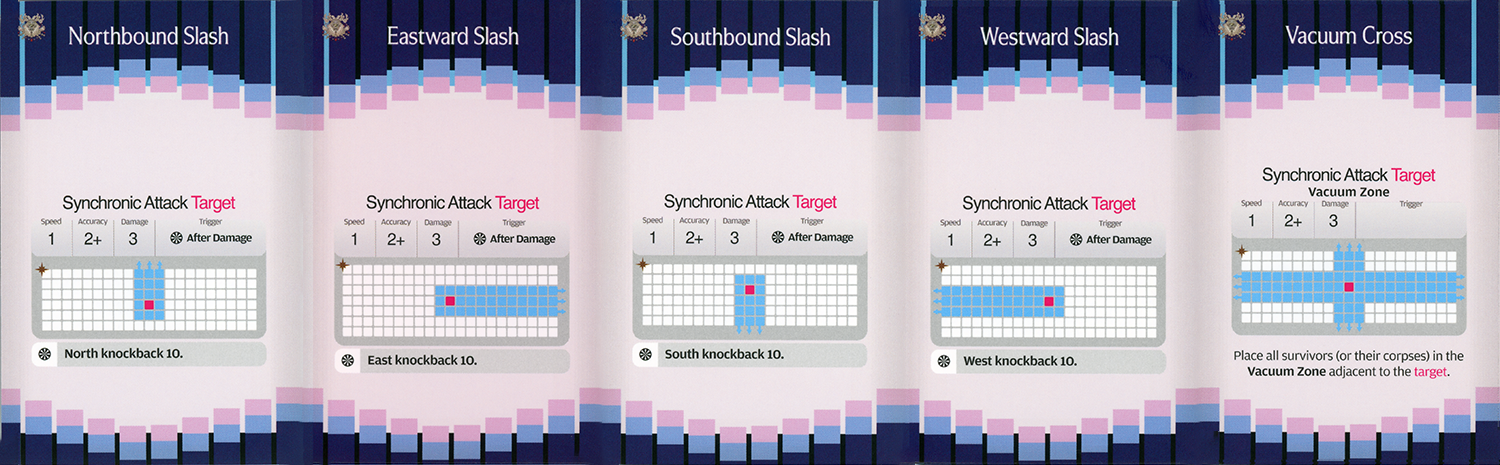
Our next set are the “Corridor Attacks” Each of these has a similar design with just the direction of the slash changed. The (1/2+/3/Knockback 10) profile is as soft as you could ask for and while one would prefer the other survivors to not get hit at all if forced to make a difficult decision I'd pick being in one of these corridors over getting hit by Twin Sweep, Bulwark Pierce, Bull's-Eye Slash or Guilotine Whirl.
Vacuum Slice is a little different to the others when it comes to the final position that the survivors end up in, and it has a larger amount of squares hit. The main concern here is when this hits early in the chain because it sets up all the hit survivors for many of the more dangerous attacks that hit in a rough bubble shaped zone around Atnas. This is why I will avoid corridor positioning if I can because having the survivors get pulled together (or knocked back together due to the board edges) can be a disaster near the beginning of a Sword Craft attack chain, but sometimes you have no choice.
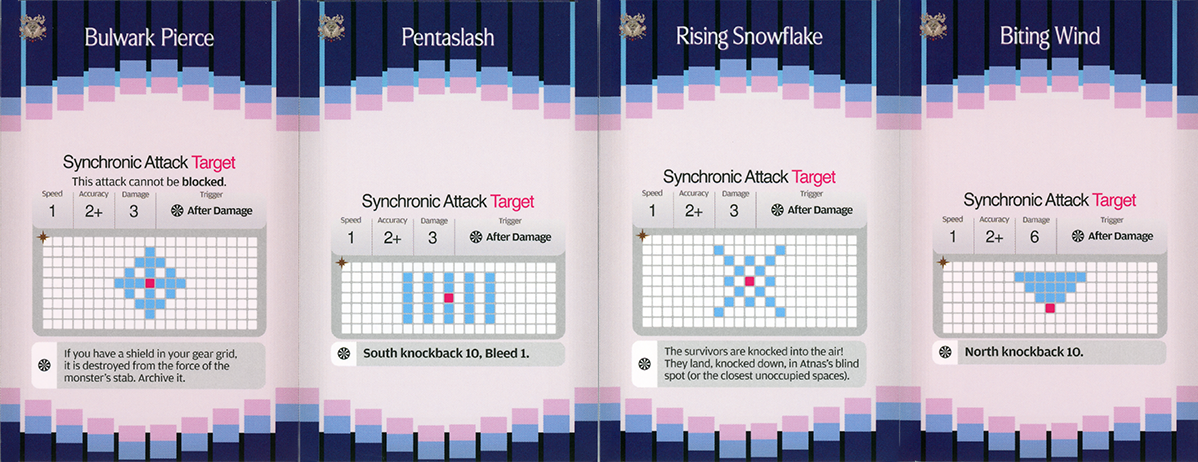
Our last eight cards have the most interesting patterns and they showcase a world that could have been. If Team Death had been confident enough in their Sword Craft system to let players have advance knowledge of how the attack patterns were going to play out then these all would offer really interesting and tricky positioning puzzles. As it is, those puzzles are there, but they are mostly concealed from we the players. That is a shame and turns something that's very interesting into something that feels random and arbitrary.
Again with these something was missed in respect to how the Sword Specialists could have operated. I would have given the Deflect 1 to only Sword Masters and instead allowed Sword Specialists/Masters to get to move a certain amount of spaces when each card is revealed. The exact number would probably be something like a half or a third of their proficiency level, nothing too high just enough to function as these Sword experts manoeuvring through and with the dance of blades. I've tried this out while writing this article in order to see how it felt and the honest truth is it felt really good. It was super, super fun to run the Seven Swordsman campaign (where all survivors start with Sword Mastery) against Atnas as it felt like five Masters facing off against each other.
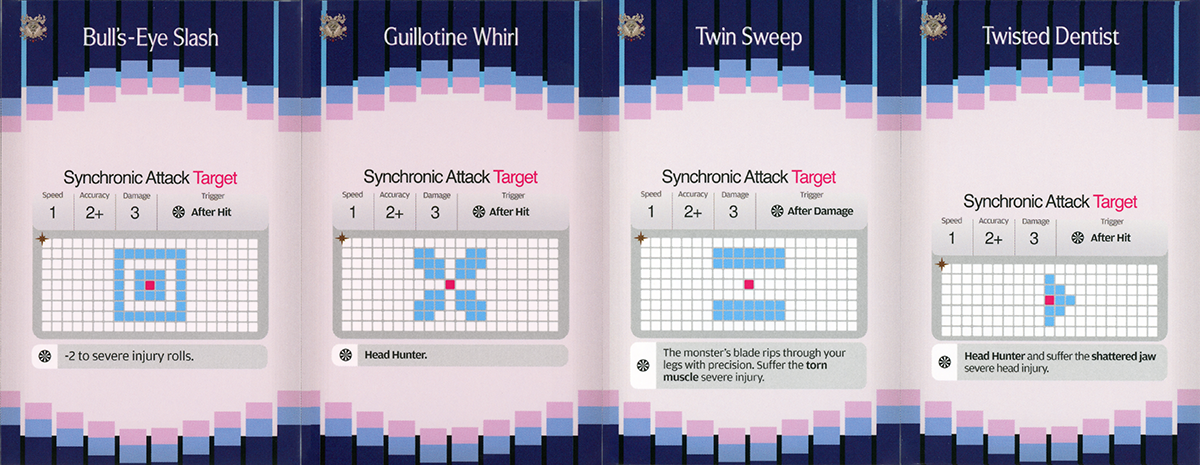
As it stands though all we have are general positioning rules instead, it's best to stand survivors no closer than when they have Zone 4 between each other, it's also very important to not rely on shields for your blocks/deflects because they have a fair chance of being archived and instead look to employing alternative methods for generating that kind of defence such as swords or survivor abilities like Verminism. In particular the following group of attacks should really be memorized or noted in some form. You do not want to be standing in the blue places for these attacks.
These all either inflict direct severe injuries or have increased chances of Severe injuries being death. Not much more to really say except note that if you have to stand next to a survivor, it's safer to be on their left side rather than their right because Twisted Dentist has a lopsided right pointing pattern. The tough part of that is if you are doing it, one survivor is always going to be in the bad spot and if the Sword Craft cards fall out wrong then wave goodbye to that survivor's jaw (Dragon Armor helps with shattered jaw, there are also other forms of dentistry that can turn up during games like the Smog Singer Milk Tooth or the Dark Dentist).
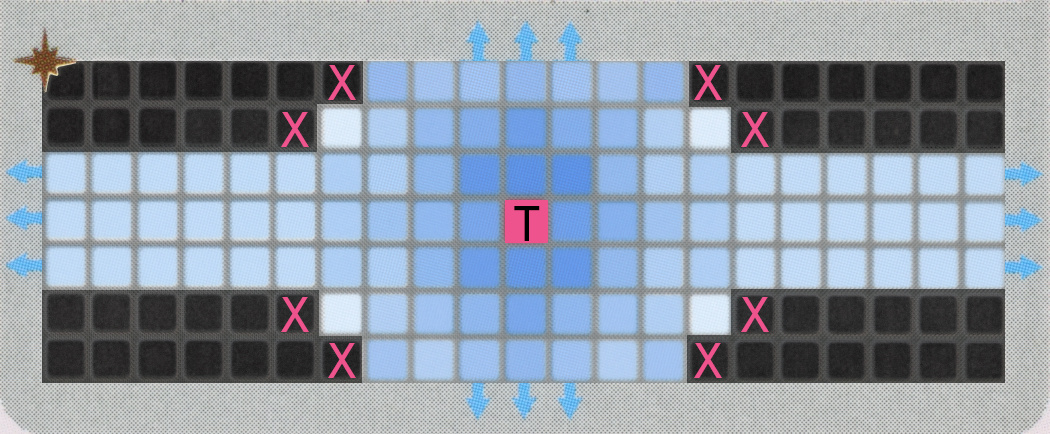
All of these Sword Craft cards in totality come together to create this pattern.
I've visualised it on a grid with the target being the Pink T (as per the cards) and the black areas representing completely safe zones. The tricky part here is this pattern sits on top of each of the survivors, with it getting closer and closer to the above pattern the more Sword Craft cards a survivor has. That's can be a tricky thing to visualise but what it boils down to is keep your survivors 7 spaces away from each other where possible and if you can't do that, be in the 3 wide “corridors” rather than the central zone. I couldn't get the contrast right without redoing the whole grid in probably a spreadsheet with %s, but the lighter blue squares are less likely to be targeted (Also when overlaying these the top and bottom corridors become a bit lost, but the arrows show where they extend out from).
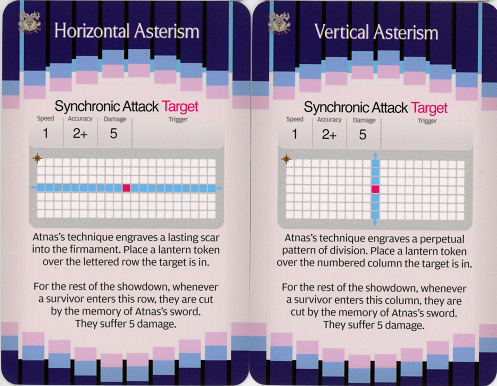
Finally let us take a brief look at the two pairs of cards that come with the Deathmas sets. First up we have the Cockroach Queen, this is interesting because it's a hard hitting attack that creates a row or column with an automatic 5 damage whenever anyone enters for the rest of the showdown. There's not much to cover in respect to avoiding the initial slice, it is in the middle of the 3 wide corridor we're already trying to avoid. Once the token(s) are down the various knockback slices become even more dangerous because they can force you to enter these “trapped” zones.
I like these two cards a lot, they're interesting, playful and they are the kind of card I have been looking for, one which creates difficult decisions that are based around known information.
Percival's two cards are; if I am completely honest, absolute garbage. These two cards break all of the “rules” the other cards have set up because they demand you to be positioned close together, this is part of why the hidden nature of the Sword Craft cards undermines the system as a whole. I'd honestly recommend not adding these two cards to the deck unless you're using the Deathmas Percival gift card (maybe tying all of these promotional Deathmas cards in that manner is just a good idea in general). But if they are in the deck, it's very hard to position at all because Lonesome Death punishes you for not being adjacent to other survivors while most other cards trend towards punishing that. I've found that this pairing was the straw that really broke the camel's back for me, it turned from somewhat controlled chaos into an apathy generator.
Final Thoughts on the Sword Craft System
There is the seed of an excellent idea here, but the desire to hide away and “surprise” players muddies the design and ultimately I think that is to its biggest detriment. We've seen from other Boss Battlers such as Oathsworn, Grimcoven and Dante:Inferno that one can reveal the information of what a boss is going to do in advance to the players and still make it a challenging puzzle of a move to navigate. Kingdom Death's boss behaviours tend to try and strike from concealment anyway, that's a big part of what makes deck scouting so strong, because when you take the surprise away the actual moves the bosses make are greatly softened (Durations are the exception to this, because Durations are really cool AI cards).
Sword Craft attacks as a different kind of card could have flipped this on its head, creating intricate patterns on the board and forcing the players to dance around between the gaps in order to avoid getting massively punished by a slice that they couldn't get away from. There's so much potential here, but it just falls a bit short and instead the experience tends to be information overload to the point that it generates apathy and fatigue. Atnas is generating so much noise, so much nonsense to track with these cards that at times I simply can't be bothered to engage with it an instead bring as much luck and devastating mechanics as possible to end things as fast as I can. I don't feel scared by these cards because it's just too much to feel anything about really.
Final Thoughts on Atnas Overall
Like the Sword Craft cards, Atnas itself is something of a badly cut diamond, there is an interesting character underneath all of the external baggage that being “bad santa” brings. We have one of the greatest sword wielders of the world's history brought low by a parasitic creature that seems to be related to the Watchers. We have a seemingly immortal and crazed sister (Elgnirk) desperately searching for a brother who can only remember her as an imaginary Elf helper companion. There's so much tragedy and history here, but it's layered in a lot of clown make up. You can have a sinister character who is outwardly “friendly” looking but inwardly black and beastly (It, Weapons, The Joker), you can have a bumbling idiot who's really talented, skilled and dextrous (Drunken Master, Kung Fu Hustle) but it can be difficult to express such a character when they are a boss in a board game like this. There is something very “Adam” about how the humour of Atnas is intended to play out, it's not a surprise that Atnas is like this at all, but somehow, in contrast to Atnas's curb stomp the just doesn't quite stick the landing.
As you've seen in this analysis, the Sword Craft cards are very indicative of this same issue, there's another incredible idea here, but the execution is a bit held back by 1980s and 1990s design choices, the players are treated as things to surprise and brutalise more than being trusted to get thrown difficult choices and asked to make the best of it. We see some of these ideas being better expressed in the Pariah, who I think has some similarities to Atnas and executes some really wild ideas as well but I think it works very well there.
Atnas reminds me of the Hand, the King's Man, the Scout system and the Phoenix in that I like a lot of what this is expressing thematically, but the execution here in game just falls short and creates frustration instead. I'm going to be forced to dig out Atnas each holiday season to review the inevitable Deathmas release, but I can't see myself choosing to put it into the campaign over sure fire hits like the Slender Man or Red Witches. I'd even take the Lion Knight over this one if I'm honest.
Files