Home

 Creators
 Search
 Recent
 Random
 Posts
 DMs
 Tags
 Random
 Importer
 Import
 FAQ
 Account
 Register
 Login
 Favorites
 Keys
 Logout
 Telegram

The Forlorn Encyclopedia: Chapter 2 – First Men Warriors | Kingdoms Forlorn (Patreon)
Content
I don't like apes and monkeys, I'm not sure when or why this dislike first originated but all simians apart from orangutangs, gorillas and baboons trigger a mild amount of revulsion in me. I don't like to look at them, I don't want to be around them, they're the only type of mammal I have no time for in any medium. Why share this at the start of this chapter? Well it is in order to give context to the following statement.
The First Warriors from Kingdoms Forlorn is one of the best designed boss battles in any Cooperative Boss Battling game released to date. The sheer amount of confidence, design skill and flair that is in this clash is something that Into the Unknown Studio should be incredibly proud about. There are some really great fights in this game, but I've yet to find one that is as textured, varied and fun as this one. This is a fight that not only has variation in moves via their AI and BP decks, but it also has the cards themselves vary with an additional modifier. It even has another Clash monster sometimes making a guest appearance, which is such a cool and impressive moment that feels right out of the pages of a top end video game.
I do not like the creatures these guys are based on, but I absolutely love the First Men themselves, they are one of the most fleshed out and interesting factions in all of the currently released in this game's world and a large part of the draw that encourages me to get back into wandering around the Sunken Kingdom even after I've explored most of its nooks and crannies. As I've written before, I'm not going to get into lore for this series, but I would absolutely recommend experiencing Syr Uber's story as he is the Knight inflicted with the curse of turning into an Ape and that story perspective provides a fantastic lens in which to look at the First Men.
The Clash Layout
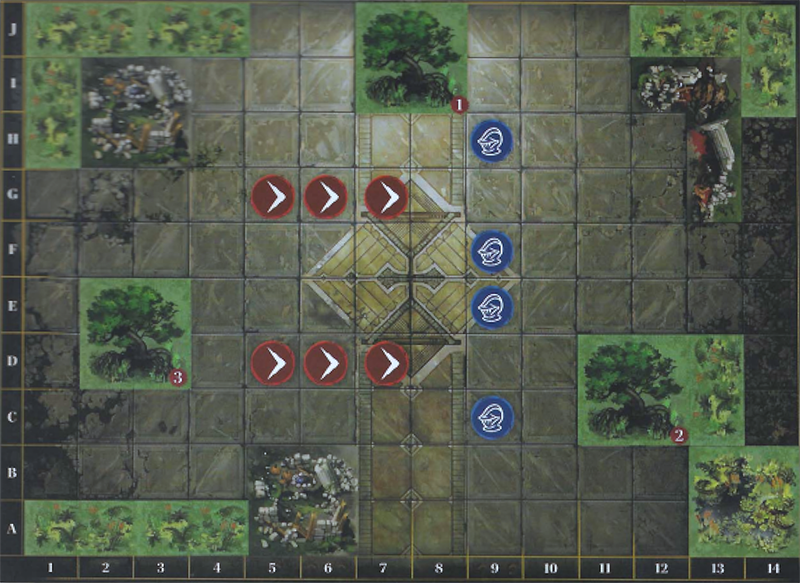
Every boss fight in Kingdoms Forlorn (KF) is closely tied to its terrain features, KF has a smaller board with a high level of density and that allows for the terrain to be far more important than its cousin ATO. Don't get me wrong, ATO uses terrain in some really interesting and challenging ways, but the tightness of KF's boards feels so good to move around in.
The heart of this Clash is the three tree terrain tiles, which give us places where the First Men will spawn from after one of their number is felled. Mobs replenishing their numbers is pretty common in Mob Clashes, but it is often done with flair and thematics. Here the trees where the Mob miniatures will be placed are cleverly located near the edges of the board, allowing for the thematics of the First Men swinging their way towards the fight via the tree tops. That's something which evokes both the simian part of their design but also the need to keep off the ground because of the Sunken Kingdom being a boggy, dangerous place with risk of flooding.
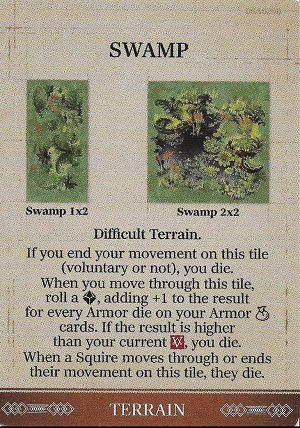
Speaking of which, swamps in the Sunken Kingdom are an incredibly threatening terrain tile that is often employed in these clashes, here they are located around the edges, giving the feeling of the fight taking place in a rare patch of solid ground. Being on the edge makes the swamps less dangerous than when fighting the Knights of Fen, but one of the tactics cards makes them more dangerous. I'll get into this tactic in their particular section, for now it's worth noting that despite having the same layout for all three different types of troop, the impact each terrain tile has can vary.
The Dashboard
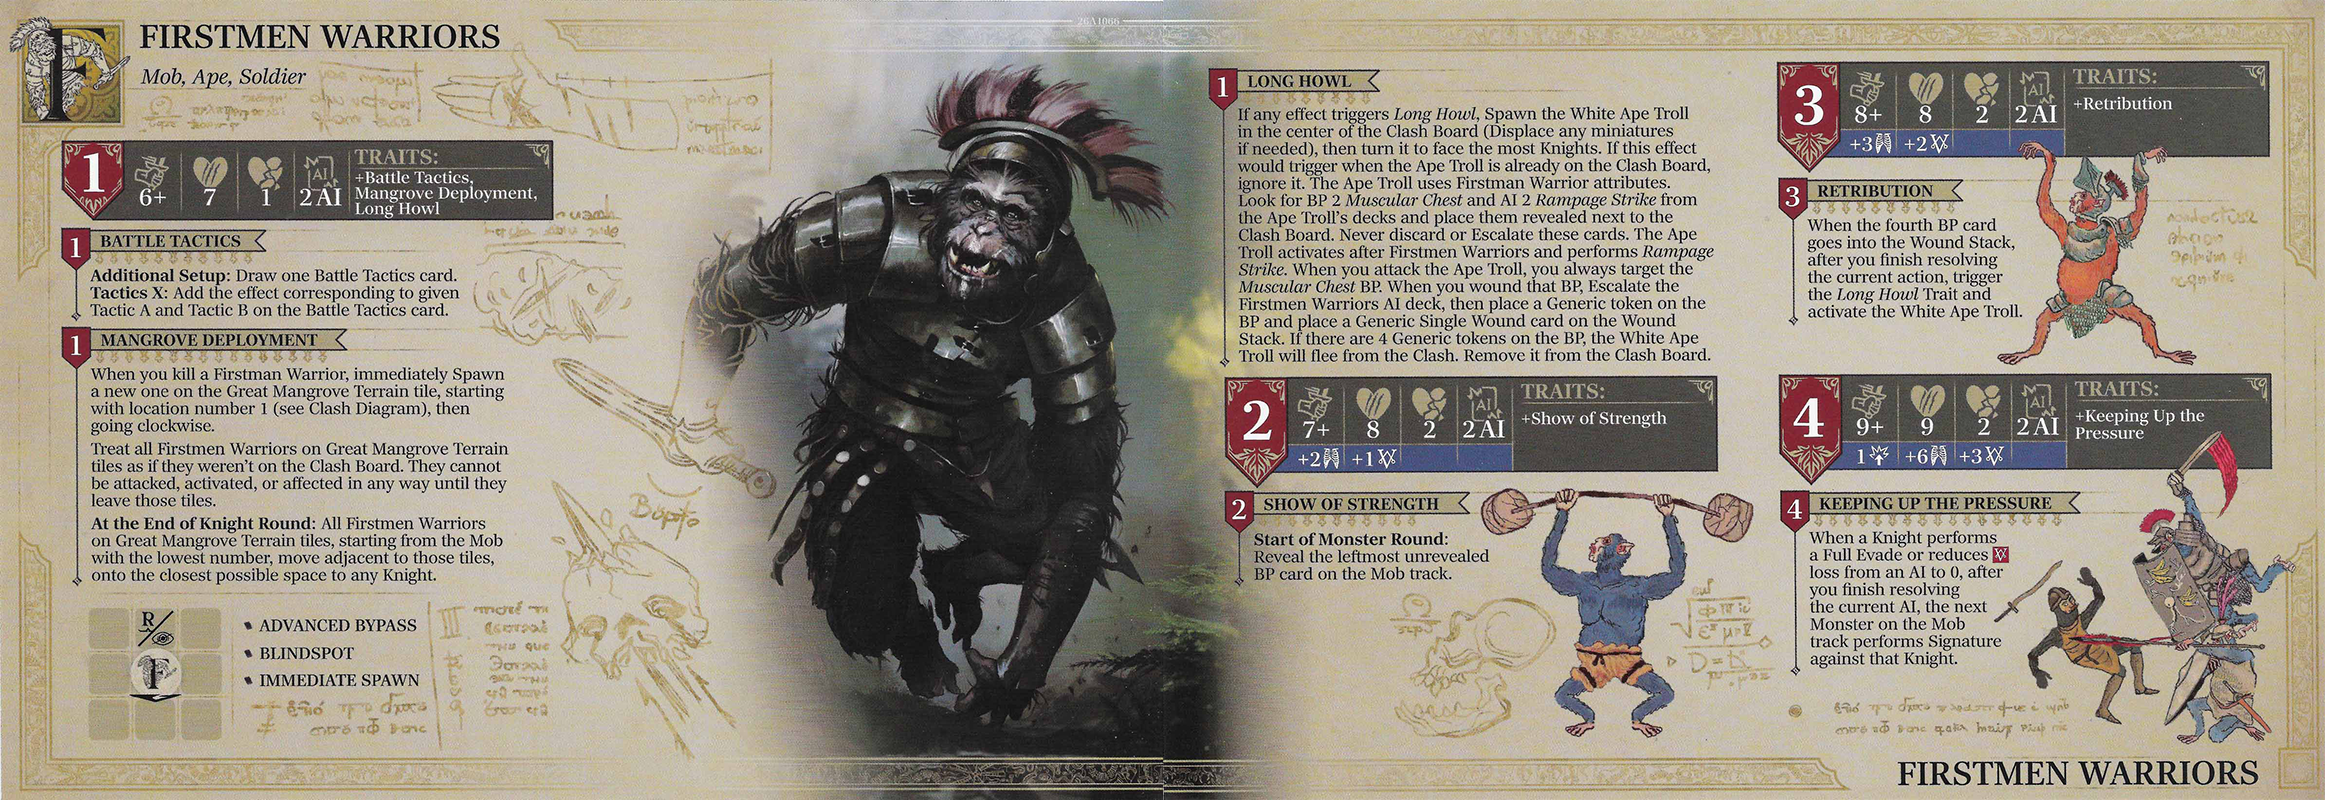
Our baseline Firstmen are appropriately statted for their position as the early game mob monster for the Sunken Kingfom; they have a baseline 50% evasion, require 7 wounds to defeat (6 for exhibition) and have a method of respawning via the Greater Mangrove (tree) tiles. However, unlike the Ironcast dead, the Firstmen do not use their signature attack as standard. Instead they employ two AI cards per round, this combines with the tactics cards to result in an incredibly varied set of attacks. You really are asked to adapt on the fly when fighting these guys rather than have a set plan of operations.
The Mangrove Deployment is our respawn mechanism for this Mob, when one is slain, the miniature is immediately placed on a Great Mangrove Tile (following the numerical order clockwise) and a new BP card is spawned. They wait there in a dormant, non interactable state until the end of the Knight round where they will leap down from the tree as near as possible to a Knight. It's a very thematic way of showing reinforcements arriving from nearby and I appreciate both how distinct it is from the Ironcast Dead and also how the players get to know where the reinforcements are coming from so they can position as well as possible.
I'll cover the Long Howl trait in its own section near the bottom, so let us move onto the levelling up sections.
At level 2 they become 10% harder to hit, gain an additional wound for an 8/6 Full/Exhibition split, become tougher, deal more damage and get the nasty little “Show of Strength” trait that causes a reveal every single monster round as long as there are unrevealed BP cards to turn over. As we'll see in the BP section, the Firstmen have a lot of additional things they will do when revealed, in fact only four BP cards out of the full 18 do not have any “When/While this BP is revealed” text and some of them have both a When trigger and a While passive impacting the game.
Level 3 increases their defenses even further with that 8+ to hit, and they also gain a bit more durability and damage as well. The big thing that happens here is the guaranteed Long Howl with immediate activation when the fourth BP card is wounded.
Finally at Level 4 the Firstmen get up to a base 9+ to hit, gain one last wound, double their durability, add another point of damage and they get to escalate once at the start of the clash. However the real punch here is the new “Keeping up the pressure” trait which ensures that any knight who doesn't suffer consequences from an attack because of a full evade or damage reduction will suffer a Signature attack. You're forced to take damage every round and the game becomes about mitigating as much as possible while still taking as little as you can and that's one heck of a tightrope to walk.
The Signature, Routine and Tactics Cards
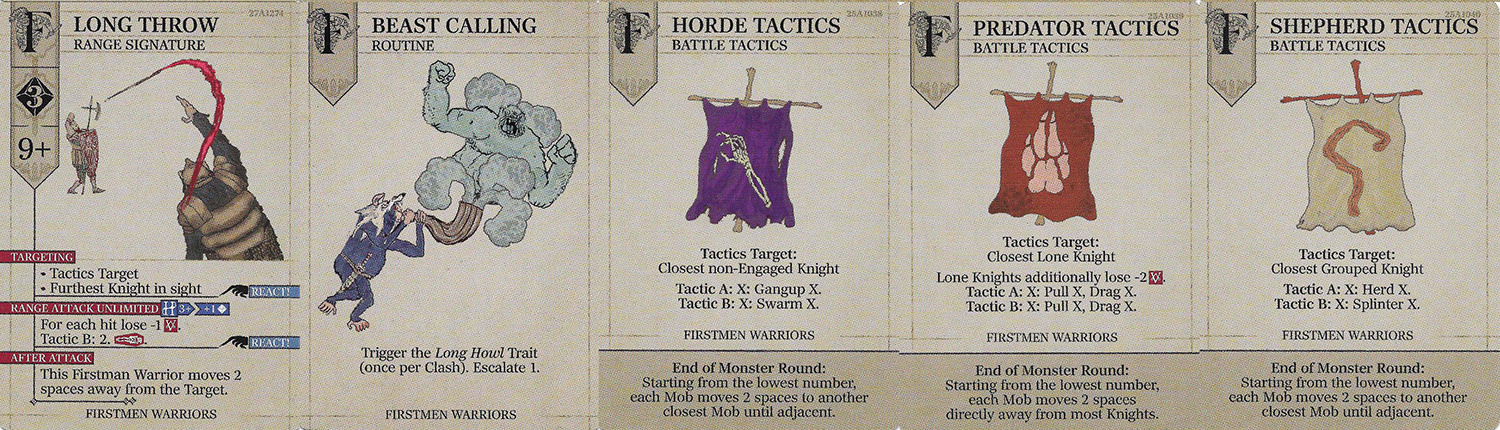
This portion contains the absolute slam dunk designs in the Firstmen, while the Signature is not that wild and unusual, the Routine and Tactics cards are a huge part of what impresses me so much about this clash design. The Routine triggers Long Howl (more on that later) and Escalates the monster cards, the escalation isn't super unique, but Long Howl is. More unique is the three tactics cards, these seem to represent different troops of Firstmen employing different battle plans and they are bring something so fresh and new to this genre. We have here effectively three different flavours of Firstmen wrapped up in one single package, a Neapolitan Ape Cream if you will. Each of these cards provides variety in who each clash of the Firstmen will target while also modifying every single AI card.
As we can see on the Long Throw signature, the attack will target the “Tactics Target” which means Hordes target closest non-Engaged Knight, Predators target closest Lone Knight and Shepherds target closest Grouped Knight. The ranged attack is also modified to be either Swarm 2/Pull 2, Drag 2/Splinter 2. As these are the biggest modifier and the thing which has the potential to triple the analysis for almost every AI card in this clash, I'll cover them here.
First of all we have the Horde Tactics; this has the Firstmen act a bit like the Ironcast Dead, they're ganging up and swarming in order to overwhelm with numbers.
Gangup X: Move up to X spaces toward the Target. Then, move the Targeted Knight the remaining number of spaces, ignoring the source, toward another closest Monster along the shortest path, or until adjacent. Treat this as involuntary movement. If the Target is already adjacent to another Monster, they suffer Knockdown instead of being moved. Afterward, the source always moves adjacent to the Target. If the Target would end this movement on a space occupied by the source, the source is Displaced to the previous space the Knight moved through.
Swarm X: The attacked Knight loses -X vigor for each other adjacent Monster.
In addition at the end of the Monster round they will also group up together.
As the name suggests, the Horde Firstmen act like, well, a horde. Seeking to drive knights towards other Firstmen in order to gank them. Here the goal for the Knights is to not let the Firstmen cluster up too much by thinning out the groups that the Firstmen have formed at the end of their round. You end up with the Knights splitting up a bit to achieve this because you don't really want to kill all members of a particular horde grouping if you could instead reduce another group's total size. Reducing the Swarm damage is the name of the game here.
The Predator Tactics on the other hand aim to isolate the Knights for brutal 1v1 combat, both pulling those knights away from their comrades and dealing more to isolated Lone Knights.
Pull X: Move the affected miniature up to X spaces toward the source of the Pull, along the shortest possible path. At the end of the Pull, turn the source to face the affected miniature.
Drag X: If the target is adjacent, the source moves X spaces directly away from the target, then move the target miniature X spaces along the path the source took. At the end of the Drag, turn the source to face the affected miniature.
Keeping everyone as close together as possible near the middle of the board is a major goal here. The knights move as one and watch each other's backs, because otherwise they'll be picked apart and slain. This is also the tactics that has the highest chance of bringing the ultra dangerous Swamp Tiles into the equation as not only will the Firstmen pull/drag knights towards them, but they also kite the knights by moving backwards at the end of the roung. Of the three possible tactics it is Predator tactics that I have found to be the most challenging and potentially deadly, the Firstmen have to be chased after and that means the edges of the board come into play more often, bringing with them that potentially deadly fate.
Our third and final tactics is the Shepherd ones, this troop seeks to push the Knights together and then harm them with splash damage via Splinter.
Herd X: Move up to X spaces toward the Target. Then, move the Targeted Knight the remaining number of spaces, ignoring the source, toward another closest Knight along the shortest path, or until adjacent. Treat this as involuntary movement. If the Target is already adjacent to another Knight, they suffer Knockdown instead of being moved. Afterward, the source always moves adjacent to the Target. If the Target would end this movement on a space occupied by the source, the source is Displaced to the previous space the Knight moved through.
Splinter X: Knights adjacent to the Target of the Attack lose -X vigor.
This tactics cards asks you to keep your knights apart as much as possible, I found this to be the softest of the three cards because Tactics A numbers tend to be 2 or 3 and that's a very reasonable distance to be spaced apart. Of course if you have knights who need tanking/protection from others they are going to have a rough time, but that is a reasonable trade off that I'll take over the constant potential threat of being dragged into the swamp or swarmed.
Understanding these three traits is at the heart of operating the Clash, knowing how they work and what their goals are are a fundamental piece of both running the clash correctly and positioning your knights. The simple way to remember this is that Horde Firstmen are seeking to surround and attack the Knights on mass, Predator Firstmen aim for deadly 1 or 2v1 combat and the Shepherds are (as their name suggests) trying to group all the knights up so they can cause vigor loss to multiple knights at once. Keep the horde numbers thin, stick together against the Predators and spread out against the Shepherds.
The BP Cards
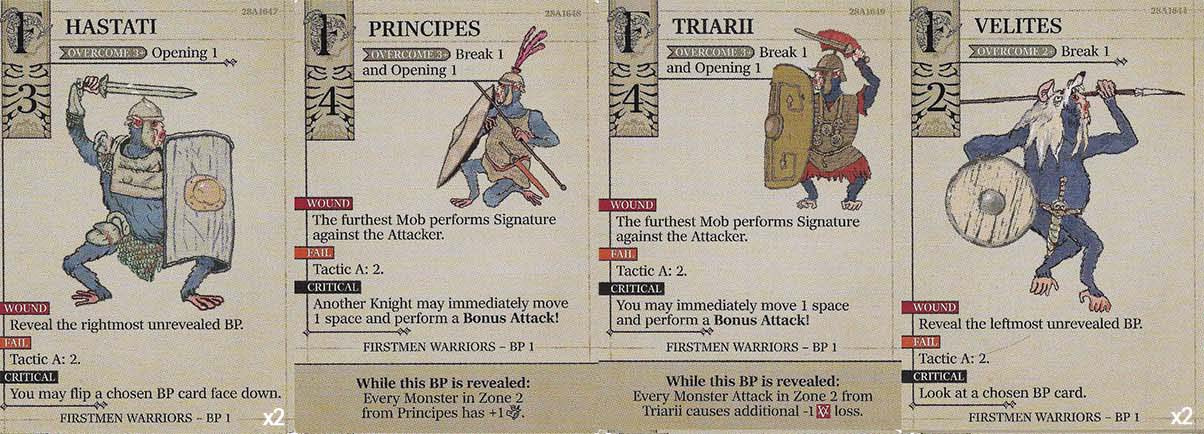
The core themes of the Firstmen Warrior BP cards revolves around them making use of their given tactics card or signature, they also have a lot of BPs that aim to punish attacking them but failing to secure the kill as while there are a few 'When revealed' triggers, the vast majority are 'While revealed'. Overall this is relatively consistent across the levels, but there are a couple of unusual threats to bear in mind if you've not located them already. Another thing to note is that in each BP rank there are some duplicate cards (I've marked these in the bottom right corner of the card with a white “x2”), the remaining ones are all unique. This can make attacking the Firstmen a bit chaotic at higher BP ranks because they have more individuality between their units.
BP Rank I
The first tier of BP cards start us off gently, they have very consistent patterns to their wound and fail triggers, wounds result in either revealing other BP cards in order to try and generate buffs for the troop or causing the furthest away Mob to contribute with a signature attack. Our target AT number range is from 2 to 4, meaning we should aim for 4 power when hitting these (not including level up buffs to AT). The critical results are also relatively simple, we're either looking at a BP card without revealing it (love to see that result as it's information one can use to secure easy targets or avoid dangerous attacks), flipping BP cards back down to disable their passives or the classic of gaining a bonus attack.
Principes and Triarii are the biggest threats in this tier as they both have high AT numbers and “auras” when revealed. The exact level of threat that these present depends on the troop tactics card. If the Firstmen seek to group up then these Zone 2 auras will be stronger than if they're naturally scattering. However as the board is a tighter affair than in other games the reach of these cards is quite substantial. You can bait individual Firstmen to move out of these zones if you are familiar enough with the AI card targeting, but on the whole it is often better to seek and slay these two in order to remove their passive auras. It is often the right call in combat games to remove the supporting or healing units first, and it is very much the case here even if they are tougher than the others.
Before we move onto the rest, while I'm not taking a deep dive into the lore of the monsters in this series, I do want to once again praise the artwork on these cards. Giving the Firstmen the look of Romans of various types is quite inspired and fun.
BP Rank 2
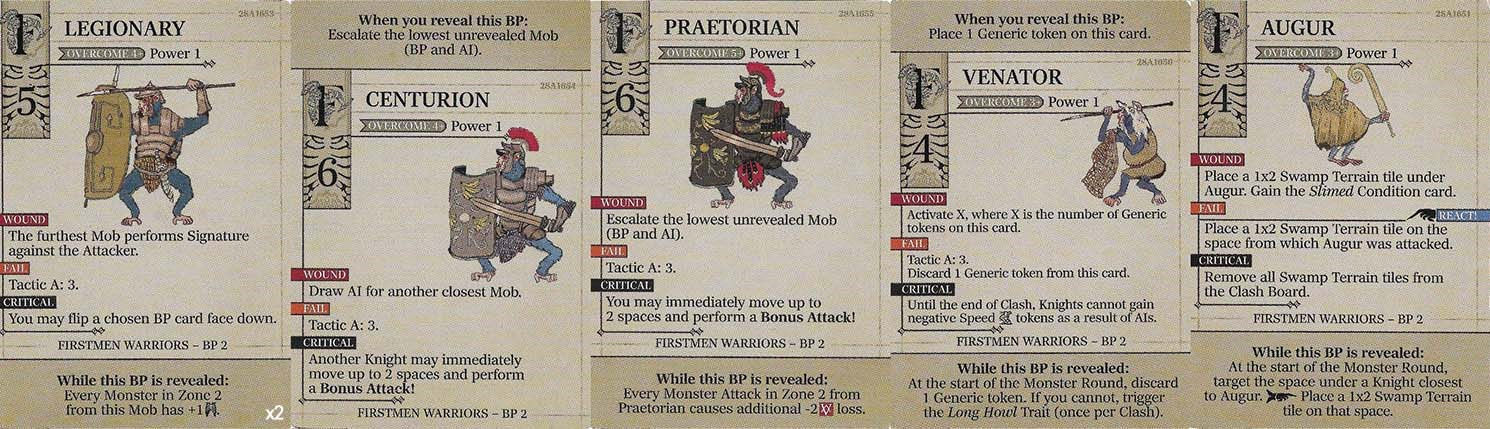
As we move up into BP 2, we lose one pair of duplicates and now have two Legionaries and the remaining four are all unique. The Legionaries are souped up versions of the BP1 cards, having that combo of Wound creates Signature attack, fail triggers Tactic A and a Critical flips down a BP of your choice. They also have an aura that makes all other monsters in range tougher to kill.
Before we get onto the unique members the group's AT numbers range from 4 to 6 now, and they're evenly split across these numbers so it is very difficult at times to narrow down if a lower power attack might squeak out a cheeky wound or if we're going to be more likely to fail and trigger the overcome to help boost the next Knight.
The Centurion is one that you'd prefer to leave face down if possible because of that escalation ability, if you manage to spot them via a critical look, you'll want to track that and avoid attacking them. Otherwise they are going to promote one of the weakest Firstmen into a harder target. The Praetorian is a powered up version of the Triarii and as such is a high priority to eliminate when revealed. The Venator when found is incredibly important to remove because it is one of two ways that the Long Howl can be triggered and it's also (to my understanding) a separate event from the Routine one, meaning that if the Long Howl has already resolved and the White Ape Troll dealt with, it can bring a second one onto the field. For my money; our last mob, the Augur is the largest threat in this rank because of it generating swamp tiles when wounded/fail and then repeatedly making more swamp tiles if it isn't dealt with immediately.
These tiles and their 'you die' triggers on both normal and involuntary movement are; as mentioned above, very threatening. It is worth noting here that the Swamp Strider mercenary is really helpful when delving in the Sunken Kingdom as it has the Lifeline keyword, which can stop a Knight or Squire from dying.
Lifeline: When you are about to die from moving onto a Terrain tile’s space, Displace instead. Alternatively, when you are about to die from falling from a Boundless Board Edge, stop adjacent to it. This ability can be used even if knocked down or otherwise prohibited from using active abilities.
I think this mercenary is such a great safety net that it's worth picking up if you have the chance. It is easy to overlook the Mercenaries at times, however they are additional cards that can turn around desperate moments incredibly well.
To return to Augur, the general rule with Augur is to make sure you're hitting into Rank 2 BPs with as much a guaranteed roll that will beat its AT of 4 (+ level bonuses) and otherwise never doing it. If you're not confident you'll reach that, picking other, lower BP targets is a better choice because of how dangerous this Swamp Ape is.
BP Rank 3
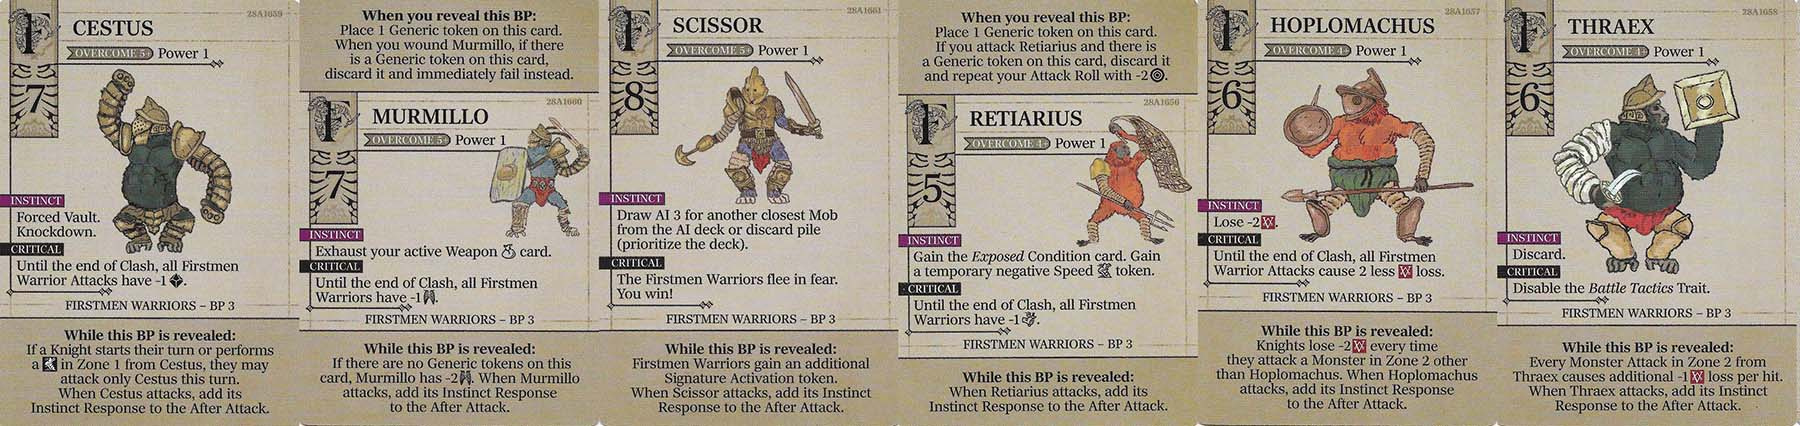
This is the rank with the wildest variance as all the Firstmen are unique. They are also very consistent with punishment for attacking them because they're all Instinct users. The AT range is also the largest of all the Firstmen BP cards as it runs from 5 to 8, though there is only one 5 and one 8 in the bunch. I'll walk through each of these individually as that's the best way to cover them. Our first member of this rogue's gallery is Cestus. Cestus works like a tank for the Firstmen, forcing you to attack only them when they are revealed and near a knight. It also employs a lot of forced vault into knockdown as a part of not only its response, but also its AI card. This is an additional factor you need to keep in mind when dealing with Cestus, watch out with where you attack from because being thrown into terrain via that Force Vault is not good.
Murmillo is our next BP card and this Firstmen is another tanking type, though instead of controlling the Knights via vaults, Murmillo instead soaks up hits with that shield and exhausts weapons. It can be a bit daunting to break through Murmillo's automatic protection, but once it is gone Murmillo is a lot softer. As such it's worth double teaming this Mob monster because having Murmillo exhausting your weapons is not ideal.
Scissor is the biggest, baddest ape in the entire deck, not only does it have an eyewatering (for early game monsters) base AT of 8, but it also triggers an AI 3 card whenever it is attacked and while it is revealed it adds a signature action to the Monster's turn. It's also a nightmare when it is attacking because it triggers that AI 3 card. Scissor turning up is a signal to either shut that ape down or close out the Clash as fast as possible because otherwise you're going to get buried by the Firstmen's increased action economy. A critical on Scissor is an easy win because the others flee but this isn't a game where we can improve those odds too much, so one should enjoy it when and if it happens.
Retiarus is similar to Murmillo in that it employs a defensive off-hand weapon, here it is using a net, which causes Explosed and temporary negative speed. You'll have to live with that annoying forced reroll on the first attack against Retiarius, but fortunately it is removed via the attack rather than the wound roll. Overall Retiarius is the weak link in the BP 3 crowd, once you see them and the other options aren't threatening you should mop this card up and secure a relatively easy wound.
Hoplomachus is one of my favourite Chip Theory Games, but it is also our penultimate individual in this part of the breakdown. Hoplo is an alternate form of the “Zone 2 Damage” aura that has been present in all ranks. But it inverts the punishment because it doesn't increase other Firstmen's damage and instead deals vigor damage for Knights attacking in the zone. This technically includes Hoplo itself because their instinct also has -2 Vigor and also Hoplo hits hard due to adding its Instinct to those attacks also. One of the best ways to handle Hoplo is via ranged attacks into Firstmen, if you are outside of the zone when you attack any of the Hoplo buffed Firstmen you don't take the Vigor loss. The other option is the same as how one handles any buffer, concentrate on bringing Hoplo down first which is very viable as Hoplo has 6 Base AT.
Our final Firstman BP is Thraex, this is another Zone 2 buffing Firstman and shares the same AT as Hoplo. The zone aura that Thraex deploys is a lot scarier than it may seem on first read, because that -1 Vigor loss is per hit not per attack. This makes Thraex a priority target the same as all zone buffing just like all of its zone support fellows.
Discard: Place 1 random card from your Hand into the Discard area.
Discard is something that Thraex adds to its defence and attacks, as you can see it's not a damage orienated punish, it is instead disruptive. A lot of the impact of Discard depends on how much your Knight and their build leans into using Knight Cards. Reinholder for example is far more dependant on cards than many of his fellow Knights, so it may be best that he switches his attention elsewhere while others deal with Thraex.
Overall the way that this Mob operates is impressive, in general terms they tend to have a mix of zone projecting leaders alongside offensive or defensive warriors and just one wizard type in Augur. As the leaders buff their fellow Firstmen via Zone 2 auras they tend to be very effective on a map this size, which means that first of all it's safer to deal with revealed Mobs rather than reveal a new Mob's identity. This is particularly important for Knights acting nearer the end of the round, it tends to be better to attack an already revealed Firstman or even just take a turn off attacking unless you are confident you'll score the maximum power number for the given Firstman (BP 1 = 4, BP 2 = 6 and BP 3 = 8. Don't forget to add any AT bonuses the Level of the Mob has given to those threshold numbers). Revealing a Champion just before the Firstmen act is helping them more than it is you and because of their Immediate Spawn Mangrove Deployment it is not like removing a Firstman from the board is thinning their numbers.
The AI Cards
AI Rank 1
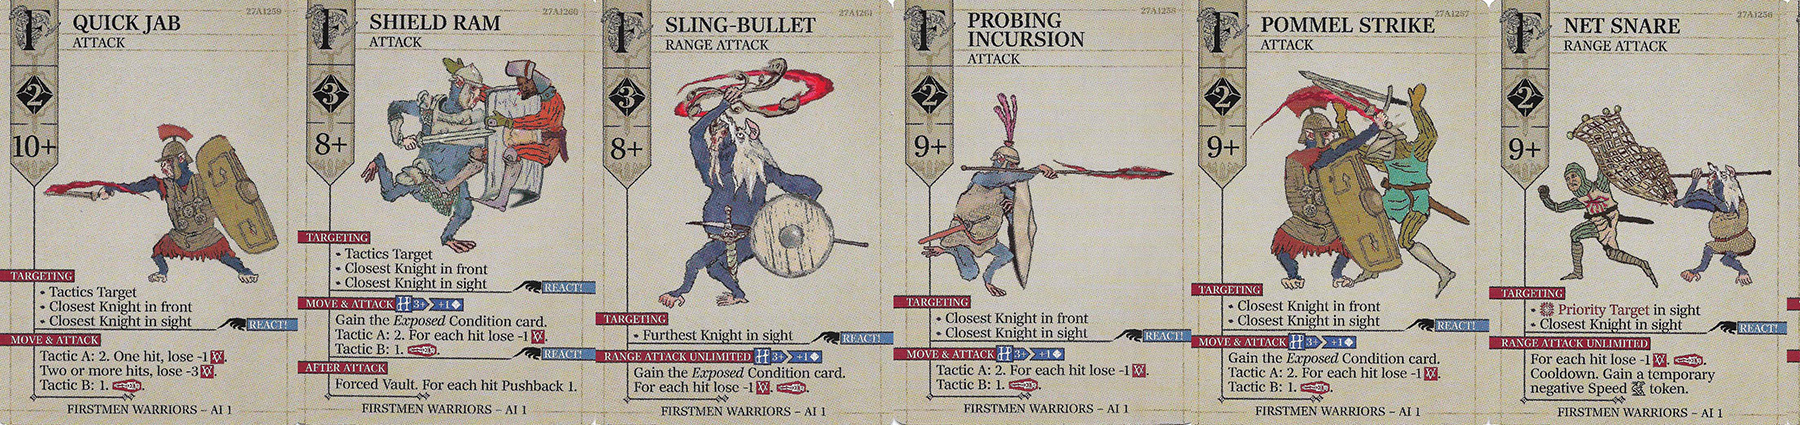
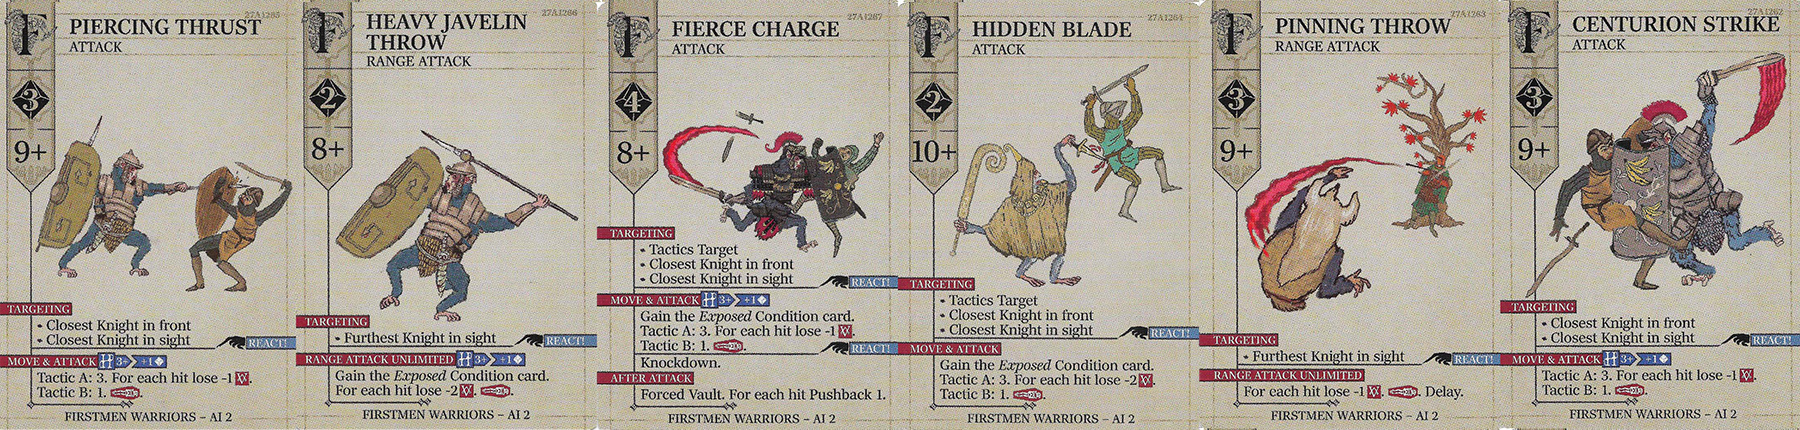
At AI 1 the targeting that we have to deal with mixes between Tactics Target, Closest Knight in Front, Priority Target in Sight and Furthest Knight. That makes the Firstmen a bit unpredictable, though we can at least track the expended targets as they reach the discard. Most of these cards are fairly straightforward, they will employ the Tactics the troop prefers, inflict Exposed and in the case of the Net Snare they will crowd control one Knight with a net. As a reminder, Exposed reduces a Knight's evasion but can be removed via expenditure of either the Knight's movement or action or if the Knight successfully evades. Exposure tends to be used as a 'set up' for other Firstmen to secure hits with that -2 evasion. Something that pushes most baseline Knights to evading on at least a 10.
The Heat punishment on these cards is relatively straightforward, 3+ Heat can result in +1 attack to have to evade. Combine that with most of these cards having 2 or 3 dice baseline and the Exposed condition and vigor loss can be difficult to avoid.
All of these are relatively straightforward and standard threat level for an early campaign Mob, with only Shield Ram offering a Forced Vault that may mess up positioning depending on Tactics.
AI Rank 2
At Tier 2 the number of attacks that are aimed at the furthest Knight doubles to 2, meaning we now have an equal split between Furthest in Sight, Closest Knight in Front and Tactics Target. This results in the ability to control a Knight that is guaranteed to not be attacked, because if they are not closest to or furthest from the activating Firstman then you just need to pay attention to the tactics target of closest non-engaged/lone/grouped. That means just like AI 1 there is a space where you can place a vulnerable Knight and protect them for at least one of the two activating Mobs.
In regards to the individual cards, again they're doing more of what we've come to expect from looking at the AI 1 cards; in addition to there's a lot of Exposed conditions, a little bit of Knight Card disruption and Knockdown instead of a Forced Vault. Given that a lot of the mechanical heavy lifting is done by the tactics card I don't think there's a lot more to write here.
AI Rank 3
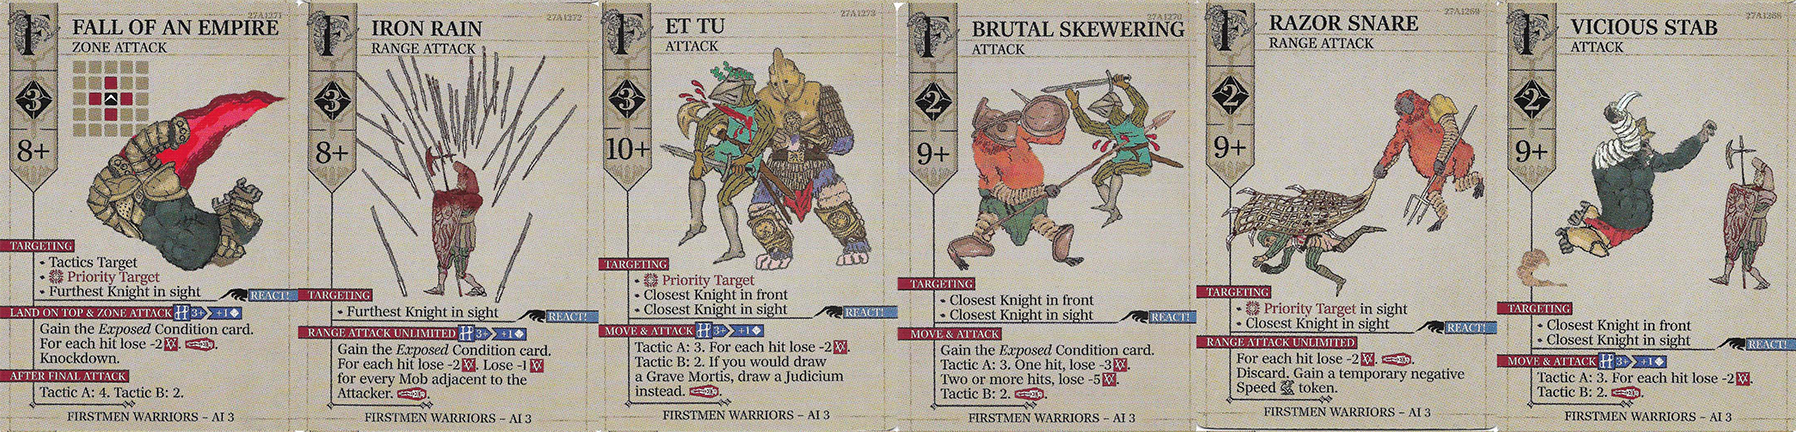
The big switch here is the general abandonment of following the Tactics target, with just the exception of Fall of An Empire we have more standard targeting. There's 2 Priority Target in Sight, 2 Closest Target in Front and 1 Furthest target (plus Fall switches to Priority Target if there is no Tactics Target). 3+ Heat remains the extra dice punish and we're still mostly seeing Exposed in concert with tactics. Damage numbers are up a bit also and Et Tu turns all Grave Mortis into Judiciums instead (Something Paracelsa can leverage a bit as she lives on the razor's edge between life and death).
Long Howl
If there is anything you can be sure of when it comes to ITU designs, it is innovation and surprises. Long Howl is one of my favourite as it has the White Troll Ape (WTA) make a cameo in this clash. This version of the WTA is very simplified as it has one singular AI card and one BP for its moves and it goes after the Firstmen. The way that the WTA operates reminds me in some ways of older Dungeon Crawler enemies, but with more sophistication. It has one move that it will employ when attacking and the same BP card it uses for defence, wound it 4 times and this champion is removed from the board. That is worth doing because the WTA doesn't reduce the amount of attacks coming from Firstmen (though wounding the WTA will escalate the AI deck for the Firstmen). It is a very predictable foe, which is part of why I like to aim at it when it is around.
The main concern with the WTA is that both of these cards cause displacement, this means we need to watch out for potentially being knocked or pushed into swamps (or other terrain and miniatures) whenever we position for attacking or being attacked. The bit that makes the positioning a bit tricky is how the WTA activates after the Firstmen, the Firstmen may reposition the Knights so the WTA switches targets or even finishes off a Knight/Squire with a swamp swat!
Summary and Final Thoughts
The main tools that the Firstmen bring to the table are a combination of Exposed to assist in securing hits and the varied threat of their Tactics cards, especially in combination with Swamp tiles. So much Exposed means that Evasion isn't a strong way of cancelling/ignoring hits so other tools for managing/avoiding/recovering Vigor loss are better. Tools like the afformentioned Swamp Strider that provide protection against Swamp tiles are always desirable in the Sunken Kingdom and this Clash is no exception.
The overarching strategy for the Knights will depend on that Tactics card; with Horde Tactics we want to keep our Knights close together and try to separate the Firstmen as much as possible by eliminating any clusters or potential clusters. Against Predator Tactics we again want to remain close together as much as possible, but we can operate in pairs to try and mitigate the additional Vigor loss on at least the first AI activation. Lastly Shepherd Tactics ask our Knights to hold around the middle of the board in order to keep their distance from those Swamps that otherwise could be fatal.
As for attacking targets, when the White Troll Ape arrives, I prefer to concentrate my offense on that because it is predictable in its BP reacts. If it is not there, revealed Firstmen are always preferable targets over unrevealed ones, but if you have no revealed Firstmen you should think hard about what might happen if you flip up a Zone 2 “Champion” and not have any available Knights to secure a removal of it before the Mob's turn. As we know the BP level of a given Mob, we can calculate the power number we want in order to secure removal of that particular Mob with one attack. This tends to be true for most Mob monsters like this, but it is very important when dealing with such a supportive Mob like the Firstmen.
Overall this is very much a fight about holding the middle ground of the board and supporting each other as much as possible. You don't want to let the Firstmen move the fight to the edges and you also want to play attention to where the redeployments are happening. Like all Mob fights, keep track of what mobs have been eliminated because it can help inform you about what is still out there for each BP level. Also remember that at Level 4+ you do not want to be completely avoiding all Vigor loss from attacks as that is going to make your job even more difficult, instead try to take as near as possible to 1 if you can. This is of course tricky in itself as the Firstmen make evasion harder to achieve in the first place.
I'm always impressed when I play against the Firstmen, they have an incredibly thematic design that manages to effectively create three different flavours of opponent inside one shell and also leaving the door open for more future Troop Tactics to modify this even further. The addition of the White Troll Ape via Long Howl adds even more to this Clash both as a big exciting surprise the first time it happens and it increases the difficulty but in what I think is a fair manner due to the simplified and known nature of the White Troll Ape's cards.
Files