Home

 Creators
 Search
 Recent
 Random
 Posts
 DMs
 Tags
 Random
 Importer
 Import
 FAQ
 Account
 Register
 Login
 Favorites
 Keys
 Logout
 Telegram

The Armory & King Patterns | Gambler's Chest Expansion | Kingdom Death: Monster (Patreon)
Content
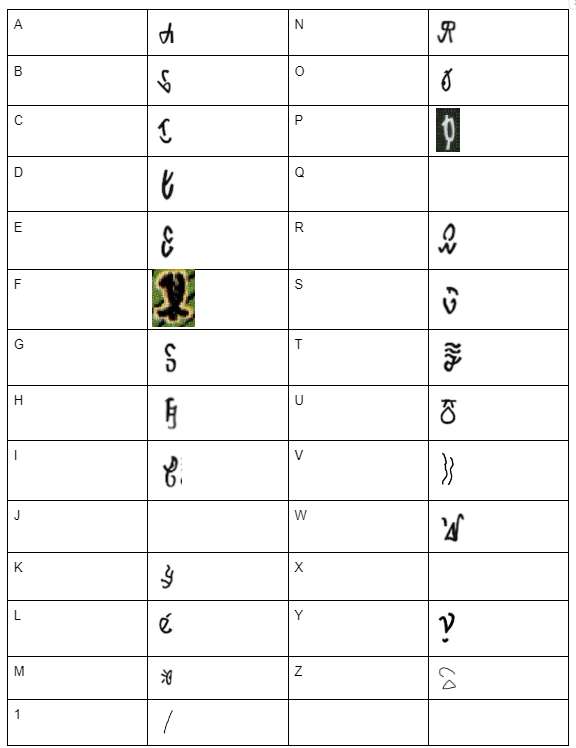
The Armory is the second crafting location that comes with The King portion of the Gambler's Chest. It is the Settlement Location and Gear Cards with the weird symbols instead of normal words. This language has turned up a bit in the Kickstarter updates before hand and as such it has been translated thanks to being a simple substitution cipher language. That is, each symbol is directly equivalent to a matching letter in the Modern English Alphabet. This level of cryptography is something I appreciate, it's clear to read and not too complex, meaning it is adding just a little bit of extra world building without turning a non-puzzle game into a surprise puzzle game. I think KDM has done this right here, for an example of how it can be done wrong I would point to Gloomhaven's character unlock, Frosthaven's character unlock plus the Babylonian and Siren Languages from Aeon Trespass: Odyssey (For the record the Centimane language from ATO is really well done). Each of those adds too many extra steps of complexity to their portion of the game and they have game mechanics locked behind them. That's not a good experience for players because they did not sign up for these in the first place and as such they may not be interested or even able to handle those parts of the game.
That's not the case here, so well done Team Death, the system used for naming this location and its weapons is perfect. Please don't ever go more complicated with your languages or puzzles than this, you nailed it.
I'll be referring to everything from the Armory by their translated names throughout this, that is because I don't have an easy way of writing the original names on patreon and also because I'm familiar enough with the letters to the point where I just read and translate them automatically now.
The language itself was mostly translated by the time I received my copy of the Gambler's Chest, so I can't really get into the process and instead I'll just share the key I was given with the two additional letters that we discovered in the Frogdog expansion.
We are still missing J, Q and X due to their relatively lower use (though I am a little surprised that X hasn't been used at time of posting). There are also the numbers on the Razor Sharp Dice, but they are very easy to note because they represent the number of pips. I keep forgetting to put together an extension of the cipher to include those symbols, but they are not really relevant here.
Before we get into the individual cards, let us first look at the process for unlocking this crafting location, because it is hidden away inside the King's showdown. This of course means spoilers for that part of the showdown.
During the King's showdown, some survivors can get drawn into the the reality that exists inside the King via card effects. This is represented on the story event page titled “Kingdom Death” which I will go through it in more detail with the showdown breakdown, instead here all you need to know is your destination is the bottom left corner of the little book grid, a place titled the “Fingernail Castle”.
When fighting the Level 2+ Kings, exploring this location (which is two turns away from the Start space) allows you to roll on this table and if you are successful the King will throw up the entire Armory Settlement location which can then somehow be transported to the settlement (it appears there despite the showdown not being located near the settlement, Kings are weird). It's more unlikely you'll get this unlock vs. the L3+ Kings, but a fortunate roll can get you there against the L2s. I think this unlock is very neat, in fact the whole Kingdom Death portion of the showdown is very fun in that fourth wall teasing manner that the Gambler's Chest likes to play with.
Our Settlement Location has 5 crafting recipes and one endeavor. The endeavour lets us use the “Wet & Dry Crusher” to turn 2 King Scrap into 1 Death Metal Strange Resource, which is helpful due to the higher Death Metal requirements on these gear cards. We also require the Cooling Innovation for every recipe and two of the gear cards have additional requirements to boot.
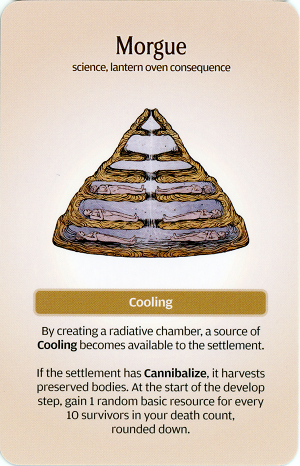
Cooling is printed on the Morgue innovation, which is a new generic (no specific monster crest) innovation in the Lantern Oven portion of the Innovation tree.
It has an additional use for cannibalize settlements, especially ones that are abusing survivor deaths through methods such as Homicidalism but for Protect the Young settlements without The King it's something of a dead innovation draw. I do hope we have more things that require Cooling in the future, but the issue is this card is in an expansion so it would need to be reprinted in new releases that used it extensively.
Let us get to our gear cards now.
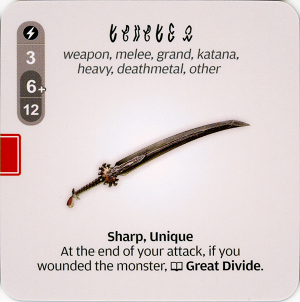
Divider
Crafting Cost: 1x Master Key, 2x Deathmetal, 1x King's Cloth, 1x Leather
Requirements: Cooling
Divider is probably the most unique and exciting of all the gear cards in this location due to it having an entirely new mechanic with its own story event. This stops the weapon being just a big old pile of stats, it is a very impressive stat line (3/6+/12/Sharp) meaning it's got an average wounding roll of 23 before any additional strength bonuses, but it does have a weak weapon typing in Katana (it's also a Grand weapon and that's the main way it's worth using because Katana proficiency is in the Sunstalker Expansion and it's another one of those 'depart for your destiny' mechanics like the Twilight Sword).
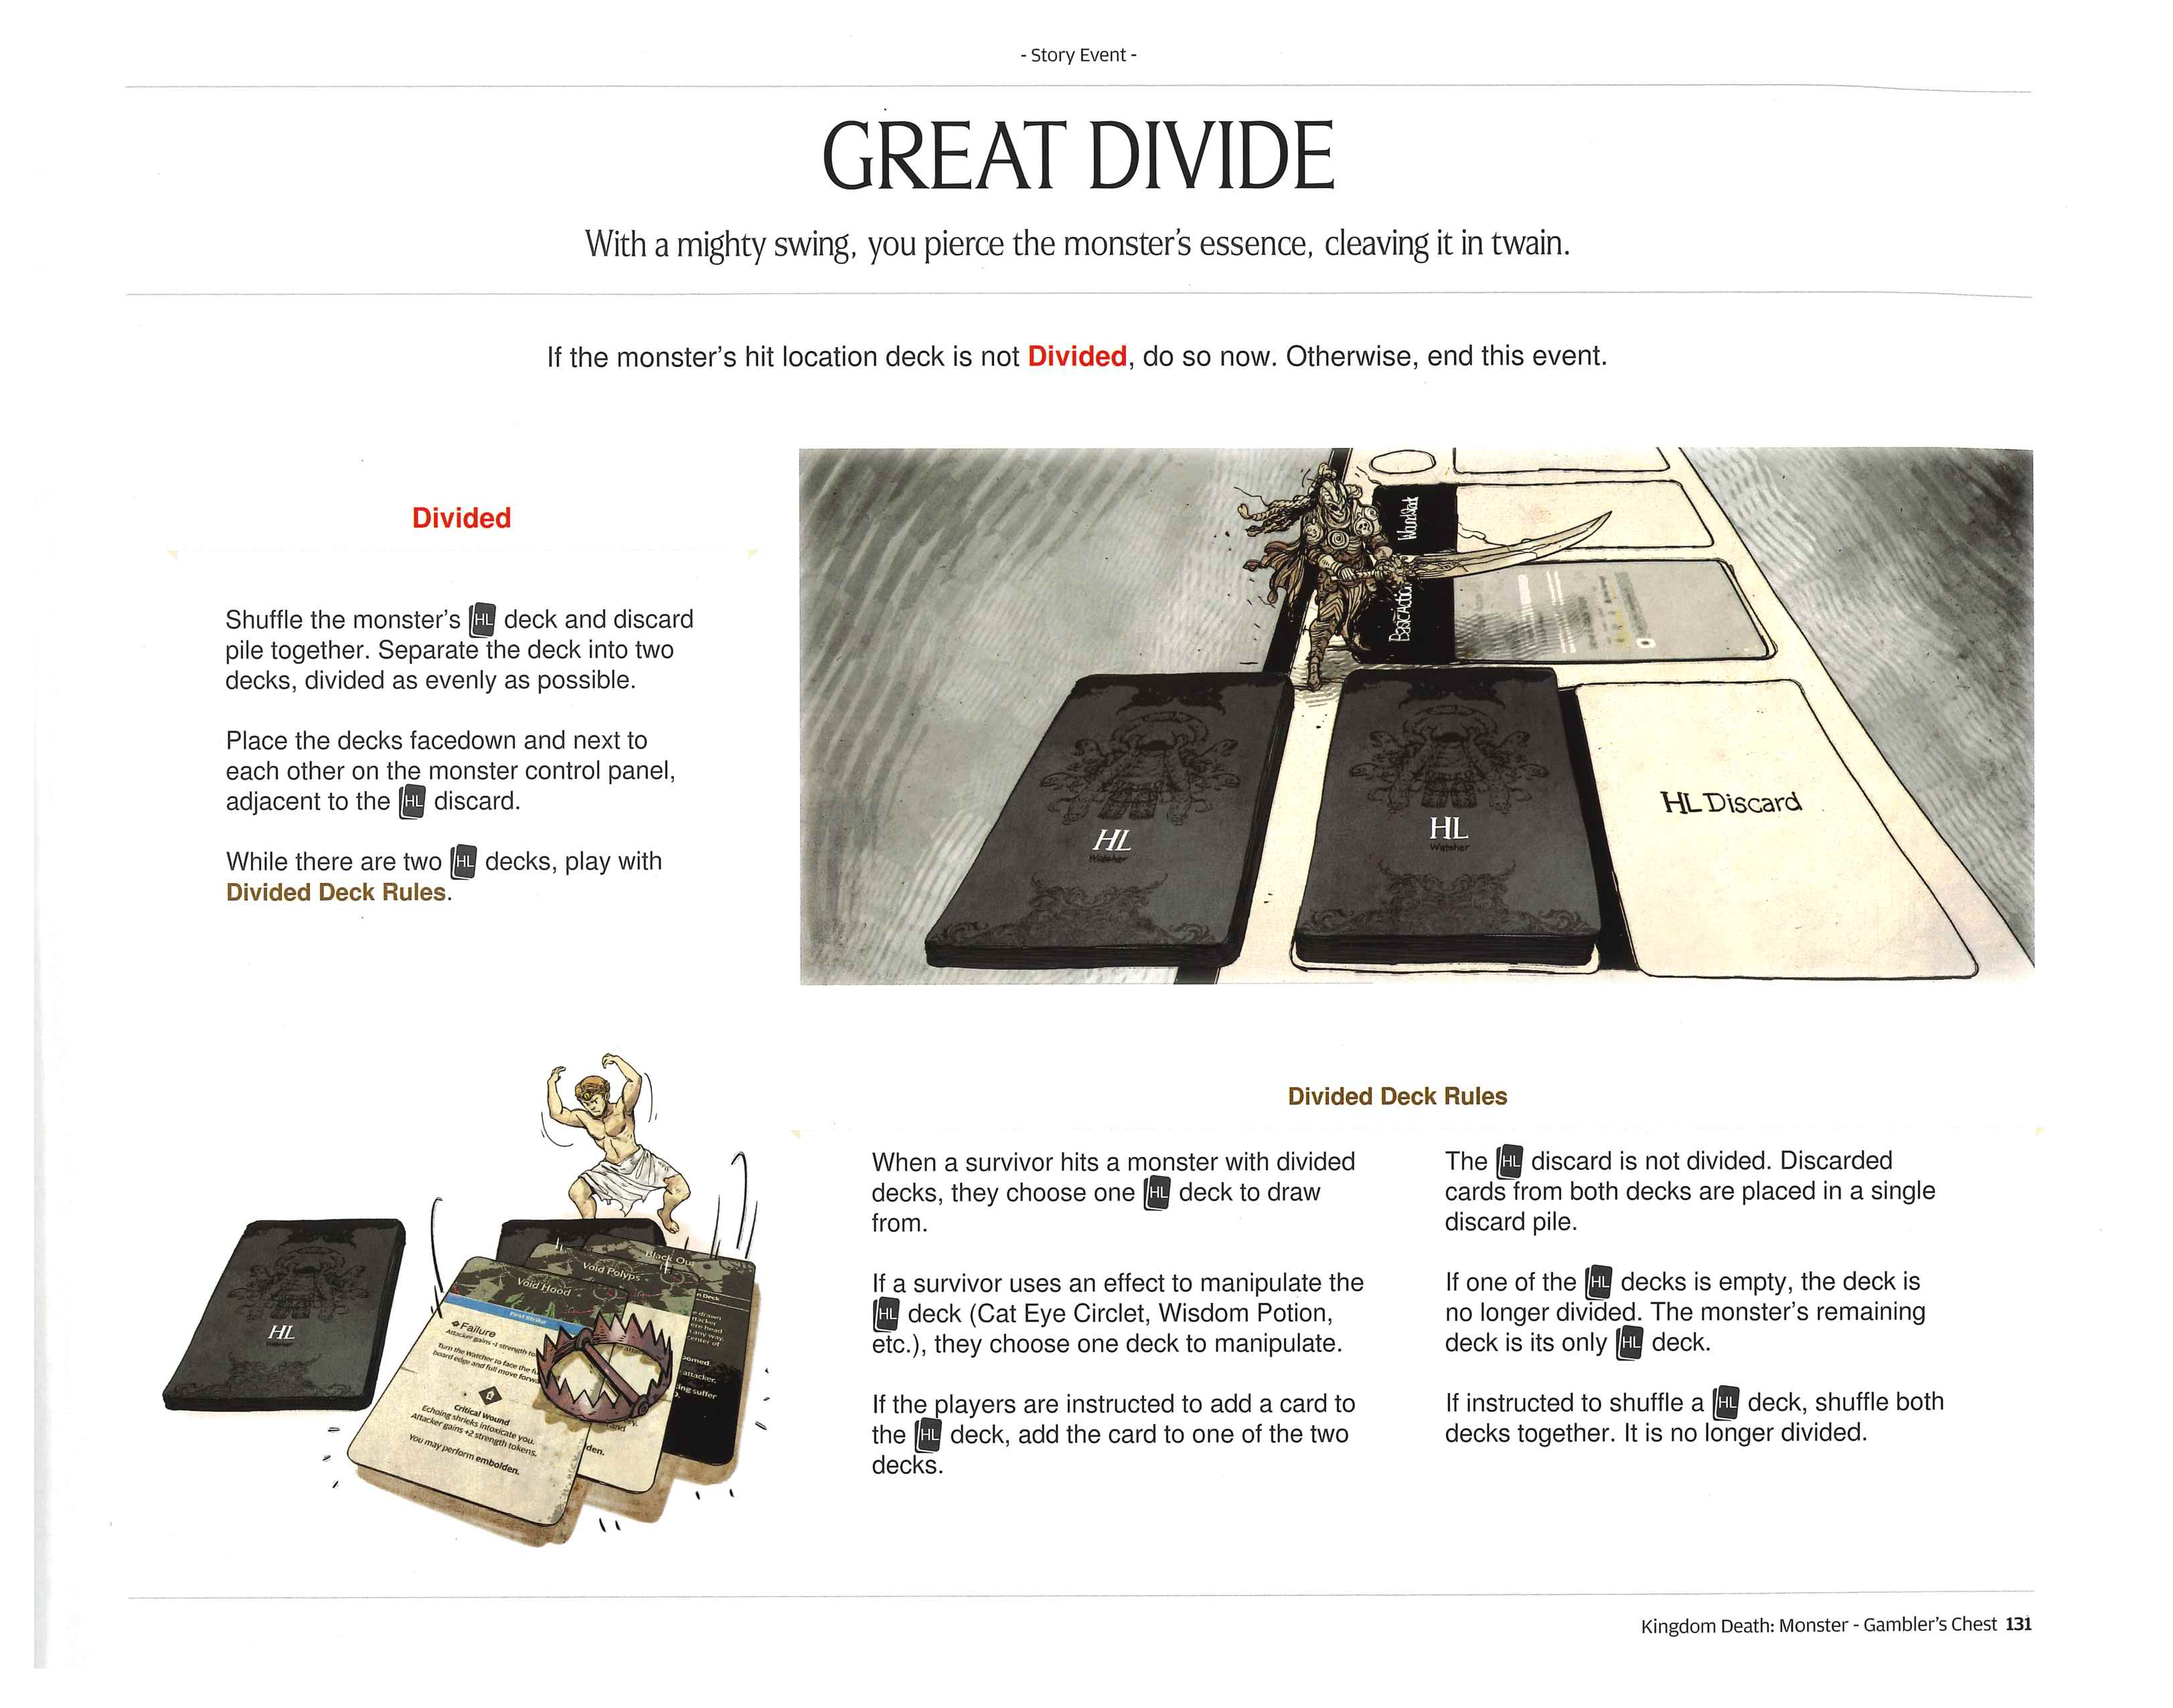
Great Divide is a neat little mechanic that splits the monster's HL deck in twain until the HL deck is shuffled or one pile is emptied. The main benefits of doing this revolve around passive HL scouting decks, if you have two passive HL Scouting cards like say 2x Wisdom Potion or Frogdoggles then you can see the top of both decks and plan accordingly. If you have an active form of HL Scouting like the Cat Eye Circlet then you can also set up both decks, but you'll have to activate that item twice. If you find the trap during these activations survivors can then carve up the trap free deck without much concern (unless it's a two trap monster).
Without scouting the overall mechanical impact is pretty low because if you do not know in which pile the trap is located, both piles are close to identical for the purposes of probabilities.
This is a very fun, unique and clever little piece of design that I like a great deal, there's room to experiment with this sort of split deck design for Team Death in the future but even if they don't return to it Divider is still exciting enough on its own.
Also that Cat Eye Circlet survivor in the bottom left corner of the Great Divide page absolutely rules. He needs to be printed on a T-Shirt.
Gavel
Crafting Cost: 3x Deathmetal, 1x Pylorix, 4x Leather, 1x Void Fabric
Requirements: Cooling
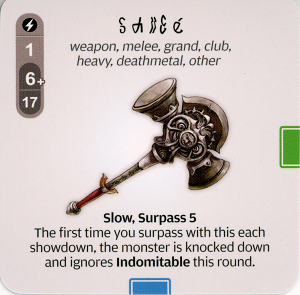
One of two non-unique gear cards in this crafting location, Gavel is a pure expressions of what a “Club” is in this game, naturally it is at its best when paired with Lantern Armor due to that armor set's club synergy and when you do that this weapon is incredibly hard hitting, going from an average wounding roll of 22.5 to 28. It also has affinities that fit very well into that gear grid as you can set it up in the 2 slot with Monster Grease in slot 3 and have 3 green affinities (you do lose the hat's Earplugs affinity ability, but that's fine). Note these clubs all do not have to be used with Lantern Armor, there are plenty of other things you can combine them with in the Armor options. Lantern Armor is just the most straightforward and generically available one, especially for clubs without reach.
The once per showdown Knockdown with temporary disable of Indomitable is also a very solid extra bonus attached to that Surpass 5, gang up kickings are back on the menu! Apart from that there's not too much more to tweeze out Gavel here, this weapon sets up the monster for a lot of pain and has close to perfect affinities for Lantern Armor Club Tanks.
Partisan
Crafting Cost: 2x Deathmetal, 1x King's Collar, 1x Skull, 2x Leather, 1x Antique Bangle
Requirements: Cooling
I love our second non-Unique gear card Partisan so very much, this is an incredibly powerful weapon with a design that is unusual without being broken. At our baseline we have a solid (2/6+/10/Reach 2/Sharp) grand spear, but it is the extra ability that makes this one so unusual. We're drawing our HL from the Discard Pile, this means that we're not going to ever connect with the Trap (making Spear Specialisation irrelevant) and that creates some very safe attacks. However, the negatives for this powerful bonus are 2 brain damage per hit (very manageable) and we cannot attack into a low or empty HL discard pile because that will result in the spear making a meal out of the survivor.
That might look like a problem, but because we always have access to Fist & Tooth and we know the maximum amount of hits a survivor can roll, it becomes something that's fairly easy to handle. The monster HL Discard is only empty at the start of the showdown and right after the trap. If other survivor(s) set up some HL cards for Partisan to connect with then there are no concerns, you have perfect information about what you'll be connecting with when attacking with this. Higher speeds can be of a concern, but survivors do always have access to Fist & Tooth if you need to scrub a few more extra HL cards into the discard before returning to your Partisan Party.
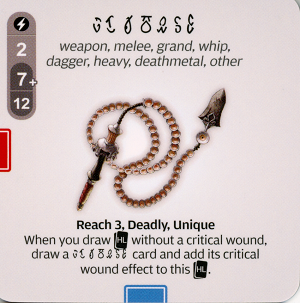
Scourge
Crafting Cost: 1x Deathmetal, 1x Unclean Endroot, 1x Heavy Chain
Requirements: Cooling, Death Count of 21+
Scourge is my other favourite gear card from this Settlement Location, though it is one which you'll have to sort of aim for if you've reached the point where most of your deaths occur outside of the showdown. 21 deaths is a lot, but very achievable with the tools we have to hand.
In the showdown this is a very good whip with long reach and Deadly, Whips are very good if you've managed to invest time into levelling up proficiency and Scourge is no exception to that. Whip Specialisation allows us to wound the top card of the AI discard rather than the AI deck, which is incredible behaviour control.
Scourge itself is not the most impressive stat block, that 7+ accuracy in particular isn't great on a weapon with Reach 3. This is because Reach lets us hit the monster from further away, but then we're sacrificing the blind spot accuracy bonus, which is something a 7+ weapon would prefer to have. As such I do find I want additional accuracy on the wielding survivor in order to not leave value on the table.
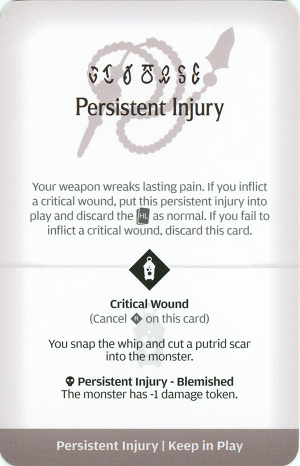
Scourge's other unique factor is the additional Persistent Injury that is added to a HL drawn without a Critical Wound effect. I do think the naming of this card is a bit sloppy, it's also called Scourge and represents possibly the first time that we've had two different cards with the same name – not a big deal but I would probably have gone with Scourged as the name here.
The Persistent Injury of Blemished making the monster suffer a -1 damage token is very strong, but it is kept in check by only being possible if the HL card doesn't have its own critical wound already. Monsters like The Butcher however, they're in for a potential world of hurt.
Blade
Crafting Cost: 1x Dark Tower's Ledger, 4x Bone, 1x Deathmetal, 1x Perfect Bone
Requirements: Cooling, Sacrifice
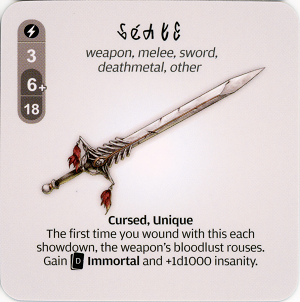
Our last Armory weapon is Blade, which is an absolutely bonkers weapon due to its ability. The weapon profile isn't that strong when compared to other Armory weapons due to lacking sharp. This is a Sword without the grand keyword and it “only” has a (3/6+18) weapon profile with the cursed drawback combining with unique to lock it to a single survivor. However that survivor is rapidly going to become very hard to harm because of that Immortal + 1d1000 insanity once per showdown.
This combo previously turned up on the Legendary Phoenix and it was one of the tools used for the first recorded/known TOM (The Old Master – Level 4 Legendary Dung Beetle Knight) victory (I cannot recall who managed it, but the thread is on Reddit somewhere). So the pedigree of this mechanic is impeccable.
There are of course negatives to this disorder/immortal combo; Immortal locks off your spending of survival for survival actions and no amount of Insanity + Immortal can protect you from direct severe injuries or instant death mechanics, but it is still an incredibly strong defensive tool for a single survivor. Just don't take this vs. the Screaming Antelope.
Patterns
There's a bit of an odd situation when it comes to Node 4 monsters and pattern gear. I thought that The King would be setting the baseline for how many a monster like this gets. 2 Seed Patterns and 2 Indomitable Patterns looked like a reasonable amount for a monster that turns up this late, but then The King got 3 additional Indomitable Patterns via White Box releases (Lordsruin, Rene and Argo). Resulting in 2 Seed + 5 Indomitable at time of writing. The Screaming God then arrived and we got 0 Seed Patterns and just 1 Indomitable Pattern.
That means we don't have a good Quarry Node 4 baseline to understand and judge against because The King is way, way ahead of the Screaming God. It feels weird right now and I hope that we're not going to get too many additional Screaming God releases – If 2+ Seed Patterns and 2+ Indomitable Patterns come with the Screaming God vignette survivors I think I'm OK with that but if we get 4+ individual releases I won't be happy. It's no reflection on The King gear however, it's just more a point of pain for we consumers.
Seed Patterns
We have a total of two seed patterns which the average settlement should have ready to go by the time the King turns up. I won't labour the point too much, but Seed Patterns have this consistency problem where the cards are all added at the start of the campaign. This means you can shake out Era 4 patterns from the very first Seed Pattern draw, or if you're unfortunate with your Insight triggers because Saga is hiding in your innovation deck you might not draw them at all. I wish there was a bit more of a curation system in the Seed Pattern deck in the way that the Innovation deck worked, but it is very difficult to retrofit it at this point.
Heartseeker
Heartseeker is a weapon that is a lot stronger than it looks on the surface, this is due to Razor Sharp being stronger than Sharp and Impeccable reducing the chances of rolling a 1 on the wound attempt to 1% (10% of 10%). Ignoring First Strike is also a nice bonus, but overall this is another straightforward pile of stats weapon that is efficient at killing monsters. I don't think there's much more to write here, stats good, affinities fine, abilities good.
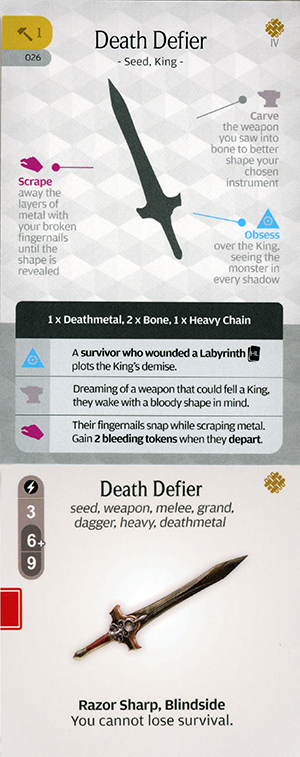
Death Defier
Death Defier on the other hand is a bit more unique, it is one of the few end game Daggers out there and in addition to having a potent stat line of (3/6+/9/Razor Sharp) we have Blindside and being immune to survival loss (you'll still have to pay survival where required, but now you are not impacted by anything that causes loss).
Blindside in particular is neat because it is an ability that combines not just with normal attacks, but also works with Dagger Mastery.
Blindside: A gear special rule. When you wound the monster from its blind spot with this gear, all of its [R] REFLEX become [R] FAILURE until the attack ends. (This includes the current reaction.)
During a normal attack from the Blindspot this is a lot of reaction protection, but the really neat part is when you use this with Dagger Mastery. During another survivor's attack, as long as they are adjacent to you while you're in the blind spot you can use your Mastery to wound the HL card just discarded and give the Blindside bonus protection to all of the other HL cards that the other survivor will be trying to wound. This is such a neat interaction to set up and use.
Indomitable Patterns
We've got five of these to go through as I'm including all of the currently released Indomitable Survivor ones. Before I get into them, note that I will absolutely be judging the attack profiles harder than the Armory ones because this is gear from L3 Kings, Armory gear can come from L2 Kings.
With that written, let us get cracking.
Regicider
Crafting Cost: 1x Huge Deathmetal Ingor, 1x Pallium, 2x Leather
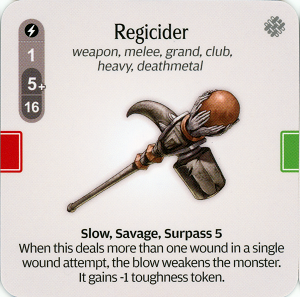
Indomitable Weapons for Quarry Node 4 monsters should be close to best in class with only unique rare weapons competing. Regicider certainly fits that bill with its attack profile and abilities. As always we can add Sharp onto this weapon with Lantern Armor, so it is very capable of managing Surpass 5 against most monsters in the game. Savage is a little extra treat here that we don't need to build around, but you can if you want because Lantern Armor does offer 2 blue affinities for a Lucky Charm (and Regicider has the Red affinity that Lantern Greaves love or a green affinity for Monster Grease).
Another really potent part of this weapon is that -1 toughness on the extra wound, this isn't limited to once per showdown, so Regicider can improve the odds for all weapons in the showdown multiple times, making the job easier for everyone.
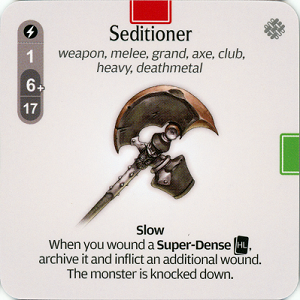
Seditioner
Crafting Cost: 1x Miracle Liver, 2x Deathmetal, 2x Leather
Seditioner is another Club, but it is also an Axe and a Grand Weapon. This makes it pretty unique in how we can combine weapon specialisations together. Like all its club kin it can be slotted together with Lantern Armor and it offers that Monster Grease activation as well when used in the slot 2+3 combo mentioned earlier in this article. I am very happy with the combination of Grand, Axe and Club specialisations on my weapon and that's made these weapon types very desirable when I'm levelling up a settlement that will be fighting Kings in its future.
The Knockdown + Archival of a Super-Dense Hit Location is an interesting point that does have some minor negatives when combined with Axe Mastery. It's not a huge deal, but you are thinning the HL deck while you do this and that increases trap frequency a minor amount. With that written it is still worth noting that my ideal weapon mastery usage with this is an Axe Master + Club Specialisation + Grand Specialisation. I don't think the deck thinning is meaningful enough to be a real downside, but it is worth holding in your head that the trap odds are slightly increased now.
Our remaining three Indomitable Patterns are all promotional ones from white boxes. These are of course optional extras, so they cost more and they also reduce the odds of getting a specific gear card from your indomitable drops because there are now more Indomitable Resources in the King's IR pool.
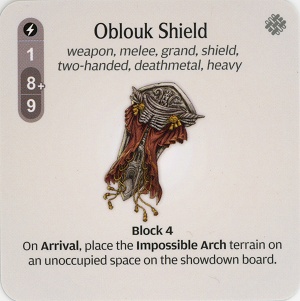
Oblouk Shield (Indomitable Survivor – Arco)
Crafting Cost: 1x Infinite Aperture, 1x Heavy Chain, 2x Spiral Pauldron, 2x King's Cloth
Oblouk is the most unique and interesting gear in this entire selection, it is a very high block shield (with an attack profile that's not worth using against most monsters you'll face at this point) which in itself makes it very desirable. But the real treat here is the Impossible Arch terrain card.
You get to place this anywhere on the showdown board during set up (as long as it is occupied) and it offers a portal that survivors can use by stepping onto the Oblouk Shield survivor to exit the Arch, or step into the Arch to exit via the Oblouk Shield. This creates some interesting strategies and opportunities where you can keep survivors “safe” elsewhere on the showdown board and have them step through the Arch to reach the monster for attacks before withdrawing. The main limiting factor here is that you can only move one end of this portal (the survivor holding Oblouk), the other end is fixed in place once deployed. So smart, thoughtful set up matters. You want the Arch to be in an accessible place, but you also want to make sure that the risk of the Oblouk wielder entering the Arch and folding space in around themselves isn't going to happen. Getting Knocked Back into this Arch is something to avoid, even if it is very thematic. (Don't ask why none of the gear ceases to exist when this happens, I imagine that the Arch spits it out right at the point where it folds upon itself.
As an aside, I do find myself wishing that there was some additional Milestone connected to this event. Having that portalled survivor turn up in a Kingdom Death (King Showdown Event) during a future campaign would be a very interesting cross campaign situation. Especially if they were changed permanently in some fashion by the experience.
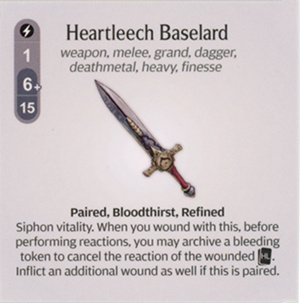
Heartleech Baselard (Indomitable Survivor – Rene)
Crafting Cost: 1x Ennui of Dominance, 2x Pylorix, 1x Antique Bangle, 2x, Deathmetal
If there is any weapon type that suffers the most from Indomitable Resources being increased in number it is Paired weapons. We only get enough to craft one of these and that always creates this awkward friction where the weapon needs to be good enough to justify using singleton but also good enough paired to want that second one if you do happen to drop out the second IR. Heartleech walks the line here and I think manages to tick both boxes, the first copy has the reaction cancellation (and Bloodthirst generates the bleed to spend for it), plus Refined gives you a reroll on a first failed wound.
The weapon really comes to life when paired though because the wording here offers an additional wound per wound when paired (unless Team Death has clarified/errata'd this interaction). The main negative here is 15 strength is smidge low when compared to our other Indomitable Weapons options but still an incredibly strong weapon when we look at the biggest picture.
Lordsruin (Indomitable Survivor – Titus)
Crafting Cost: 1x Origin Branch, 1x Hollow Crown, 1x Deathmetal, 2x Leather
Scythes are one of the best weapon types in the game due to a really strong Weapon Specialisation and Mastery. Lordsruin is a beast that continues this trend. This weapon is really good at dealing wounds via that eye watering Deadly 4, though it giving the monster luck tokens each time it wounds is an interesting balancing portion. You do want to have the puzzle affinity ability active when using this weapon because 13 strength isn't going to carry the weapon if the Deadly has been shut off. Another neat interaction is that Scythe Mastery gives us an additional activation of the Scythe to trigger this. So you can wound several times in one round and then easily reset the luck tokens without leaning into surges.
Without the puzzle affinity active this weapon is a bit tougher to justify because it will disable itself and harm other luck builds, so I wouldn't run this without having those extra affinities and that does limit the builds a little.
Final Thoughts
I adore the playful and varied designs that happen in this selection of weapons, Divider, Scourge and Oblouk in particular are the kind of things I love to see from late game gear as they are offering more than just a big pile of stats which is something that many King gear cards trend towards. Another interesting part of this is that outside of Slow weapons appreciating the extra roll there's not a lot of synergy between Deathking Armor and the weapons, Deathking Armor isn't much for synergy anyway due to it being a big old good stuff stat pile rather than heavily focused towards one particular mechanical theme but it is especially noticeable here. If you compare all of this to say, Bullfrogdog Armor the weapons in this and the previous article are very standalone whereas the Bullfrogdog copper gear is so dependant on the armor set that it is nearly parasitic. I don't know which of these two design styles I prefer, the difficulty getting Copper makes it hard to get everything you'd want there assembled. Everything here from The King is very independent of each other and also a lot easier to assemble.
There isn't a single bad gear card here though, even the ones that I list as being “low strength” is only in comparison to each other rather than the game's ecosystem overall. King Gear is the right at the bleeding edge of power in Kingdom Death and all of these cards are prime examples of that. Which does create the issue I wrote about in the previous part of this gear dive, King gear is just good, really good, often best in class and there's no roughness to the designs at all. We're not being asked to compromise on anything at all outside of affinities, which has the impact of making Deathking Armor a bit uninteresting when it comes to layouts, but at least some of the weapons do want affinities and so may be asking to get use with armor sets elsewhere. Lantern is one for the Clubs, but I've also found Dragon King and Phoenix Armor to work well also.
Files