Home

 Creators
 Search
 Recent
 Random
 Posts
 DMs
 Tags
 Random
 Importer
 Import
 FAQ
 Account
 Register
 Login
 Favorites
 Keys
 Logout
 Telegram

A Primer for Navigating the World of Kingdom Death: Monster | 2026 Edition (Patreon)
Content
I occasionally get requests and questions from people who want to know the answers to things like “What gear should I have by Lantern Year X?” or “I keep losing my campaigns before lantern year Y, what did I do wrong?” or similar. These are not questions that can be answered without being able to watch the play decisions being made, but also they are questions that are not really focusing on the issue. I'm aiming with this article to provide as much foundational knowledge and aid to newer to moderate experience players, because once you have the foundations set, you can construct almost any settlement you want on top of that. We're going to start very basic, so feel free to skip past a section you already understand and if you have already won a campaign or two there's not going to be as much for you here, but perhaps it will help you better understand my perspective on how I approach the game after playing it for somewhere around 10 years and maybe have a few tips that'll help you have successes that let you experience more of the content for this excellent game.
What is Kingdom Death: Monster?
"Monster" (which is how I prefer to refer to Kingdom Death: Monster in order to leave space for future games in the Kingdom Death world) or KDM (which is what I will use here for clarity as that's the usual shorthand we all use) is the first game in the Kingdom Death series. As a game it has the same basic structure as all games; you have a goal/victory condition, a set of rules to follow and an opponent. In the case of KDM, the victory condition is reaching and defeating the Finale Monster, the rules are many and the opponent is the system itself (I tend to refer to this as Kingdom Death's Dark Director to help personify it a bit). With that established, we'll put a pin in the goal for now and instead dive into the fundamentals of the system.
KDM is a Solo/Cooperative game, which in essence means all the human players are working together to tackle and overcome the system. In successful versions of solo/cooperative games the system is stacked in its favour in order to overcome the issue that it is a dumb opponent. By that I mean the system has no ability to react, retaliate, swerve or adapt to decisions the players make. Its actions are generated by either set events on the timeline or randomisers in the form of dice, tables and cards. In short, its decisions are made for it by the mechanisms and rules.
The Settlement Timeline is the first place where the game has some control, as the chosen campaign will have certain Story Events occurring in set years and it also will set certain years to take control of what boss monster the settlement will have to face in the form of a Nemesis Showdown. In addition to this it provides an additional randomiser in the form of a Settlement Event card for each year. The rest of the time, the players are in charge of what Quarry Monster boss they will go after and how dangerous it will be (level).
What this does is it breaks the timeline apart into a series of small hurdles, each represented by the next Nemesis Monster showdown (the part of the game where we cannot choose our opponent). Every Nemesis Monster provides different challenges and as the levels increase they also get more damage, more resilience and more tricks. In the years leading up to each of these set Showdowns our main goals are to get ahead of what the next Nemesis monster wants from us, this is done by improving our damage output, our ability to soak up the monster's damage, our utility (so we can make best use of actions even if we're not dealing damage) and tools to support our chosen strategies. We'll get back to that in detail, for now it's time to dig into the bosses.
The oppositional portion of the boss monsters in this game are constructed from four elements; the Hunt Cards, the Dashboard, the AI Deck and the HL Deck. One of the ways I approach understanding the monsters is by considering each of these elements as a separate member of a party, each with its own role to play.
The Hunt Cards are the advance skirmishers/scouting element of the monster, seeking to wear down the survivors on the way in to the hunt, with generic support supplemented by the Basic Hunt Event cards. This is the a very variable part of the Monster toolkit as hunt cards can by design can result in both bad and good things, however over time you will come to recognise some Monsters as having more punishing Hunt Events than others, the Dragon King for example has a very punishing hunt deck, making the hunt phase a really wearing and difficult time. This is why I use a 3x3 grid when analysing hunt events, it helps quickly visualise how predictable and punishing (or not) a particular hunt can be.
The AI Deck is the Damage Dealer of this “party” and it is one of the main things that players should focus on paying attention to during the showdown because of how it is completely unique every single time. Each monster has preferences and themes to its AI behaviour, and the odds of ever having two identical AI decks in the same order are miniscule. When analysing an AI deck, its AI cards break down to varying degrees of threat level.
Basic → Advanced → Legendary is the obvious levels of AI card threat, but there are also cards individually in each of these tiers that can be far more or less threatening overall or even ones that are more or less dangerous dependent on situations. Some of these cards are always a danger, others are only a danger to specific survivors on the board and some vary in how dangerous they are dependant on other factors.
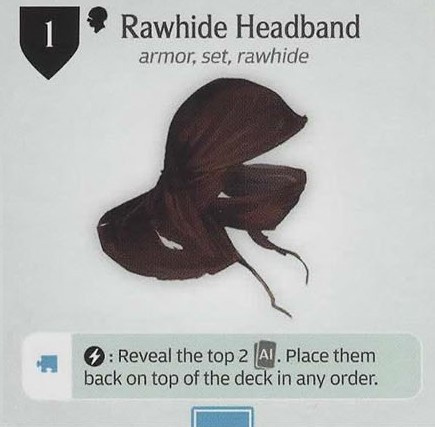
One of the key early skills to develop when learning the showdowns for the game is developing tools to internalise how a given monster prefers to pick its targets (threat, nearest, most bleed etc.) and what tools it utilises to secure kills (severe injuries, brain trauma, bleed, “ring outs" in the case of the Black Knight). The prime learning tool for this is the Rawhide Headband and when you are looking to get better at the game you should lean on this. Spending 25% of your normal activations to get control over the AI decks “activation” is very powerful and most of the older monster designs have little to no protection against this, which makes them excellent learning tools.
The Headband deck scouting/manipulation can be used in two main ways, defensive and offensive. The defensive use is employed after other attacking survivors have acted and then the headband lets the controller choose the weaker of the two AI cards to set against the survivors. Often a designated punching bag survivor known as “the Tank” will use the information from this targeting to try and ensure that the monster will come at the Tank who has resources dedicated towards defense. Early on in the campaign due to Rawhide's power the Tank and the AI controller will likely be the same survivor, freeing up the other three survivors to concentrate on dealing damage.
The offensive use of the headband is when you are dealing with a monster that has scary AI cards that you do not want to see resolve, you use the headband before an attack and order the cards so that the offending unpleasant card is on top of the deck to be trimmed away into the wound pile. With a good amount of survival and surge this becomes easier to perform as then each headband can do this trick twice, but be aware it is a very slow controlling play style that can be used to almost entirely shut down some monsters either by locking them into weak AI cards or even better, AI cards that are effectively blanked by Persistent Injuries. If used as much as possible it ensures that the actual behaviors the monster performs (the ones in the AI discard pile at the end of the first deck lap) are soft.
Once you get more comfortable with the general rules of how a monster behaves, what it targets, what attack vectors you find to be the most threatening and the monster's routes to victory; you'll start to automatically position survivors in safer spots as a kind of intuition and ensure that if you need someone to absolutely not ever be targeted directly, you can make that happen. Each monster has thematic mechanics surrounding its AI and HL decks, and that can make it easier to internalise the general positioning rules. Like the White Lion is very basic, it prefers targets that are in front of it and standing, but occasionally it will violently brutalise a knocked down survivor. Like a kitty cat, pounce, bat and play with its food.
Before we move on to the other main tool we always have available I want to stress that when you are learning Kingdom Death being a hipster about “Headband is meta so I don't want to use it” is a terrible way to approach things. You are in a learning stage, without knowledge you can't get better, use the headband with the goal of growing your internal understandings of the monsters well enough that you don't need the headband any more. This is a common route to success across all games, learn the meta inside and out to gain the foundational knowledge and then you can step beyond it and do the unique, weird stuff with confidence and success. We all learn from the knowledge and actions of those who came before us, building on that before iterating on it and creating our own style.
Another tool that is always available for us to use of is the “AI Deck Lap Check” a Lap is a term for when you've been through a deck of cards and you're going to refresh it with a new shuffle. At the point that the AI deck is empty, you will have perfect information about what this monster does, what its best moves are, how deadly it is and so on by looking through that discard deck. This means you know its preferred targets and its best moves, so it has become more predictable – all it can do now is randomise the order and not do certain moves because they were removed as wounds.
As the AI deck shrinks, the laps become faster and the information becomes more and more fixed. So I recommend that once you've drawn the last AI card from the monster's deck, before you start dealing wounds, it's worth taking the time to look through it with your group and discuss the plan you have to take down this particular unique member of the monster species you're hunting. If you have a bad memory, take a picture or write a couple of notes, or just have each player focus on one or two cards that are scary so they can remind others about the strategy to handle those given cards.
For example: “Don't stand there, we've not seen Mega Face Melt yet and that's a place where the monster will melt your exposed face as you have no head armor on your survivor Please DontmeltmyFace.”
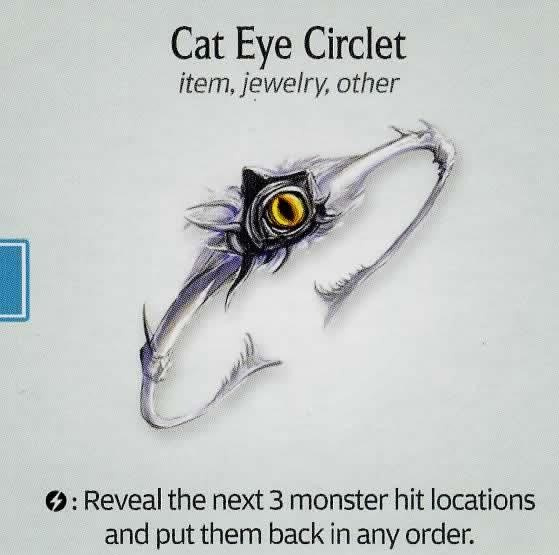
Our other deck, the Hit Location one is quite a different beast from the AI deck. This part of the monster's “party” is its own “Tank” and that deck's job is to act as a defense, a retaliatory punishment and a way for the monster to scale its damage potential to match the fact that the survivors usually have more attacks per round. This is done via various mechanics including Traps, Impervious, Super-Dense or just flat bonuses, however the main tool that is employed here is reactions. Reactions serve to either harm the attacking survivor, protect the monster or harm all survivors as a whole. We don't have generic access to a scouting tool in the main locations (Organ Grinder, Weapon Smith, Barber Surgeon and so on), but all Node 1 Monsters currently released do offer their own special flavour of HL scouting/control. Because of that we have a far wider range of different options when compared to the Headband situation, ranging from the classic White Lion's Cat Eye Circlet all the way to the new Frogdoggles.
HL Scouting and Control is far more offensive, or proactive in its approach when compared to AI Scouting. This is because the HL deck is helpless to do anything unless you interact with it directly, it doesn't get to play a card every turn. That's why survivors not attacking can be so powerful, if they're generating value through control or terrain activations the HL deck can do almost nothing except sit there menacingly. If the HL deck is expecting you to attack it four times, but you instead only attack it three times then it has lost a portion of its potential offense and can't generate any value against whatever that fourth survivor is doing (HL Control, Blocking and so on).
It is also worth highlighting here that another tool that really flips the HL Deck onto its back and exposes its soft belly to the survivors is Luck. Not every Hit Location has a Critical Wound, but most monsters have plenty of these to take advantage of. Luck is; in my opinion, one of the areas of the game where the design balance is a bit out of whack. Critical Wounds are almost all hugely beneficial for the survivors and massively punishing for the monsters, we'll get into this more in the gear section, but one of the reasons I'd love to see Team Death move onto a new base game design once they've completed the remaining Kickstarter expansions is because of Luck, it's too easily gained considering how powerful it is. Look at the crafting costs for the Lucky Charm vs. The Monster-Tooth Necklace if you want a prime example of that issue, the Lucky Charm is half the cost and doesn't need heat.
Regardless, building for luck on your survivors as much as possible will pay out very well, strength is great, but reactions can still trigger thanks to Reflex and Wound reactions. Luck on the other hand gets to both bypass those, deliver a wound and score extra rewards to boot. It's incredibly powerful, so look very hard at any weapon that has Deadly or Luck and consider how you can leverage it and also always pay close attention to utility items that can provide horizontal blue affinities. The same also applies to weapons with automatic wounds, Devastating is an incredible ability as it gets to turn 1 wound into multiple and even stronger than that are automatic wounds that do not require drawing a Hit Location card to remove an AI card as a wound.
Now I don't want to get into all this much more here, learning monsters and good movement/positional play is a something that's very hard to teach because it's full of so many variables, that's part of the reason why each chapter of the Dark Bestiary takes so long to put together, even if I spent three hours or more talking about a monster I'm not going to get remotely close to covering all the different possible survivor formations, attack orders, HL card ordering and so on. KDM's a complicated game that gets more and more complicated each time a new lot of content comes out!
However, before I do wrap up this portion I'm going to give you a way that you can analyse monsters which you are having trouble with. Outside of a campaign set up a showdown of the monster at the level you want to experience but have the survivors just be simple units that have a (2/6+/-) attack profile and can take unlimited damage. You play through the showdown, recording what damage is dealt by the monster and to where (including bleed tokens) and see how often the survivors are able to get in and score 1 or 2 hits (always apply all reactions on the HL cards when you do this). This is a fast way of running through the patterns of behaviour for a monster and can really help teach you where to position for attacks and defense. If you want to be more granular you can assign one survivor to be the tank and try to keep the monster focused on that survivor for its attacks. This is a very fast way to run through a showdown in order to understand the flow of the monster and what will happen if you let it run its own plans without resistance.
So with that final nugget I'm going to leave the tactical Showdown Phase behind and move onto the more strategic elements of the game, which is planning for those forced encounters (Nemesis Showdowns) and building towards them.
Settlement Health
A healthy settlement is has three strong foundational aspects; survivors, gear and places where endeavours can be used (Innovations, Locations). There is a fork in the road here depending on if you are playing with Arc Survivors or not, and that is because Arc Survivors are so much, much more everything than their Fighting Art cousins, but the foundational aspect of the survivor portion doesn't change and that is...
Population Quantity & Quality
One of the most common “Game Over” results for learning players is running out of survivors, this is because getting replacement survivors is not a guarantee, it always depends on some form of randomness. At the start of the campaign we can have anything between 8 and 14 survivors as our baseline depending on how many survivors perished in the Prologue and how well you roll on the First Day Settlement Event card. Having a good starting baseline population number is of course a big help, but any starting number can result in a successful run. Either way, one of the first goals for a settlement is to trigger Intimacy as this provides a Birth Principle. Since 1.5 updated Survival of the Fittest, this is the choice I recommend because it has four positive bonuses for all your survivors and just one negative. Protect the Young in contrast has just one positive and it's very lacking in comparison.
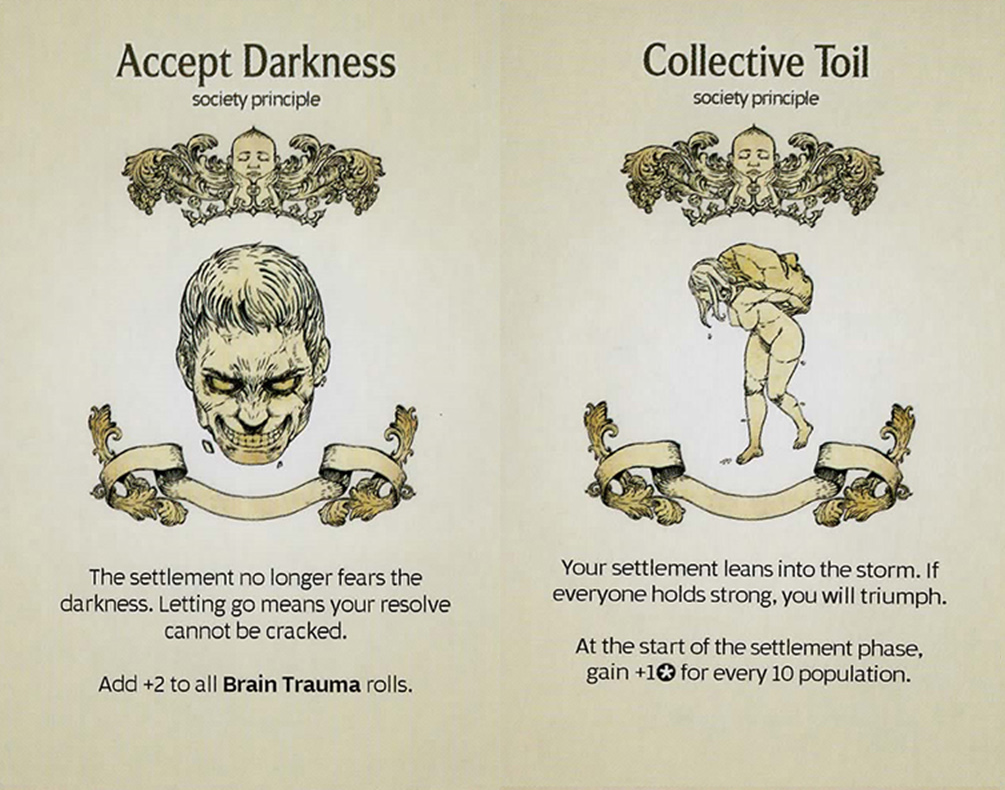
The primary goal at this early point in the game is reaching 15 Population to trigger your Society Principle; which one doesn't matter so much as there's no right choice of Society Principle as far as I'm concerned – both Principles have benefits and the one you choose will depend on the goals of your campaign. Do you want more options during the settlement phase? Collective Toil will reward your population with an extra endeavor for every 10 survivors, something you can lean into and really grow from a hamlet to a town. Accept Darkness on the other hand provides a lot of protection from Intimidates and other forms of harm that cause Brain Trauma. It's very much the fighting orientated option and as such if you're struggling with winning showdowns it is the one I'd recommend. Regardless you want this as the principle is free real estate because it is rewarding you for doing something you should be doing anyway, growing your numbers.
Once you've hit that magic number 15 Survivors I would urge you to go a bit further, 15 survivors is just one or two unlucky showdown wipes away from being in a really tough spot. My preference is to get to 20+ with at least 24 being my goal if I have Collective Toil as that secures +2 endeavours even if a full wipe is experienced. I'll also not stop at that number if I get the opportunity, extra population often has benefits in the Core or Finale Monster showdowns and that large buffer of survivors can make all the difference when you first face one of the big bosses in this game. You have endeavours via Augury and Love Juice to help, but you can also leverage things further with dice control such as Face Painting. More population might not be fancy or exciting compared to the other buttons the game offers, but it is very much the vegetables that you should be eating.
This population push isn't a task you have to do all in one lantern year, but it is something you should be chiselling at a bit at a time, you do not want to end a lantern year with population shrinkage, so at a minimum focus on replacements but ideally make it your goal to grow the population by at least one every year if possible. So, if you have completed the endeavour tasks you consider essential for the year and you have some spare to throw around, putting them into Augury via a survivor with the Understanding +1 bonus is a good shout (though watch out for losing resources here, have a plan about which resources you're good to convert into understanding if you roll poorly). Likewise stacking up any Love Juice you've gained to use all at once after a few pops of Face Painting is another really good way to set up a population boom. Everyone gets prettied up, has some drinks and begins the Fertile Festival of Intimacy! Also keep an eye out for ways to hit Courage 3 during the settlement phase because that creates Matchmakers and they offer a direct trade of 1 endeavor for 1 roll on the Intimacy table.
The second element that matters for Survivors outside of their number is their quality. Quality is something determined by the combination of a survivors stats, abilities, knowledges, impairments and personal attachment. It's a very subjective thing, but most survivors improve their quality by going on Quarry Hunts, improvement is also possible during the settlement Phase and even in Nemesis Showdowns. However until you're confident that you'll be able to pull the survivors out of the Nemesis Showdown intact it may be worth sending newbies in as a trial by fire. Gear does a lot of the heavy lifting in the early parts of a campaign, even Arc Survivors rely on it for a few years until their own progression paths really take off.
So that's one recommendation I have there, leave your best survivors at home if you're not feeling confident/familiar with a particular Nemesis's game and try to forge a potential new legend. Losing a newbie hurts a lot less than a survivor who has just achieved Specialisation in a given weapon type for example. It's worth noting that experienced players can take whoever they like into a showdown because they're backed up by that experience and knowledge. They can gamble because the odds are more in their favour.
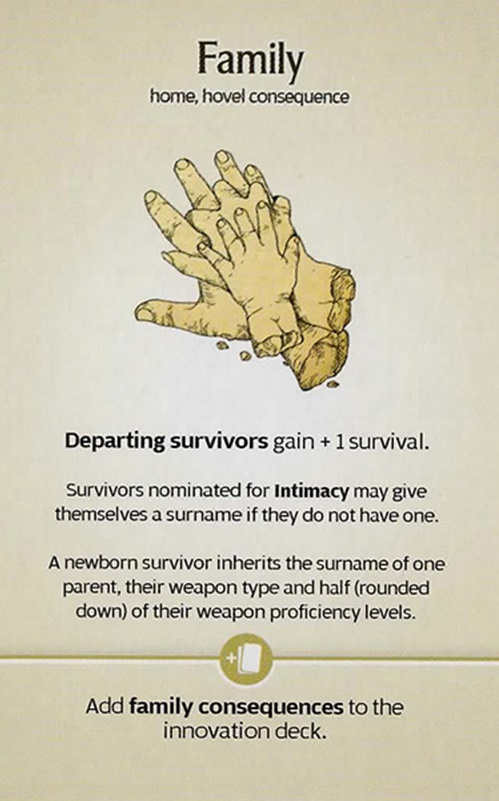
There is one interesting wrinkle in settlements, as the Family innovation is an incredible tool for saving weapon proficiency progression and it's really, really good when you have weapon masters. The Hunt Event “Manstealer” specifically targets males and makes them sterile Ken dolls, unable to pass on their weapon proficiency to their children, so there is a small edge advantage to using women exclusively in the hunts and leaving the men at home to take care of the young ones, clean, cook and be good little domestic kings. It's a really weird little edge case advantage, you don't have to concentrate on an Amazonian settlement every time you play, but I really recommend that your most important Weapon Proficiencies (Shield, Fist & Tooth, Spear are the classic trio) and the ones you are focusing on for that particular campaign are all worked on by women so we can have the next generation inherit a portion of that weapon proficiency.
Expanding to other options, a non-showdown way to improve the quality of your survivors is via Innovations, some Innovations provide access to useful Fighting Arts (Drums, Forbidden Dance) or even raise the base stats of your newbies (Clan of Death, Saga) and Family as mentioned above allows for higher quality babies via passing on a portion of Weapon Proficiency from parent to offspring. We do lose access to some of the really good options with Arc Survivors because of how that system essentially makes Fighting Arts extinct, but Drums and Forbidden Dance (for example) have Secret Fighting Arts in their options.
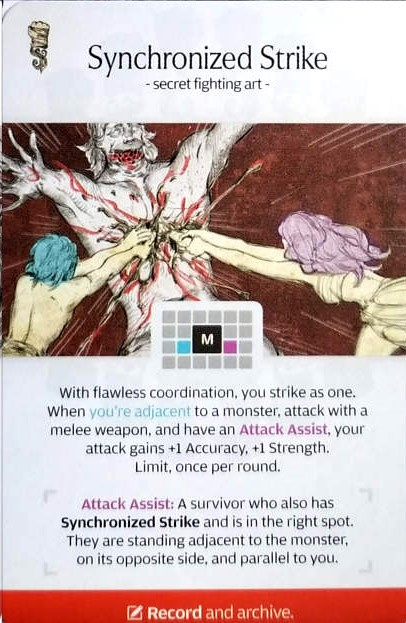
While I am mentioning Drums, do not sleep on Synchronised Strike, this SFA is an incredible boost for any hunt party and it rewards good positioning really well. I've written about this one in the past, but I want to always remind people about its existence, you can make good use of it on all melee survivors, even Tanks can carry it as they can assist survivors in the blind spots. It's a tool that improves weapons a huge amount and it's easy to forget that even Arc Survivors can gain it without needing to make a dice roll.
Outside of Synchronised Strike, many of these things are about long term and maintenance goals and that's because while Survivors are the elements of the settlement that go out and bring back resources, they're also very squishy and not very good at it if you send them out without the right gear. Which brings us to the second pillar of a healthy settlement.
Gear – Armor, Weapons and Items
Gear is what allows our squishy human survivors to triumph over the monsters they face, gear comes in three categories that roughly breakdown to offense (weapons), defense (armor) and support/utility (items). One of the interesting things about Gear cards is that one category gets to ignore the rules the other two have to follow, it's Items, items are the cheaters that play by their own rules and we'll look at them after going through the other two categories.
Armor
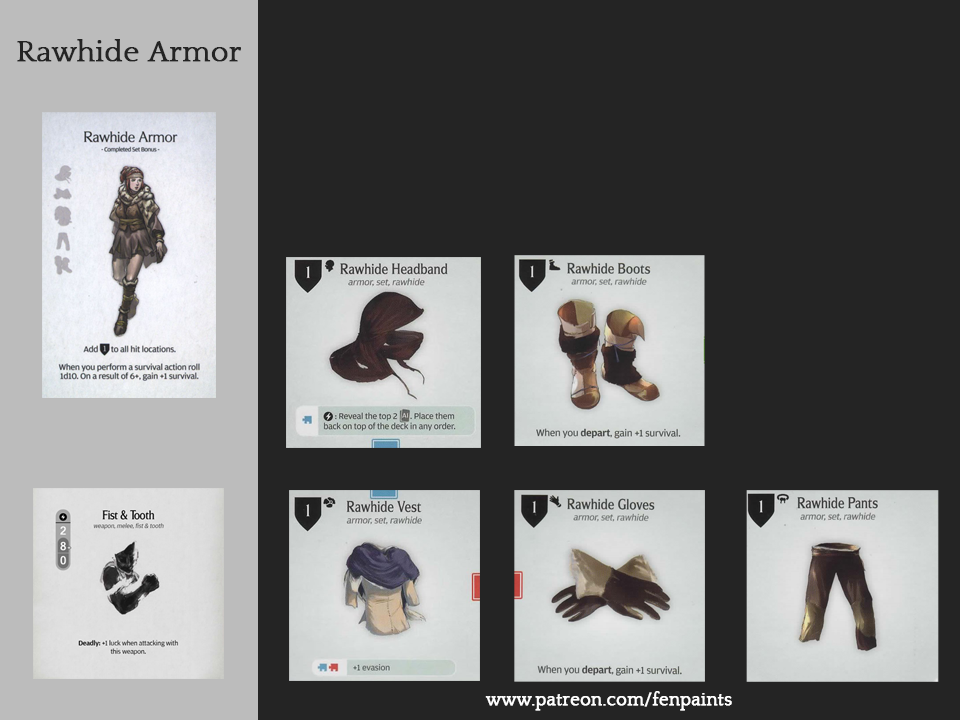
Armor is one of the things that will dominate most early game crafting and also dominate survivor's gear grids, that's because survivors have five whole different squishy locations to protect and the base injury boxes are not enough to handle the damage output from many monsters out there in the darkness. Rawhide Armor represents our baseline that we compare to all other armor sets; not only is it really cheap at 5 hide, it also has extra evasion, the aforementioned Headband, survival gains on departure, survival sustain through the set ability and that extra evasion. Everything that Rawhide does is strong and gets stronger when you gain access to more survival actions. One of the problems for other armor sets in KDM is Rawhide, it has an unparalleled level of efficiency, power and sustain that only falls off when monsters reach their second level. It's the default tanking armor in the early game, it's the default support armor set later on and it's still one of the best sets to use with a Bow. I've long felt that it deserved some nerfs, but those can only be done if many of the Node 1 armor sets are also improved enough to step into the gaps. However, newer Node 1 armor sets (Crimson Armor, Frogdog Armor) have managed to justify their existence enough to ensure that they're not skipped on the way to Leather Armor.
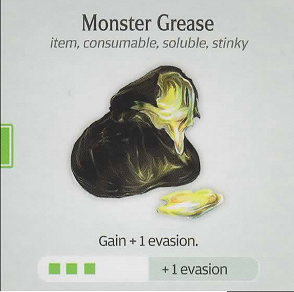
In fact, the three generic line armor sets (Rawhide, Leather, Lantern) are all so good that you can lean on them in most campaigns, which is one of those places where the game's balance has been well done. Though I do think it's worth noting that both Leather and Lantern Armor never quite reach the level of Rawhide, mostly because Leather is very focused on defense and synergies with the Leather Shield, Monster Grease and the Zanbato and Lantern Armor without a club feels like leaving value on the table.
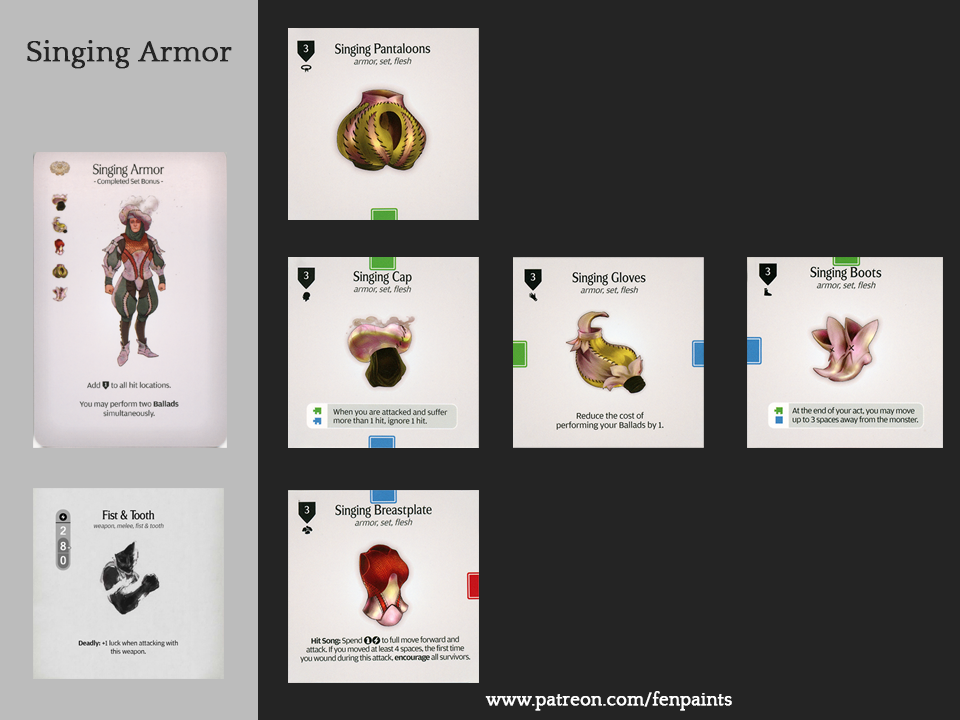
Node 2 armor sets are in a weird place, Singing Armor from the Gambler's Chest Smog Singers is legitimately great and can compete with Leather – even coming out slightly ahead which should be the case because it requires higher value resources to craft. Silk Armor is a wonderful armor set held back by requiring a L3 Spidicules kill to complete it (a bone-headed design decision that needs addressing) and Screaming Armor is very serviceable, but needs a few extra points of armor to the body and head to bring it up to match what a Node 2 Armor Set should be providing.
Node 3 and 4 armours are all in an excellent spot at the moment; Phoenix Armor remains one of the high points of that monster and works well with reach melee weapons, Dragon Armor is even better with those reach weapons, but isn't as durable as Phoenix Armor (especially when you take into account Phoenix Indomitable Patterns upgrading the armor set to end game status). Cycloid Scale Armor remains one of the most interesting melee based offensive armor sets for use with non-sharp weapons. Rolling Armor from the DBK is unique with its lack of the “armor” keyword and upgrade to end game armor via Calcification and the new Alpha Armor from the Screaming God is one of my favourite new armor sets to play with. Only King Armor is a bit off, and that's not because it is bad, it is just a bit too strong at the moment and needs a few tweaks downward in power.
Hybrid/Seed Pattern and Black Knight Pattern Armor sets are the last thing to think about, they are all incredible and a joy to include in campaigns, each one offers interesting play styles if you are willing to pursue making them. They can also be very efficient because many of them let you recycle older armor pieces into something new, Brawler Armor from the Lion Knight is a great example of this, it takes a Skull Helm you might have used in the early game and gives it new life.
Before we move on from Armor I wanted to note one quirk about armor design in Kingdom Death, armor points tend to be given evenly across all the five hit locations that survivors have, but those locations are not all equal. The Body is hit twice as often as any other location and the head is significantly more lethal than anything else. If the game was designed with this in mind then the body would get double the armor points of the arms/waist/legs and the head would get a few extra points as well. As that is not the case, we want to be spending our dodges/blocks on head and body hits more often than when they land on other locations. Rawhide in particular is great for this because you're going to get that survival from the dodge/block back half the time. Dodging body hits early in a showdown is something that can really make a difference later on.
To highlight this before we get onto the last section, consider what happens if the monster hits 30 times during a showdown and manages a perfect spread of hits based on the HL Dice probability. The average split is not an even 6 hits per location, it is instead this spread:
Head: 5
Arms: 5
Body: 10
Waist: 5
Legs: 5
That's because the odds are 1/6 for all hit locations except for the body which is 1/3 and that is rough because of armor design rarely taking this into account. I hope that helps you understand why you may see experienced players dodging body hits even if they have plenty of armor points still there. It's because the body starts with effectively half the armor points any other hit location has. I do hope future armor design addresses this, but it seems that Team Death like an even spread of armor points across all hit locations over providing armor that lines up with the Hit Location dice results.
Our final section for armor is the most exciting one, the Zero Armor or Naked Builds. Sometimes Kingdom Death throws us a real solid and lets us have survivors who can generate their defenses without relying on armor gear. The most common and powerful options for this are Crystal Skin which is gained from Mineral Gathering post Overwhelming Darkness and can be passed on to children as a dominant trait (ensuring that once you have it, you've always got it as long as you never risk your last Crystal Skin survivor without breeding offspring first) and Marrowism which is gained via the Arc Survivor Skull Eater event. There are also Leyline Walkers, but evasion is not as reliable in comparison to gaining extra soak, some Shields can allow for pseudo-no-armor builds by taking up less slots but still providing good protection (we call these tortoise builds) and there are other options out there also (Iridescent Hide, Acanthus Doctor SFA for example), so keep an eye out for them.
The reason Zero Suit/No Armor builds are so exciting is because they free up five slots in your gear grid and let you put other things in there, armor is good and has some incredible options at times, but items are frankly ridiculous and being able to add in up to 5 extra items because you're gaining your protection from sources other than your gear grid is just so very strong because it offers flexibility and utility to a degree that armor sets usually cannot get close to replicating. These zero armor sets are also the places where personal flair, expression and style can really come to life. If I'm honest, the Armor Set system is one of the largest anchors around the neck of the game, where we are slaves to getting full sets in order to unlock our bonus “gear card that doesn't sit in the gear grid” also known as the Armor Set Bonus. Having those slots freed up for anything else we desire is so wonderful and freeing.
Weapons
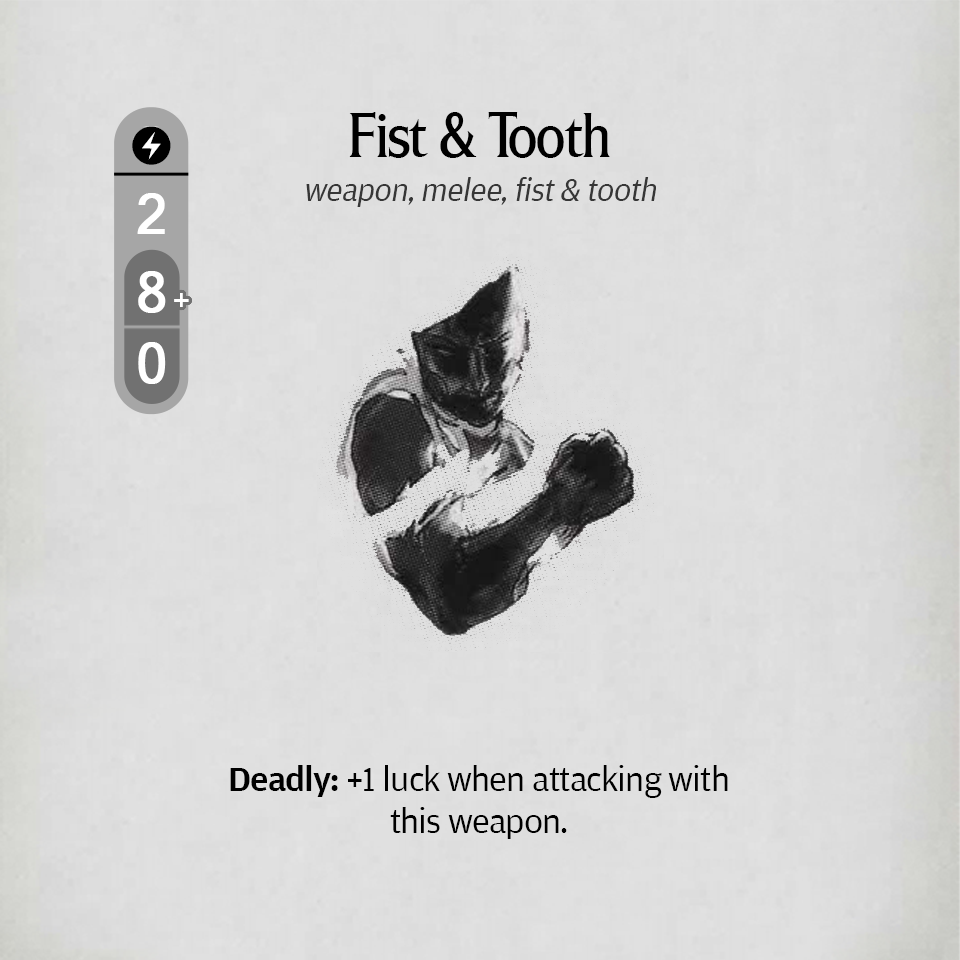
Before we get to items however, it is time to head through Weapons, by which I mean all gear cards with attack profiles, all weapons are "weapons" but not all "weapons" are weapons. This is because we have tools and arrows in the game and they often offer attack profiles without being explicitly weapons themselves. Weapons are important, because while we once again have a natural option in Fist & Tooth, we can get larger benefits by using weapons. In particular weapons offer two more “extra gear cards” in the form of Weapon Specialisation and Weapon Mastery.
However, Fist & Tooth has advantages that the natural soak of survivors does not. It is ridiculously rare for a survivor to improve their base injury boxes (once again Marrowism offers us one way around this), we're usually stuck with just those nine boxes between life and severe injuries. Fist & Tooth on the other hand can be directly improved by survivors and even items. This is because survivors are good at gaining strength and accuracy to make up for the terrible (2/8+/0) attack profile that F&T has, but it is also because F&T has the built in cheat code. Deadly. We can easily supplement that Deadly with the Luck Charm for just one organ (and some extra blue affinities) and then we're wounding the monster with Critical Wounds 30% of the time. Which nicely lets us pivot into understanding the two types of weapon; Strength based vs. Luck Based.
Strength Based weapons are the most common type of weapon we'll find in the game, they are in an arms race against monster toughness; seeking to keep up with the higher and higher toughness numbers that the various creatures in the game feature. At the moment the common cap for Monster Toughness is 30, but 25 or 27 are other numbers that some campaigns cap out at. When we are attacking monsters with strength based weapons we want our attacks to trend towards being favourable for us.
What I mean by that is, when you hit the monster, that Hit Location deck is going to try and deal punishment back at you. This is commonly done via reactions, which is something strength based weapons usually have to deal with (unless you get that lantern 10 on a critical wound). The exact mix of Failure/Wound/Reflex reactions that a monster has varies; as does their make up, but what we want to avoid is the situations where we hit the monster and it gets to hurt us without having to take wound(s) in exchange. Failure reactions are the worse case for this, we've hit the monster and hurt ourselves, nice one there Allister, are you playing for the monster team?
Wound reactions also hurt us, but we've traded blows and inflicted a wound there, so that is acceptable. Reflex reactions are always going to punish us (same with Wound + Failure on the same card), so we want to be wounding there also. This means we want our hits to convert to wounds as often as possible. The ideal number is a 2+ roll, because that is the cap due to how a 1 is always a failure. However, we don't always get what we want where weapon strength, so instead the goal is to ensure that we're wounding more often than we don't. That's where the 60% chance to wound, also known as wounding on a 6+ comes into play. That guideline, which is the bare minimum to have the wound rolls favour the survivors, is what drives weapon choices for strength based weapons and because we know the toughness values of the monsters in our campaign we can build a plan around that.
For example here is the toughness list for the Nemesis monsters in the core game (Ignoring the Hand because we don't want to lay a finger on that precious bean).
LY 4 - L1 Butcher – Toughness 9
LY 9 - L1 King's Man – Toughness 13
LY16 - L2 Butcher – Toughness 12
LY19 – L2 King's Man – Toughness 15
LY20 – Watcher First Possible Fight – Toughness 20
LY23 - L3 Butcher – Toughness 15
LY25 – Watcher Last Possible Fight – Toughness 25
LY 28 – L3 King's Man – Toughness 17
LY30 – Gold Smoke Knight – Toughness 27
So now we can work out roughly the minimum strength we want on our weapons by lantern year by subtracting 6 from that number. (Note if you're trying to calculate how Sharp figures in, it is +5.5 strength on average, so subtract an additional 5 from the toughness for a total of 11 and that'll give you a comfortable strength number to reach with sharp assisting.)
LY 4 = 3 strength
LY 9 = 7 strength
LY 19 = 9 strength
LY 20 = 14 strength (though we have assists here via Retinue)
LY 25 = 19 strength (We still have assists to this number via Retinue, but you can see how much harder it is to reach the Watcher if you delay, you really need good gear or to be desperate to do that)
LY 28 = 11 strength
LY 30 = 21 strength (There are tools to help reach this number post Watcher)
Deficits in the weapon strength can be covered for via survivor strength, innovations (Survival of the Fittest in Particular, why doesn't Protect the Young get the +1 Evasion btw?) and even items, with the Monster-Tooth Necklace being a classic example. Automatic Wound mechanics also help, with Devastating X being one of the common powerhouses because even Devastating 1 doubles the number of wounds you inflict, halving the amount of HL cards and wounding rolls you have to contend with.
Luck is our other weapon wounding mechanic and as mentioned above it is overwhelmingly powerful to an absurd degree, because it bypasses all reactions as long as the location hit has a Critical Wound to roll against we're happier with a lower success threshold. Generally the lowest number we aim for is an 8+ Critical Wound, that is +1 Luck and Deadly and Lantern 10 all combined. We would love to have more than that, but it requires access to things which are not common. We can always combo a Deadly Weapon with the Luck Charm and the natural 10 result to get to that 8+, so that's what we accept. We're also fortunate in that Luck isn't independent of strength, we can have weapons that wound on a 6+ and critically wound on an 8+ all inside the same weapon. That's why the Lion Beast Katar is such a well regarded early game weapon in the core game, it offers all of that in one package and only the Butcher is resilient to it.
In fact the only protections monsters have against Luck are the design of their hit location deck, Luck Tokens and special mechanics from traits/AI cards or similar. If you're torn between Luck and Strength weapons, always lean towards luck because it's better against far more monsters and safer.
Accuracy is a very simple weapon stat to understand, the better our accuracy, the more reliable our attacks are. We know with more confidence that a hit on a 2+ will convert into a drawn hit location than a 9+, that's just how dice mechanics and probabilities work. Of course, the important part is not just hitting, it is converting that hit into a wound, but that is the job of Strength/Luck – accuracy can get you to the door, but it'll take something else to get you past it. One interesting element of Accuracy though is lower accuracy weapons get better with higher speed, that is because when you are rolling more dice, averages come into play and you can depend on them a bit more. For a simple example, a d20 will roll any number from between 1 and 20 with a 5% chance of each. 2d10 however cannot roll a 1 or a 20 and have an average roll of 11, with the results being in what is called a bell curve. This means there's an interesting design space for high speed, low accuracy weapons as long as said weapons are good at converting hits into wounds.
Speaking of which, Speed is our next element to consider in weapons. We always have a base minimum of 1 dice to roll and the less dice we roll, the higher we want the accuracy to be. Speed 1 weapons are very acceptable if they are accurate and powerful, but Speed 2 weapons are the bare minimum preferred by most players because of the tactile elements. Roll 1 dice, now roll 2 die. The second one feels so much better doesn't it? The sound, the sensation, the way they might clash into each other when they spill across the table. It's not just a roll, it's an experience.
More dice are also less likely to create the greatest level of frustration, which is having a full miss. While I maintain that in truth a full miss is better than full hit but zero wounds, both of those results feel bad. It feels like you're doing nothing at all, which is why I prefer to advocate for weapons at the 2 to 3 speed level most of the time.
Higher Speeds are not automatically bad either, but higher speeds create higher variance, you have less knowledge or control over how much you'll hit, how many reactions you'll deal with and if you're going to hit the trap or not. 1 card is only 1 chance to get your attack nullified, 4 cards is 4 chances and each additional card has a higher chance to hit the trap than the previously drawn ones. We can however be smart with our speed, as long as we're converting them into damage, utilising them on weapons that have reaction/trap cancels (like Katar, Dagger, Spear) and are smart about attacking with high speed weapons earlier in the survivor act order, we can do that. Generally I've found that players who like more speed tend to be players of war games, especially Warhammer ones, where the sound and feel of rolling multiple dice can be exhilarating. Speed freaks are a thing, if you have them in your group it is worth working out how to play around and support them.
If you are still struggling with winning showdowns I recommend sticking to dependable 1 speed or 2 speed weapons with at least a 6+ accuracy (including the blind spot bonus), but if you do want to branch out and roll more dice, it isn't automatically a bad thing. It is instead just something you need to be careful and measured about, really good players can roll a bunch of dice and have it work out, but that's not just luck. There's experience, probability assessment and a bunch of other hidden learned skills behind things like that. It's not the number of dice, it's the intent behind it.
Our last element of weapons before we get to items is distance. Distance in Kingdom Death is a very useful tool, standing right at the edge of the monster's movement range creates opportunities that would not exist otherwise. The most obvious of these is the Dash-Cancel, where the monster targets a survivor, the survivor dashes during the flow step and the monster is locked in to following as far as it can and wasting the rest of its AI card. This is also known “kiting” in video games, where you attack from a safe distance and keep the monster chasing and that's exactly where it comes from.
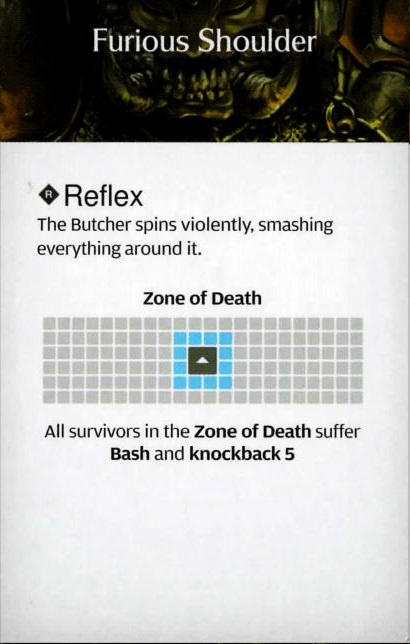
As a consequence, having distance on the monster is an incredible defensive tool, but it doesn't just end there. Being further away from the monster means it is less likely to target you, so that survivor can build with less protections and more offense, this is why Tank, Damage, Damage, Support is a successful hunt party role/class set up. Everyone gets to leverage their strengths further because others are covering their shortcomings. Being further away also protects you from reactions, Spears with Reach 2 for example are excellent against The Butcher because that monster often spins around and hits survivors within 1 space of it as a reaction. If you've triggered that with a ranged/reach weapon you get to watch The Butcher do a pretty pirouette for you without any risk to anyone.
We have three types of distance weapons, Reach, Thrown and Bows. Reach Weapons are the melee version of this and they are very powerful because many armor set “Monster Movement” set bonuses (which are very common on Quarry Armor sets) force survivors to move in a set pattern and then activate a Melee weapon (Shout out to Singer Armor because it works with Ranged as well as Melee). That's quite restrictive, but having reach allows us to attack more potential spaces, improving the utility of the armor set bonus and giving access to that value. Most Reach weapons are spears or polearms (Spear/Axe hybrid weapons), but there are also really long swords, whips, chain weapons and similar out there.
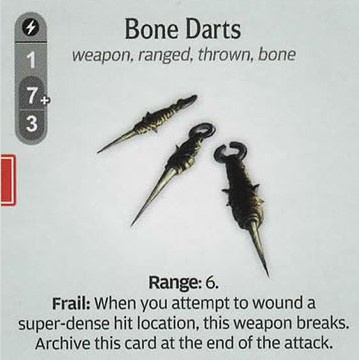
Our other options are Thrown and Bows (There is also room for Crossbows and Firearms, but they have not had much exploration yet). Thrown Weapons are very much Kingdom Death's “unwanted stepchild” right now as they are hard to find, often have lousy stats do not have a Specialisation/Mastery to pursue. I'm someone who recreationally learnt a bunch of different thrown weapons and KDM's failure to address how much of a threat skilled people with thrown weapons are has always rubbed me the wrong way. Many of the early thrown weapon designs are garbage (Spidicules Throwing Knives, Dragon King Chakram) mostly due to having terrible wounding odds, there have been exceptions like the classic Bone Darts and the modern Frogdog Acid Bombs. For the most part though, without a mastery Thrown Weapons are more of a support/temporary option but I do hold out hope that we'll see more exploration of this in the larger releases that are coming.
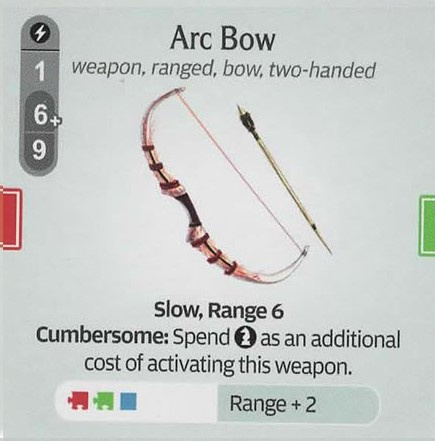
Bows are our main ranged weapon and there is really no debate, they are one of the best weapon types in the game. They feature attacking from very long distances, good accuracy, good strength, an amazing Specialisation/Mastery card and they have support from Arrows & Quivers. Arrows offer additional bonuses on attacks in exchange for a limited number of uses, while Quivers allow arrows to either get used more often or sometimes be stored off the gear grid. The largest problem with arrows is them occupying that gear grid slot for something that may not even do anything, but that is often worth the risk due to arrows having some insane debuffs they can deploy on monsters. The Phoenix Hollowpoint Arrow is a classic example of this, a hit causes the monster to get a -1 movement token. That's a hit, and if you really wanted to, you can run it with the Shielded Quiver from the Dragon King, which gives you the potential for a second hit. I've tried out all archer settlement runs before and it is a lot of fun, but it can also trivialise monsters.
The main drawback for bows is if they are long range they tend to also be cumbersome, meaning that you can't move and fire them without using a Dash to move and you can't double fire them with surge unless you're also able to dash (combining move+surge and then dash+activation to get the two shots). However, this is often compensated for via the long range that the weapons have in addition to including some utility activation gear cards like the Rawhide Headband or Cat Eye Circlet. It gives the survivor a way to generate value when they can't attack.
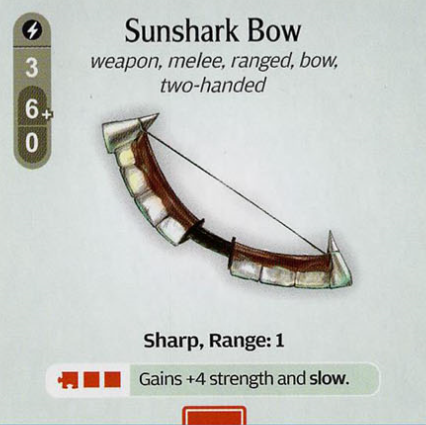
Before we move on, it's worth mentioning that there is another breed of bow that is starting to appear here and there and that is the short bow, our first one of these is the Sunshark Bow, which is a really sweet melee/ranged hybrid weapon from the Sunstalker and one of my favourite weapons. However we've started to see these short range mobile bows turn up elsewhere and the design where the bow has a shorter range in exchange for mobility is interesting, though I personally would have preferred to see this space handed to Thrown Weapons more fully.
Our last part of weapons is Tools, tools are a small subcategory of attack profile gear cards that sometimes have other uses, the Bone Sickle and Pickaxe are the first ones most players will encounter. For the most part tools are curios, things that we don't really use for combat, but there can be exceptions, especially when you have other gear cards that synergise with tools or have anti-synergy with weapons. Most of all though this area is very underdeveloped at the moment and will hopefully be explored in the future along with thrown weapons.
Items
I've left the best for last with Items. Items get to cheat the entire game because they have flat scaling, what I mean by that is an item is most of the time as effective against a L1 monster as it is against a L4 one and it takes permanent modifiers like traits or starting attribute tokens for the monster to mess with that. Items are such a broad category that it's very hard to cover everything they can or will do in the game, so instead I'm going to mention a few specific categories with some baseline examples (from the base game box if possible) but before we get into that the main things we are looking for with items are:
Attribute Boosts
Protection
Sustain
Control
In addition to those categories, affinities are something else items are great for because we're not locked into a specific group of armor cards or a particular weapon type, we have more freedom with what we add and often an item that's kind of OK or single use, can become something great because of the entire affinity system. I've written in the past about the affinity and gear system, but I will once again beat that drum here, while the structural design of the KDM gear grid is a little flawed, the overall gear system, how it operates like a tableau builder where you are constructing an engine out of 9 little cards and then combining that engine with not just a survivor, but three other 3x3 engines is incredible and the affinity system adds to that a lot.
One of the main things that makes other boss battlers and dungeon crawlers as a whole less interesting and engaging is their lack of this system. Gear Grids are not perfect, not in this iteration, but they are infinitely better than the four decade old system of two hands, one head, armor, a belt, boots and maybe some potions that other dungeon crawlers think is acceptable. It's wild how many designers have looked at KDM's monster design and adopted that only to fall over the real innovation which is the gear/affinity system. You know it is a good system when a mediocre card becomes great due to its colour, or you're scrambling through all your crafting options to try and build certain set of connections to complete some almost perfect design.
Items tend to be the glue in our builds, but that is most of the time because of the fact that two thirds of your gear grid are gummed up with weapons and armor and we're needing to find bridges to complete our luck, strength combos or perhaps even get our armor sets working right (looking at you Phoenix Armor). However, once again, when we get to the No Armor gear grids we get to see some truly spectacular demonstrations of utility, value and power.
Even just as a splash addition to a gear grid I find one or two items with activated abilities to be of immense value as they let survivors do something even when the monster is out of reach or you are in a place where you want to let the monster do a specific attack for some reason (be that the attack triggers an important story event or maybe say you want to let the monster perform a revealed attack that's soft enough that the monster is almost skipping its turn).
To focus in on the four categories I listed above, we'll look at some classic examples of each. Attribute Boosts need no reintroduction, I've mentioned them several times above, the core game offers us Evasion, Luck and Strength all in the Bone Smith. Though for some reason Strength is locked behind heat, both strength and evasion cost two resources while the strongest of the trio Luck, just requires an organ. The Frogdog completes this selection as the Turbo Tonic and Vigor Capsule give us Speed and Movement respectively. I've not written much directly about Movement here, but it is what I consider to be the “King of Stats”. Everything in KDM's showdowns is based around your position, what you can reach from where you are, extra Movement allows for you to be more threatening to the monster, more supportive of your fellow survivors and more able to play it safe. Many armor set boots offer extra movement range or other additional re-positional tools, items rarely do so because of how strong it can be.
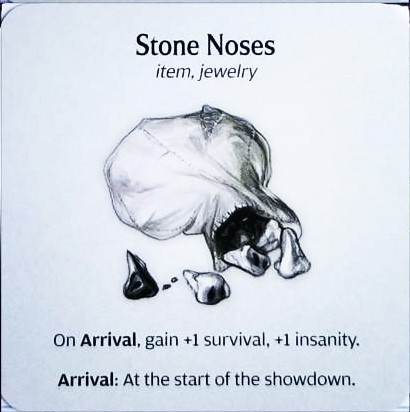
While Protection's first port of call is either armor and/or abilities/knowledges, items also offer a lot of options for protection. The 1.5 item of Stone Noses is a great example of this, offering +1 insanity and +1 arrival survival (I love saying arrival survival). It doesn't protect us during the hunt, but if we have all our survival and/or insanity taken away from us, we get a little bit back, replenishing reserves that may have been depleted by the hunt phase. It's also an incredibly cheap gear to craft as it only requires endeavours, which are the main resources survivors generate themselves. Protection doesn't just limit itself to gaining insanity or armor points (Bird Bread) though, we can also protect ourselves from the monster, with cards like Poop Make-up (aka Fecal Salve) removing the “threat” tag from our survivor and the Bloom Sphere ensuring that random targeting has to go elsewhere. These forms of protection are quite hard to quantify because they don't have numbers written on them, but they work out often to be incredibly good. The Fecal Salve is so strong vs. some monsters that you basically know that unless the survivor attacks they won't be targeted at all, leaving them free to stare into the monster's mind and control it from afar.
Another form of protection is severe injury protection, this wanders into the next category a bit, because not taking severe injuries is a part of sustaining a survivor to last longer, but I can't really mention protection without pointing at Dried Acanthus, and that not only protects your survivor by giving them a one time 'not today' against a severe injury, but it also provides more survival on departure, which can allow for survivors to be more mobile and explosive in their damage through survival actions.
Sustain itself is a very interesting part of KDM, there has mostly been an explicit drive to keep healing to a minimum in the game and that is very understandable. If you have easy access to healing, it deforms the game around it, lengthening encounters with enemies and turning every battle into an endurance marathon or war of attrition. However, we do have access to a lot of survival gains, while nothing comes as close as Rawhide's potentially infinite pool of survival, we do have all sorts of interesting little ways to sustain our survivors for longer. Sometimes this is baked into armor sets, for example the Screaming Horns can activate to give everyone +1 insanity as long as they're not already insane. The White Lion's Frenzy drink can give a survivor a burst of insanity (plus strength and speed) at the cost of now being Frenzied, which can be a life saver against a monster that deals a lot of insanity damage.
Bandages and other forms of bleed control are one of the most obvious places where survivors are sustained. Bleeding is a form of instant death that doesn't care about armor points or severe injuries. You get that final bleed token you are done. As both monster attacks and severe injuries can both create bleed tokens having a constantly available way to remove them is incredibly useful. Bandages not only do this, but they have great affinities that are useful, meaning even when they're not stopping someone from bleeding out they're contributing to other affinity abilities in the gear grid.
We do also have direct access to healing as another form of sustain though it is incredibly rare and usually requires leaning into acanthus in some form or another. We had a bit more of this back when Screaming Armor generated acanthus as terrain, but we can still pull tricks like that with Satchels from the Flower Knight and the Screaming Antelope Knowledge “Herb Grinder” to generate the Acanthus and Screaming Armbands for the roll bonus. So while sustain more often leans into ways of creating/generating/replenishing survival, it can be armor points at times.
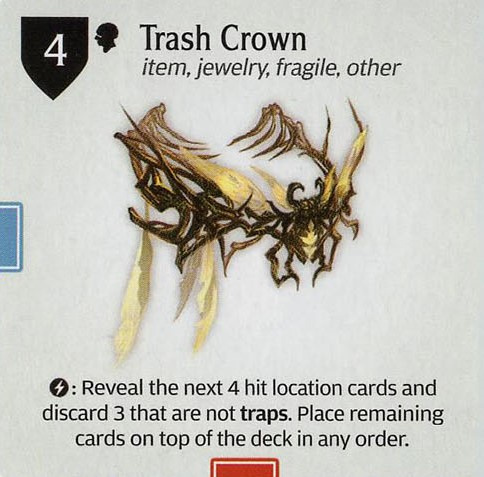
Last of all in the gear category we have the big one, control. Monster control is something that one can do without perfect information as learnt positioning and ordering of who attacks when and what order to select Hit Locations in is a huge skill in this game but nothing is as good as cold, hard information especially when learning the game or fighting an unfamiliar monster. You may find that the play patterns of hard control are not something you enjoy, but that does not mean you should eschew the headbands, potions, crowns and circlets completely. Just having them available for key moments where perfect information can make the difference between life and death is a huge safety cushion to have and they are rarely wasted slots because most of them offer affinities to unlock affinity abilities elsewhere. There are also some tasks, such as turning a Spidicules into a ball, that are ridiculously chance based if you are not using Hit Location Control, the difference between doing that task with a Circlet or Trash Crown (Dung Beetle Knight) and without is massive.
It's also worth mentioning that even if you don't want hard HL control, there is soft HL control on gear in the form of reshuffles, reaction cancels and spear/blue charms providing trap lancing. The Phoenix Crest Crown for example provides a reliable shuffle whenever you need it and because a reshuffle of the HL deck in KDM means the deck and discard combined (unless you are told differently) that means you can put all the hit locations you've already seen back into the deck and reset the odds of hitting undesirable locations. You won't be able to measure the results directly, and you'll certainly notice the times that you shuffle the trap onto the top of the deck, but overall it will have an impact.
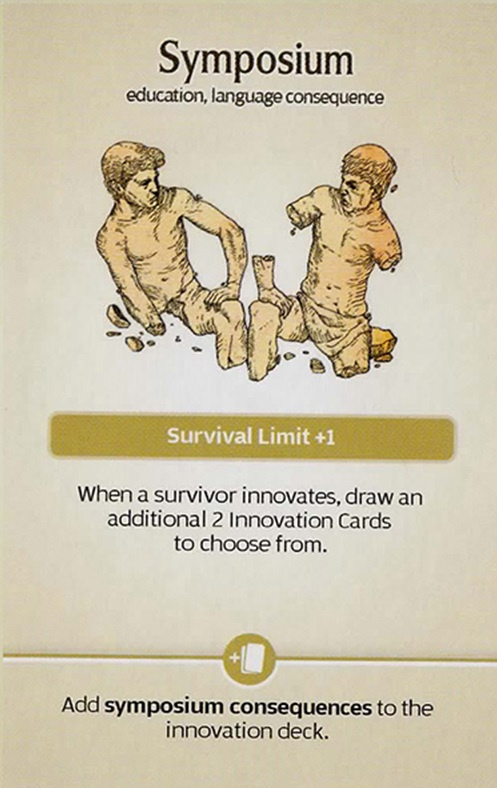
One of our advantages over these monsters is having access to a wide range of tools that can be used to solve problems. These tools (and language) are something that's allowed humans to emerge as the dominant species on Earth and they can do the same for your settlements.
It's not gear related, but I'd also like to briefly mention a very helpful game plan rule to follow, which is when you are ahead in the showdown, when the monster has lost a lot of its life and the players have plenty of armor points to soak, it's worth playing safe. Not letting the temptation of a risky move bait you into leaving the wrong survivor in the wrong place can save lives. The flip side of this is if you are behind, aggression and taking risks becomes more viable because you many be in a position where you need that epic moment to secure the win. Survivors start a showdown from a position of strength as they have the number advantage with more units and often more total soak. Survivors also do not lose options as fast as monsters because monsters rarely break gear and their disabling of various survivor elements leans on either mechanical gimmicks or severe injuries. Rotating a survivor who is at risk of death (low head/body armor is a key indicator here, but 4 bleed is another one) and moving them out of the fight so their healthy compatriots can close in the kill may feel like a waste, but it's not a waste to preserve your numbers and resources. This goes double for monsters that scale up in threat if they get kills such as The Butcher.
Finally before we move onto Innovations, there is one other small area to consider and that is Material and Affinity Synergies. Material Synergies are not well explored at the moment, with the main material one being bone synergies, but they are something to watch out for, affinity synergies are something else that's somewhat adjacent to them. The main driver for bone synergies is the Stone Circle's Bone Necklace, but also Marrowism by theme naturally leans into it a bit also. For affinity synergies the classic examples are Saviours and Acanthus Doctors, but the trio of Barber Surgeon charms also offer build arounds in exchange for providing a lot of synergies.
While the Blue and Green Charms are both clearly stronger than the Red Charm, there are still benefits to the Red Charm as you get to ignore a weapon's strength (and luck) in exchange for accepting a coin flip chance of wounding – that does mean some weapon you're fixated on, but can't make work because it has the offensive power of a wet noodle can find a home if you're able to make your gear grid red enough. Affinity and material synergies can be fascinating because they sometimes offer good enough rewards that you're willing to accept just “Clothed & Satiated” as your armor set bonus in exchange for other rewards that come from unusual combos.
Innovations & Endeavours
Last of all in this Primer we have Innovations and Locations, there are a number of skills involved in gaining and using Innovations and a lot of it comes down to personal style. However just understanding the basics and following them can go a long way towards victory. Innovations are very powerful, they are how we gain access to additional Survival Actions, passive attribute boosts for newborn survivors and a host of temporary benefits such as armor points, healing broken bones and so on.
To start with the basics, the Innovation deck game is a simplified deck builder/tech tree. We start with six possible options in the deck and as we pick them they will impact on the deck size. In general terms they'll either inflate the size of the deck, maintain it or reduce it. So learning how many cards will be added to the deck if you pick a certain card is very useful, this exact number changes depending on what expansions you have picked up and what monsters are in your campaign, but there is zero shame in looking at the number of cards a given innovation will add. You'll know immediately if nothing new is added in because the card itself will not have any consequences text, so one trick is picking cards like that to thin the deck. Be measured in what you grab, especially if you've played a lot of campaigns previously and you're past the “mystery surprise” part of the game loop.
Another useful element of innovating is to have a goal in mind, certain cards offer huge benefits that are worth scooping up as early as possible. Symposium is the number 1 pick if you see it because it allows you to see more Innovation cards in each future innovation. More options means a higher quality of innovation for the rest of the campaign.
Drums not only has an incredible Secret Fighting Art attached to it in the form of Synchronised Strike but it also leads to Saga, which jumpstarts the development of all new survivors. Inner Lantern and Paint are both survival action innovations, so very high picks, but Paint also leads to Face Painting which is a key tool for population growth and Inner Lantern leads to Shrine which allows for the exchange of an endeavour for a lot of armor points. Even Hovel leads to Bed for healing broken severe injuries and the incredible Clan of Death.
All of this means that once you are past exploring the game mechanics to find your preferences each innovation you activate should have a goal in mind. “I'm innovating to try and get more Survival Limit or Departing Survival” is much better than “Lets push the button and see what we get.” There's always an interesting push/pull between Survival Limit increases and Departing Survival bonuses, you need to try and increase them in tandem, so that's one simple goal you could have. Lots of survival really turbo charges survivors in the mid to late game.
“Free” Innovations are another thing you should keep your eye out for, the Gorm and White Lion are notorious for providing free Ammonia, but that's not the only place, for example, while it is expensive, the Weapon Crafter gives us a direct way to innovate Scrap Smelting and thereby get future access to the Blacksmith settlement Location. Watch out for these Special Innovates, they are great and worth paying a premium for when you've reached the part of the game where resources feel abundant.
While we are on this part about innovations, we'll quickly retread the old “controversial” Skip Innovating early on. Innovating is a very expensive activity as it costs 4 total resources (I count endeavours as a resource), that's a third of everything you bring back from a successful L1 hunt. Early on that number represents a stone noses, a bone weapon, a piece of rawhide and a utility item, you've got a total of 36 gear slots to fill up during this part of the game, so you're paying a significant price if you innovate early on. My default position is to skip innovating in lantern year 1 and then start in lantern year 2 onwards. It's worth noting that this is absolutely a play style choice, there is a perfectly valid path in pushing for getting Dash and Surge as soon as possible, but that route is more challenging and has a higher chance of failure. I prefer to smooth out variance where possible, but it's not the “one true way”, you'll find what works for you as you play. I do recommend taking a gear focused early game for newer players because gear translates to a raising of power across all avenues and pushing the floor of your power level up is really helpful for reducing the chances of failure and survivor loss. Gear does that.
If you're concerned about missing out on that innovation, never forget that you can innovate in the years after a nemesis monster has turned up, you simply have to set it up in advance by storing the resources (watch out for nemesis monsters like The Butcher if you're not confident in a win). This can allow you to “catch up” or even get ahead of where you would have been otherwise and it's a lot easier to do when your gear is working for you and securing kills.
In respect to endeavours and what to do with them, one of the biggest skills in this area is understanding which ones to click and how to click more of them. A major goal during the settlement phase is triggering Bold and Insight on survivors, this is because they gain the Matchmaker and Tinker ability respectively, meaning they either give you direct access to Intimacy without rolling for Augury/spending Love Juice via Matchmaker and generate an additional Endeavour via Tinker. Once example for making Tinkers is if you've innovated Saga an newborn survivor has 2 Understanding and they can gain a third one by rolling “badly” on the Organ Grinder's Augury table and spending a resource. There's a similar route with Saga plus the Weapon Crafter's Scrap Gathering though you need to roll a 10 to achieve that. So be on the lookout for ways to gain Courage/Understanding during the settlement phase because the rewards are so great.
Endeavours are such a potent resource for players to utilise, they can become population, new fighting arts, attributes, even gear. So like everything above have a goal and purpose with them, take your time in the settlement phase and consider what you want to need to move forward and upward. I've mentioned a bunch of personal favourites but to quickly run through a list I greatly rate Bed, Partnership, Drums, Forbidden Dance, Shrine/Sauna Shrine, Scrap Smelting, Nightmare Training, Black Mask, Settlement Watch (Protect the Young settlements), Choreia, Round Stone Training, Petal Spiral, resource/gear generating endeavours and of course Cooking keeps getting better and better over time as we get more and more recipes.
Lumi
As Arc Survivors are now a thing I'd be remiss if I didn't also have a section about Lumi economy. Survivors are the source of Lumi, and for the most part they generate it rather slowly at a rate of 1 Lumi per rank gained. That is quite slow, but there are plenty alternate ways to bolster this, with a basic one being Saga + Newborns, they immediately adopt a philosophy and have that single point of Lumi available even if you're not going to use them for anything right now. There are also Lumi generating Philosophies, with Romantic being the leader for that, but there are also some philosophies that generate higher Lumi gains on rank up and occasionally you get the ability to pick up a 0 cost knowledge and gain 1 lumi “refund” aka free money!
The forum provides a bunch of places where we can spend this Lumi, one of the major projects worth investing in is setting up a Shadow Caesar, which is a survivor who reaches Rank 4 in Survivalism without leaving the settlement. This has a whole bunch of benefits including being able to send out survivors who normally would not be allowed to depart for various reasons. Also having a good spare bit of Lumi on survivors means they can jump on good Knowledges when they see them in turn up in the forum options. The system as a whole is far more complicated than that and I'm still working through all of the intricacies via the philosophy series of written articles and
Closing Thoughts
I hope all of this is of some help, it's not comprehensive and it doesn't cover all the wide range of different play styles one can adopt, but if I was going to boil it down to some key points they would be:
Early on Gear protects survivors who generate resources
Mid Game onwards innovations become powerhouses
Saga + Clan of Death good as are Survival Actions, but Drums and Symposium are the king and queen of the early picks.
Luck/Deadly are "cheat codes"
Monster Control is good even if you don't use it every turn
Don't be a hipster when you're learning the game
The Settlement Phase has a lot more to it than is first apparent, expect to spend more and more time here as your settlement develops
Have a long term development plan for the settlement and try to stick to it!
Last of all, don't beat yourself up if you screw up the rules, outside of a fully automated version of the game that enforces all the rules you are going to miss things, we all do. Perfect play isn't worth as much as having a fun time and be kind to people who record/stream the game, their attention is always split which means they will also make mistakes. It's a game, not even a competitive one, so be kind to others!
Files