Home

 Creators
 Search
 Recent
 Random
 Posts
 DMs
 Tags
 Random
 Importer
 Import
 FAQ
 Account
 Register
 Login
 Favorites
 Keys
 Logout
 Telegram

Efficient Farming of the Antelope (Patreon)
Content
As a part of the Screaming Armor review I had some requests to talk about how to farm the antelope as efficiently as possible and I said I would provide either a written guide or a video for it. I looked at things and decided I didn't want to do a video, in part because I do not convey myself as well in spoken situations as I do when I write; but mostly because no matter how perfect your strategies are in a game with dice and random draws sometimes the game just foils what you are trying to do.
No plan survives first contact with the dice!
With that in mind here is a written and picture guide for how to farm the antelope along with an additional section at the end which explains the rare circumstances under which you can do it with the White Lion and the Flower Knight. I have additionally made this post public in the hopes that it reaches Adam and his design team so they can ensure that none of the new quarry monsters are designed with the same flaw and maybe even 'patch' the three who have this exploit in them.
(All screenshots are from Arbie's (RB) tabletop simulator version of the game, this is the best version in my opinion, it has the CE elements and not too much annoying scripting. Highly recommended).
Goals:
Farming the antelope over and over is one of the strongest routes to success, this is because its armor and blood paint are two of the strongest parts of the core game load out. Screaming Armor is literally the best generic armor set for using most weapons with outside of Cycloid Scale Armor. Blood paint fuels an entire pair of unique weapon classes (Bruisers and Dual Wielding DPS), both of which can provide a massive amount of power and utility for a group of hunters.
Strong foundation gear for a settlement is important, because it allows you to take additional risks in the mid and late game or go after weird and fun builds that normally you cannot pursue if your settlement is struggling. So getting one or two suits of Screaming Armor is a massive boon for any group of players.
However, we do not want to spend years and years and years hunting Screaming Antelopes over and over. This is a boring exercise and reduces variety in our games of Kingdom Death. So instead, specifically farming everything you need from the Screaming Antelope early on, by dragging out the fight, allows you to both reduce the amount of times you fight the Antelope to between two and four (depending on if you want to fight an L2 for Pottery -> Barber Surgeon or an L3 in People of the Sun); and it allows you to turbo charge your settlement's early development by giving you a big base of resources to turn into weapons and armor.
Set up:
The stats of your survivors on the whole do not matter that much here. You can perform this task with a bunch of newbies as long as your gear load out is correct. I'm going to run through each survivor, talking about their ideal load out and also mentioning the various additional options you can have for the fight. This can be done with the core game gear only, but I will be highlighting the Gorm build variants because of how much more efficient the situation becomes when you play with the Gorm.
Tank
I've written before about why tanking is so important in Kingdom Death, it's not a glamorous job, but successful settlements always have one or two survivors built to take hits.
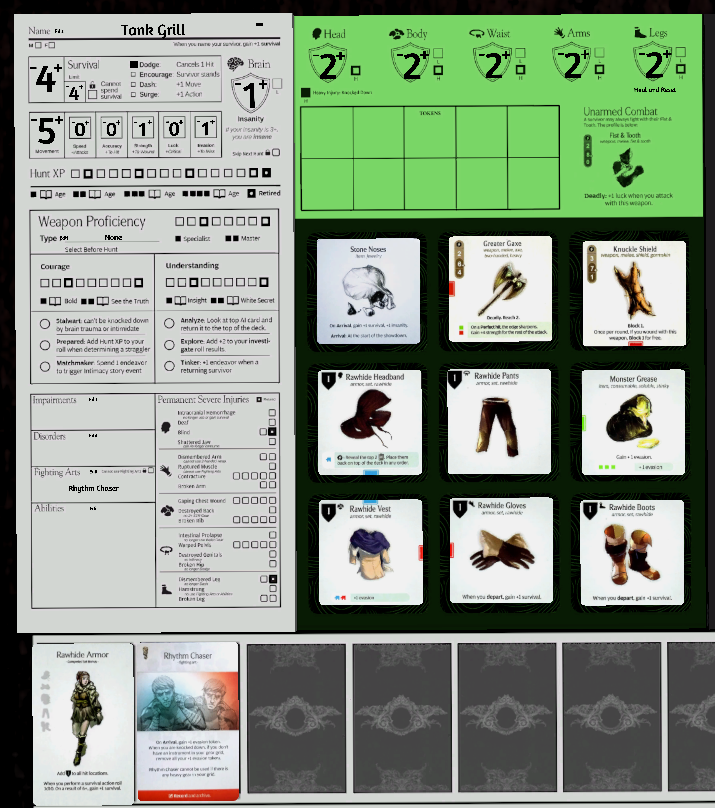
Here is our optimal, but easy to make, load out for our tank:
The tank absolutely wants to have full Rawhide and monster grease because this combination means that you will reduce a lot of the hits that you take from the antelope. Additionally, being smart and innovating Drums early gives you access to Rhythm Chaser, which I have shown in this build for demonstration purposes only (Yes I am aware it does NOT work with the Greater Gaxe. Do not write that in the comments), if you do not have access to the Knuckle Shield you are going to want to use Rhythm Chaser.
The Tank's job is not to attack, they are simply there to AI manipulate and take the hits. However, you may want them to be able to trigger the trap in order to refresh the hit location deck. The Greater Gaxe is an awesome option here because it is a reach 2 Deadly weapon. This is super relevant as an emergency back up weapon, but it is not required.
An alternative Core Game only tank is:
Full Rawhide + Monster Grease + Catgut Bow/Bone Darts + Stone Noses + Flex choice
This is because your tank does not care about scoring wounds at all, they only care about keeping the attention of the antelope on them. The tank will generally go last, and if they are AI manipulating they will do that then position so the Antelope comes at them. If they are Blocking with a Knuckle (or Leather) shield, then instead you will want someone else to AI manipulate and then you will move to the appropriate position and Block 1.
Support/Control
Supports are the second vital part of any successful hunting party, and normally they are a hybrid class that deals occasional damage. But when you are farming in this specific situation you absolutely do not want them dealing damage - with the exception of when you have the Flower Knight available and I'll write about that in the alternatives.
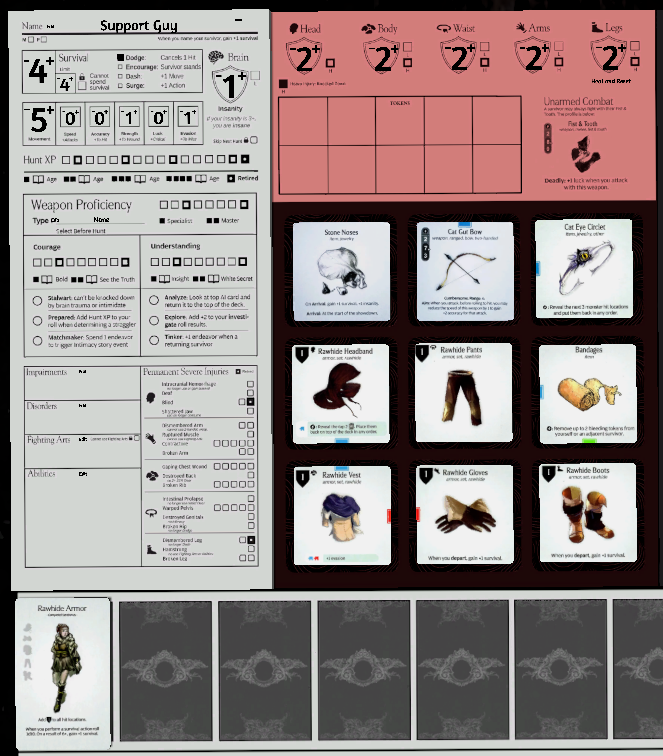
The support is the second most important part of any hunt party, and they will get the second set of Rawhide Armor - especially if you have Surge innovated. Their job primarily is to use the Cat's Eye Circlet to rearrange the hit locations so that the ones that can be critted for a benefit (to either remove them from the deck as a persistent injury or create resources) are available for the two remaining survivors to attack.
The support has a Catgut Bow to allow them to shoot the trap when it is time to trigger it (see Trap section below), but you will notice that they have a lot in common with the alternative tank build.
Alternative options for this survivor include putting monster grease and a shield on them so they can play tank once the first tank is worn out and giving them a King's Spear instead of a bow.
If you are pushing things early, you do not have much rawhide and you do not need the very optional Surge - you do not need to give the rawhide to the support, they just need a headband to combine with the bow and a Fecal Salve so they can make themselves not a threat (which will stop a few of the Antelope's targeting choices).
If they are unarmored; it is very important that the support is never the furthest survivor away from the Antelope, they should be standing at the same distance as at least one other survivor. Sometimes the Antelope targets the furthest survivor, and in that case you want it to go elsewhere, so pay attention to positioning.
Damage Per Swing (DPS)
You will have two of these, and there is a lot of flexible options for them as long as you ensure a few key things.
Always have a Deadly Weapon
Always have an active Luck Charm
Try to have some protection
Lucky us Rawhide + other early game gear easily achieves this, it's funny how powerful Rawhide is eh?
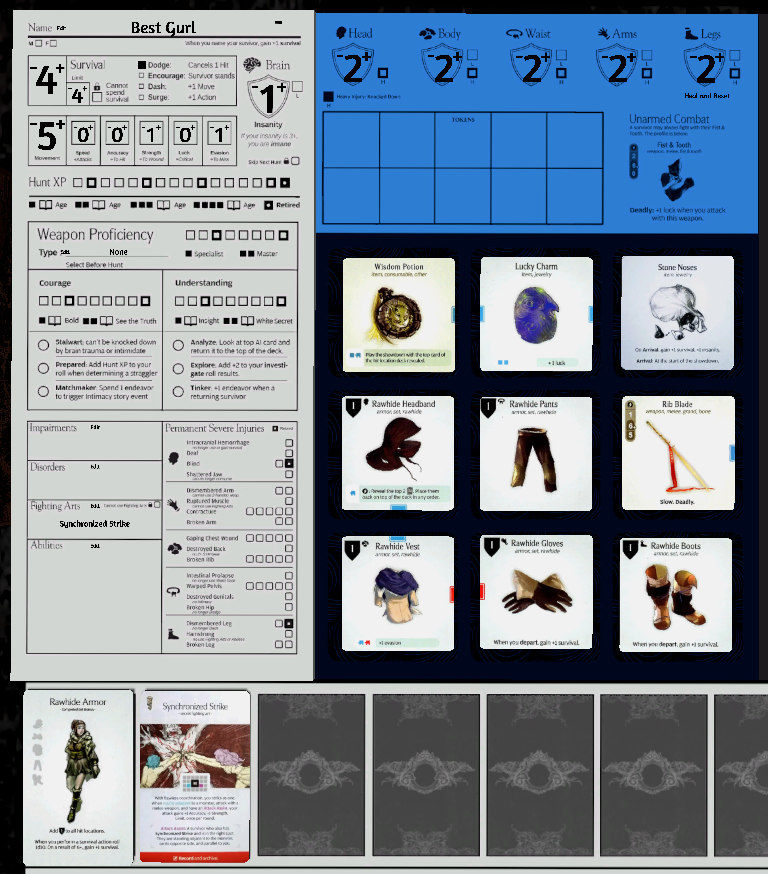
Here is one of my preferred Gorm based DPS farming Builds.
This set up ticks all the boxes because it even provides a form of Hit Location scouting in the Wisdom Potion. When combined with a slow weapon, this reduces the load on your Support survivor, so they can concentrate on AI manipulation instead (which prevents so much damage). However, there are many other options and this second grid will demonstrate that:
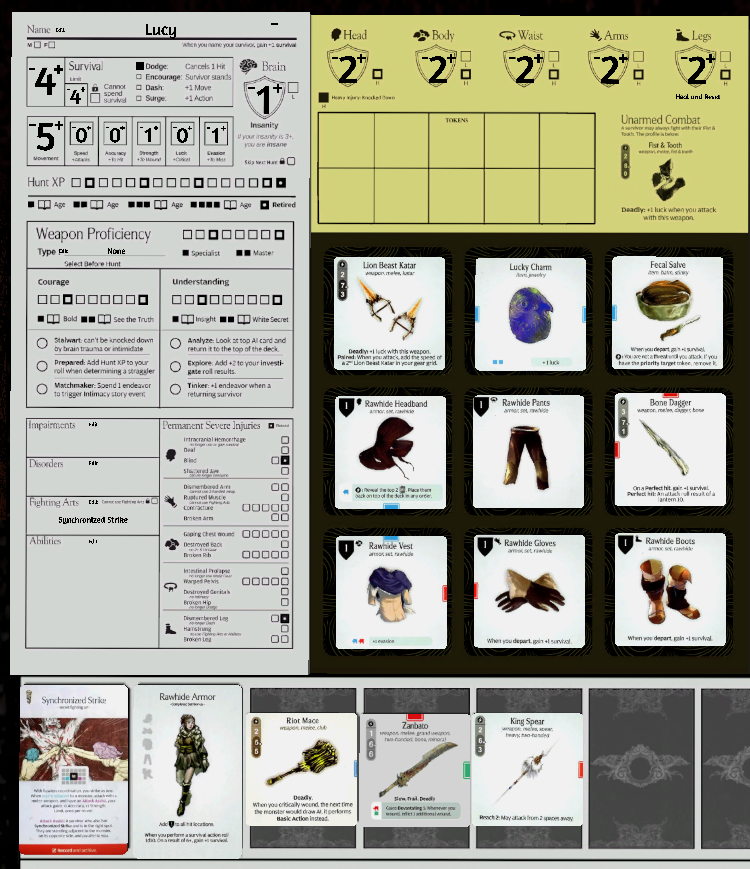
This survivor is loaded out for core game (and also we have 3 gear cards at the bottom I want to highlight). They have the deadly + active luck charm, and also they have Synchronised Strike, which is from the Drums innovation - just get it already. Additionally they have a bone dagger in their gear grid, which is used for "sweeping". Sweeping is where you use a trash weapon (low strength, relatively high speed) to get rid of hit locations that you have no desire to hit. I wrote about this in the article on Spidicules last week.
The three weapons below are other options you can use. The Zanbato is the best choice from the core game for this job, and it's a very cheap weapon to make, so in an ideal situation you would have 2x Zanbato instead of the Lion Beast Katar.
The King Spear is an alternative "sweeper" that also allows you to also trigger the trap. This is good for a DPS survivor to use because if your tank is going with Rhythm Chaser, they can't wield the spear because it's heavy.
Finally I wanted to mention the Riot Mace because it's a weapon that you sort of can't use, or you can only use it in very specific circumstances. It looks like it should be ideal, because it's a deadly club and the antelope has a weakness that gives clubs extra luck. But in truth it's not, because the club bonus locations generally do not yield resources and additionally it triggers the antelope's basic AI action.
So now we know our players, understand their gear and why they have what they have (plus you can see how cheap it is to build a lot of this stuff). Let's look at how it's done.
The Plan
Set up
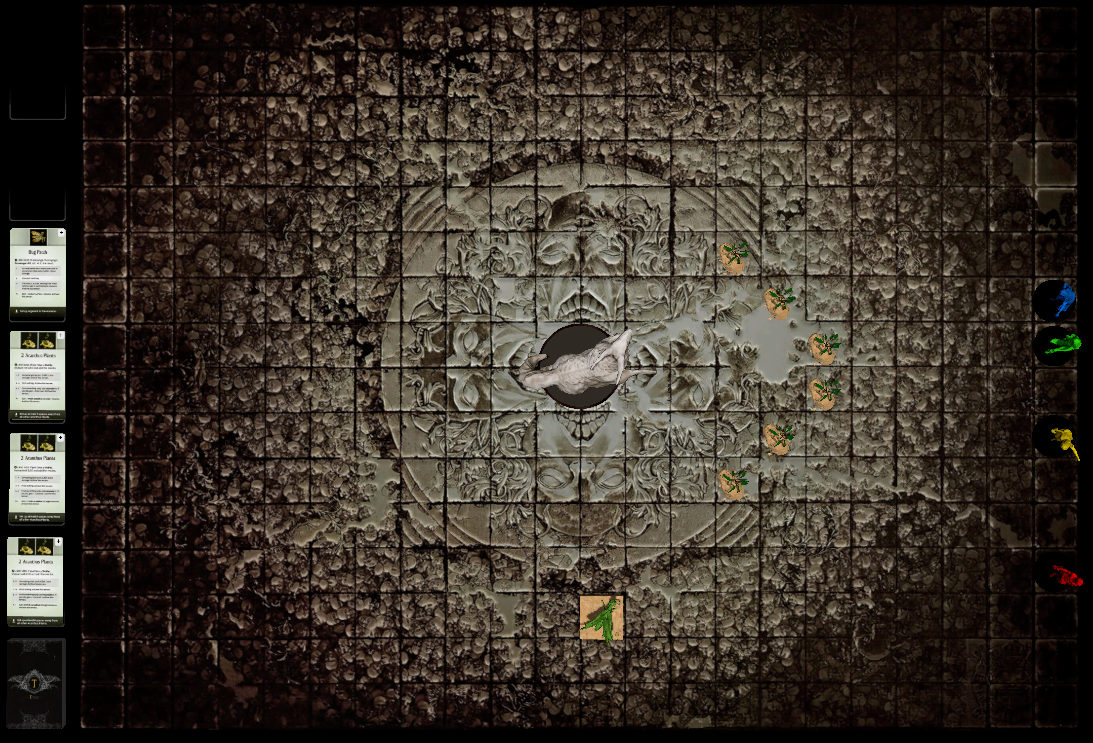
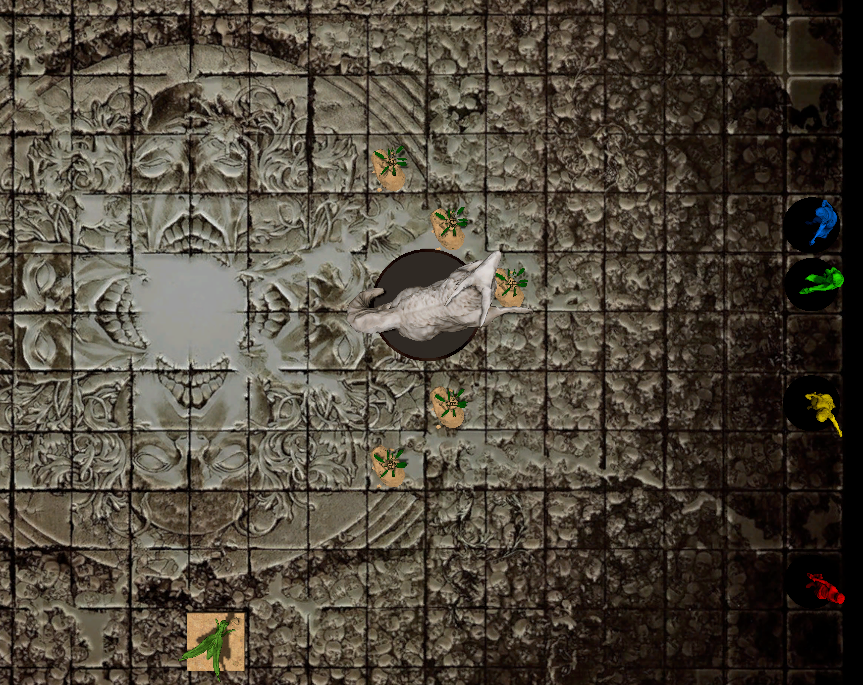
The way that I deploy when I set up for the Screaming Antelope is pretty much locked in stone now. This is it (excluding the impact of the two extra random terrain that you draw). I always set up on the right hand side because the Bug Patch is one space closer (and you want to grab that bug patch) and I deploy all the Acanthus in a V like this, which is where I intend to fight.
The support is far enough away that they are not in range of the Antelope (14 spaces) so they will not be targeted on the first turn, and the Green Tank is the nearest target. If the support has rawhide and the DPS do not then the Support would be in either the Yellow or Blue position.
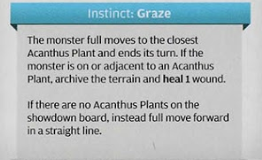
Typically on the first turn the Antelope will graze, which is unfortunate, because we want to protect the Acanthus for our farming purposes, but that is something you do not have control of. Sometimes you'll get lucky and the antelope will Stomp or similar, but most of the time it'll end up in this location
So we have 5 Acanthus Plants to use for this fight, and our tank is in range for the antelope's attention, where they will remain for the entire fight.
I'm not going to go into the Antelope's AI in a large amount of detail here, we've done that in the Great Game Hunter's podcast, and additionally you should be using AI manipulation on it after the DPS characters have attacked. Your turn order typically is:
1. Support HL Manipulates to try and put resource generating locations on top
2. DPS Survivors attack resource locations or sweep others using either the King's Spear, Bone Daggers or similar.
3. Tank AI Manipulates and then positions accordingly.
This order can vary depending on circumstances, but it's the main one that works. Positionally, your DPS survivors will be one on either flank and the tank will be in the appropriate target position. The support usually will be heading for the Bug Patch to collect it, and outside of that they can be anywhere on the board - further away if they are not the tanking flex, closer if they plan to take over tanking.
So, there is one AI card in particular you are looking to manipulate, and the Screaming Antelope is generous enough to have two copies of it in its pool of potential AI cards - this is:
This card allows the antelope to exchange 1x acanthus for 1 to 5 additional wounds. That's potentially +25 chances to score wounds that will result in critical hits, typically it's more likely to be 12-15 extra wounds, but if you are paying attention, that's still going to allow you to get close to draining the HL deck.
Also, Chow Down sits on top of the AI deck without being a duration card. This means you can move it down one with an AI manipulation, then use a slow weapon to score a wound, move it down another one with a second AI manipulation and continue. Essentially you can 'save' the Chow Down until the Antelope has taken at least 5 wounds and ensure that you have the potential to get maximum returns from it.
If you screw up, eventually the antelope will have no AI cards left in its deck at all, they have all become wounds. At this point it will perform its basic action, which is normally going to be it's instinct (please don't have knocked down survivors at this step), and grazing will heal it up. If you go with this method you can get 5 extra wounds onto the monster, which is a way of converting 5 acanthus into 5 Screaming Antelope resources.
So it is this combination of Graze and Chow Down that allow you to give the Screaming Antelope a massive amount of additional wounds; far, far more than it should really have for a monster of its difficulty, and you then get to convert those wounds to additional chances at extra resources.
This means that typically, with the aid of the 4 antelope resources you get as a reward, you can drain 80 to 100% of the resource deck (depending on chance), which means that hunting the L2 or L3 antelope is grossly inefficient at the risk vs. reward level in comparison.
Spend a few years really pruning an antelope for all its parts and you can then ignore that part of the game forever and get on with battling Sunstalkers, Dung Beetle Knights and the Dragon King!
Flower Knight & White Lion
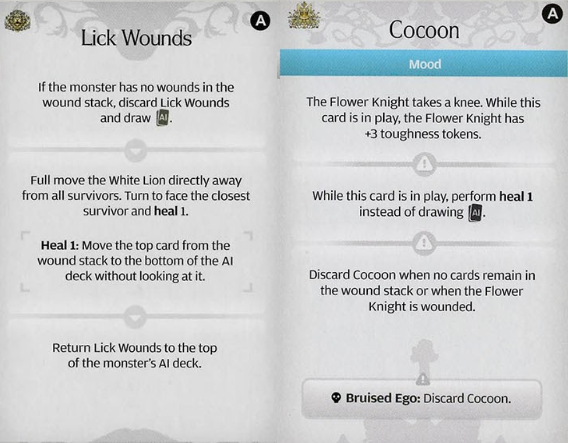
These two are the other candidates for this process, but you have a lot less room for error, and sometimes the monster will just not give you want you need. The two 'Chow Down' equivalent cards are:
You do exactly the same process with Lick Wounds (moving it down each turn to protect it until it's the last AI card left in the deck and then you let the WL heal up fully), and because there is no limit to the amount it can heal, you can farm the entire resource deck with enough time and control. Lick Wounds is infinite healing if you are patient enough.
The Flower Knight one is easier to use, it just gives you access to a full heal and then discards itself, where it won't be removed by attacks for a while. However you absolutely need to avoid causing the Bruised Ego persistent injury, so watch out for that. Again when played correctly you can farm the entire Resource Deck from the Flower Knight.
The advantages of these are that the White Lion is easy to control because of its predictable targeting, while the Flower Knight is the weakest monster in the game and it gives you luck tokens like they are going out of fashion. So it's super easy to farm as long as you don't bruise it's ego.
Summary:
So, you are now prepared to keep an eye out for these opportunities. Exploiting situations like this can turbo charge your settlement - a little bit of boring farm gives you a wide world of fun later on.
Additionally, I must stress to budding designers and to Adam's design team as well. Do NOT print self healing cards for quarry monsters (nemesis monsters are fine if they don't drop resources on crits), players will find a way to exploit the heck out of them. This is one of the reasons why I will be returning to revise the Black Lion (though the Black Lion only drops basic resources on critical hits, so it's not as bad)
NOTE: I am not here to discuss if this is 'interesting or boring' just to spread the word and mechanics of this strategy to people so they are aware of it. I will be deleting comments of that nature, we're not here to debate if it should be done or not. It can be done and there is no stigma for doing this or not doing this.
Files