Home

 Creators
 Search
 Recent
 Random
 Posts
 DMs
 Tags
 Random
 Importer
 Import
 FAQ
 Account
 Register
 Login
 Favorites
 Keys
 Logout
 Telegram

Restoring a doll's hair - With a short tutorial (Patreon)
Content
Hello everybunny!
While we finish working on a secret commission and other pending work, we’ve wanted to make a different but interesting post!
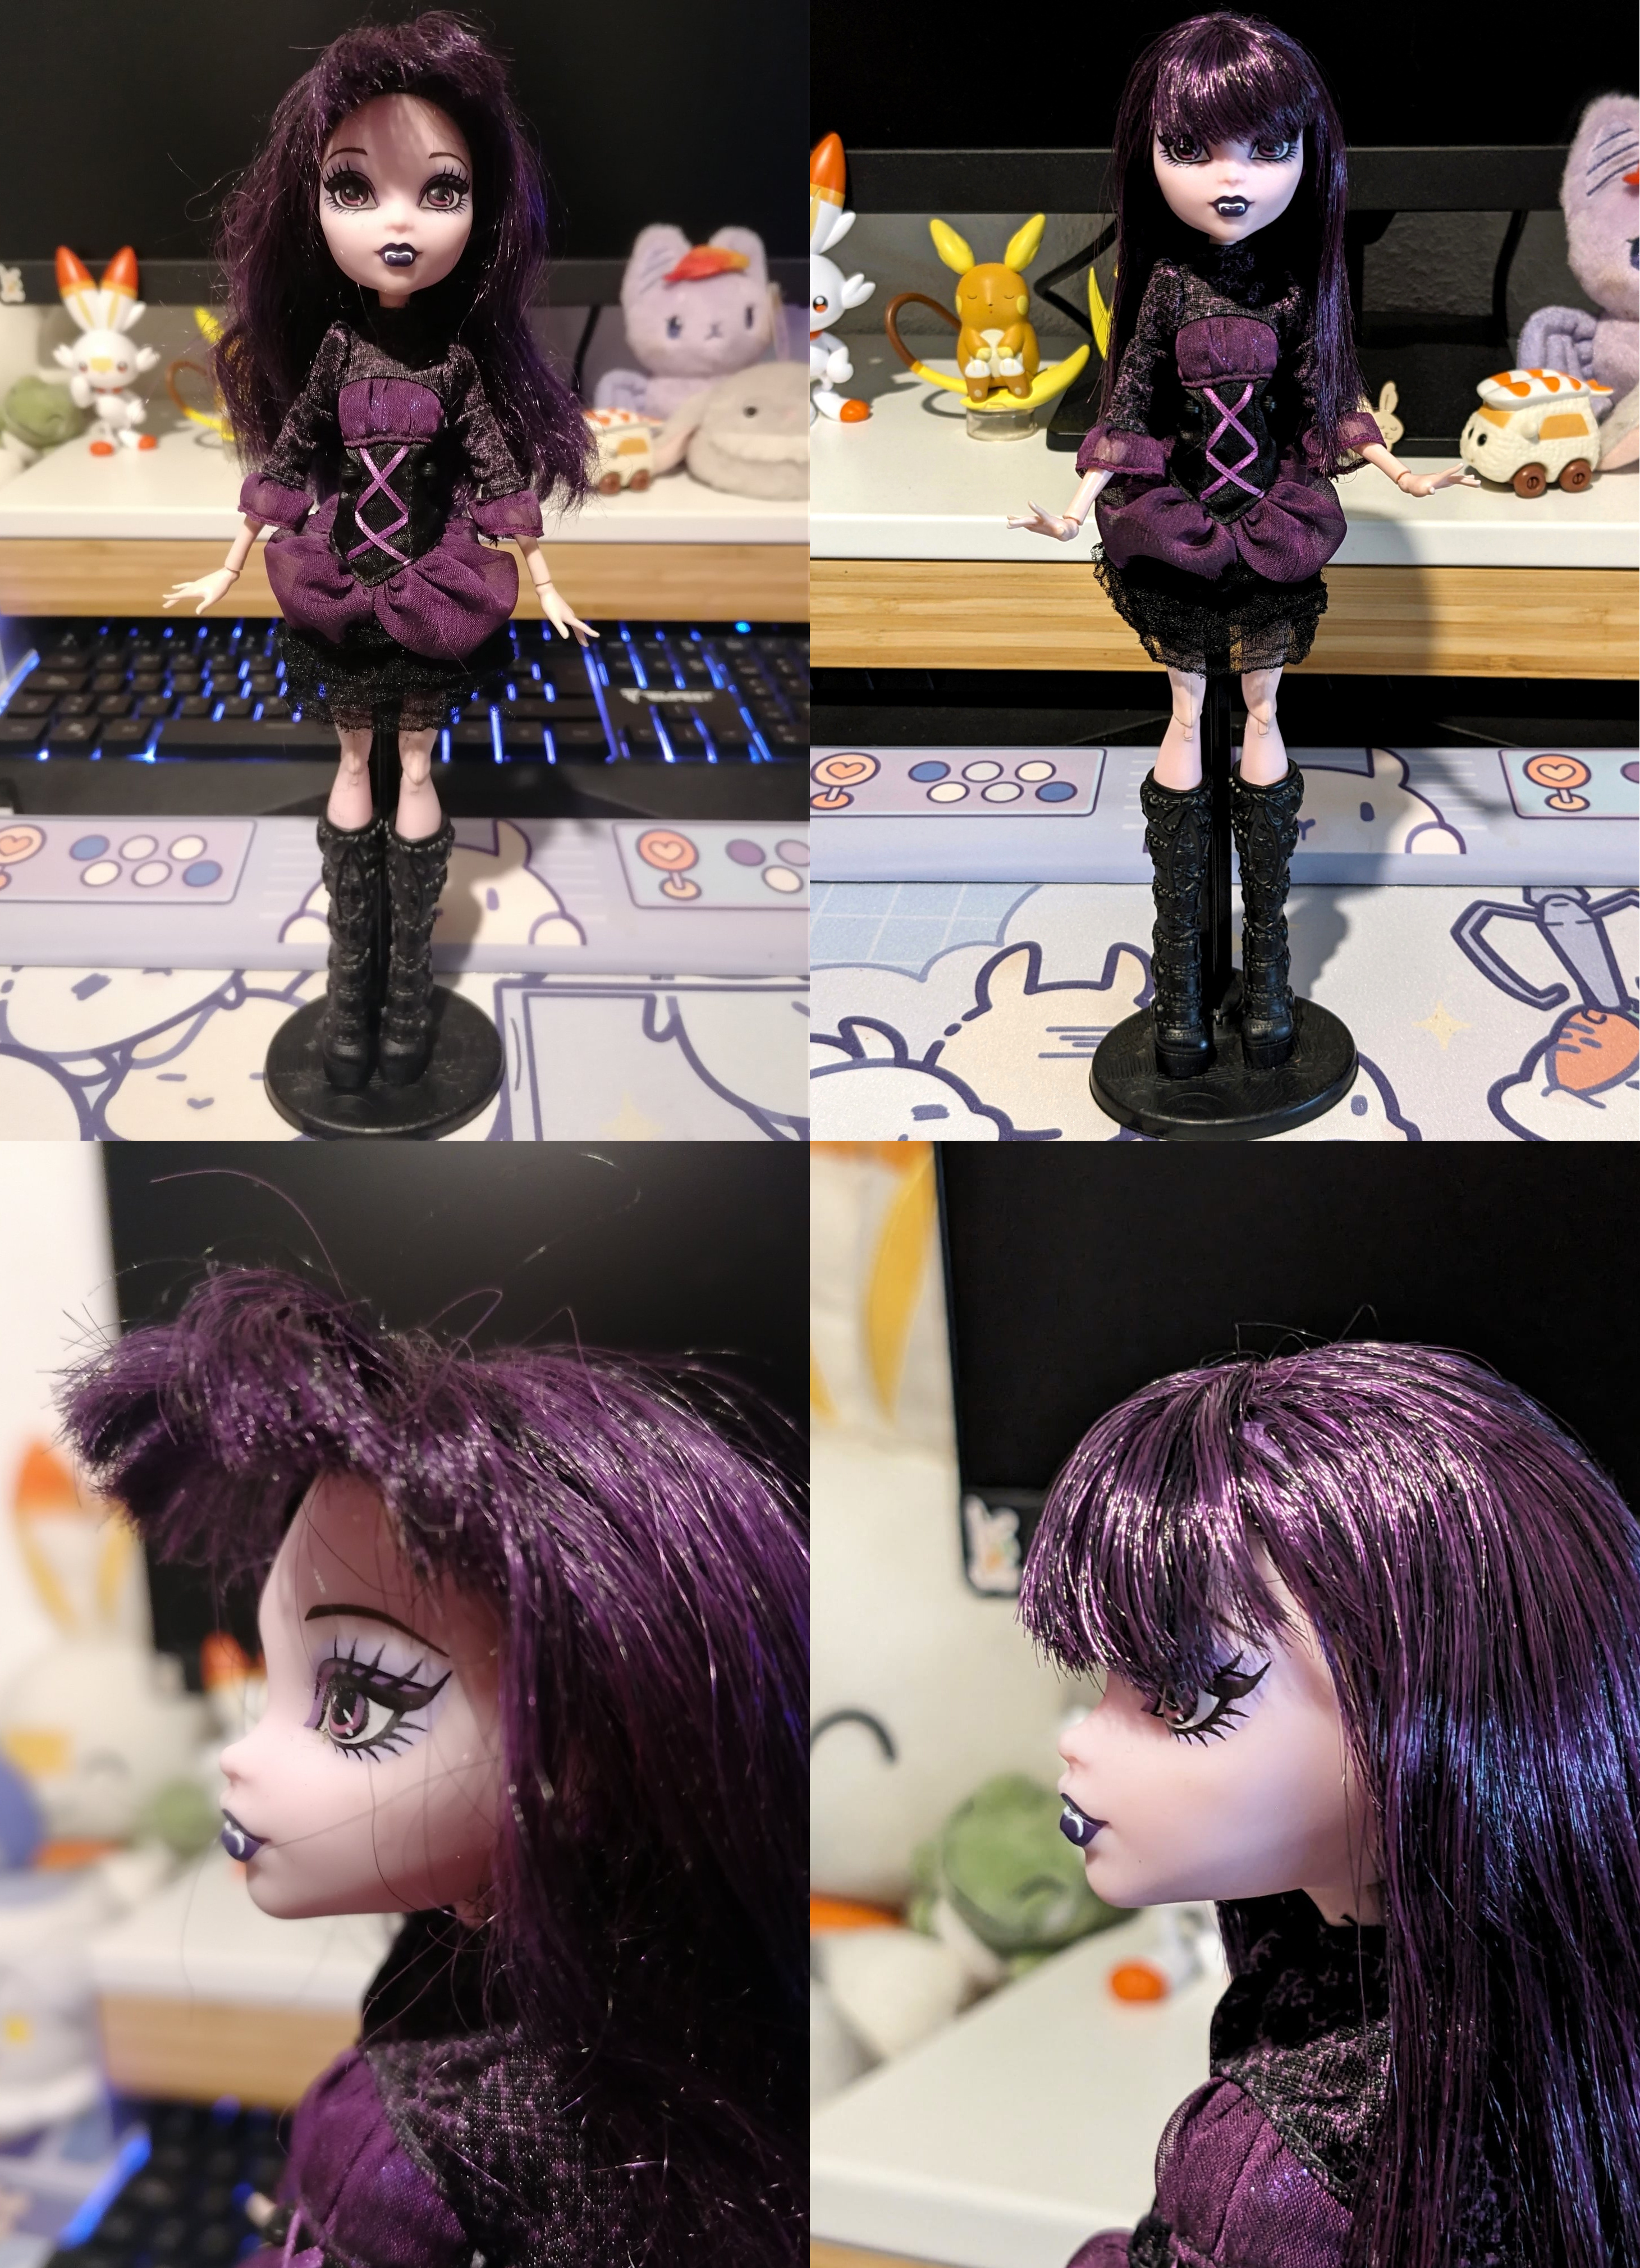
When we’ve made plush restorations, you’ve always given us lots of support and showed interest in the process. Today we have a different kind of restoration, of a Monster High doll! Cris is super fan of the franchise. They have a huge collection hahaha. They recently traded some dolls, and one of them was this Elissabat with hair in a terrible state.
So as a personal project, Cris decided to restore it. We thought some of you may like to know how to do it, so here’s a small step by step on how to restore a doll’s hair ^^
As you see in the photo, the doll’s hair was frizzy, tangled and with a spiky fringe. Her dress was also a bit frayed, so we cut the loose threads to make it look better. The big work was on the hair.The first thing we did was remove her clothes and accessories and brush her hair. we used a Monster High brush, because doll brushes don’t damage a doll’s hair as much as one for humans. You can also use a wig brush.
Once brushed we washed her hair in warm water with dish soap. You can also use laundry soap. Never use shampoo as it’s made for real hair, and it has certain oils and components that can damage synthetic hair or leave it oily. We rinsed and brushed again.
If the hair is still too damaged, you can soak it for an hour in a bowl with a few drops of fabric softener in warm water. Again, don’t use hair conditioner. Fabric (and dish) soap is made to clean synthetic fibers and doll hair is made of them.
After that, we brushed the fringe down and covered the head with aluminium foil to keep the fringe in its place, and poured boiling water over the head to shape the hair and specially the fringe. We removed the aluminium foil and poured some more water. We brushed Elissabat again and left her to dry.
When her hair was more dry, we realised her fringe was too flat and covered her eyes completely. So we made a hair curler with more aluminium foil, put it under the fringe and poured more boiling water. For curling doll hair you can also use plastic straws and hairpins, but they don’t sell those straws anymore, so we had to improvise hahaha
We let the hair airdry and finally used a hairdryer in the lowest heat setting to finish drying. And here’s the final result!
We really didn’t expect that her hair was going to turn out so good knowing how it was when she arrived?? It’s amazing what some hot water and careful brush can do! She looks like she just came out of her box ;3;
Knowing how good this worked, we will probably try to restore the hair of other old dolls we have. And if you have dolls as well, you can use this tutorial to fix rebel hairs in your collection! If you do it please show us some photos
We know this short tutorial is very different from what we usually do since we are plushmakers, but as artists we enjoy sharing bits of other projects we make in different fields. That you know more about us, our likes and personal projects. But don’t worry, we’ll soon post more plush WIPs hehehe 😉
Sending a big hug and we’ll see you soon with new work updates!
-----ESPAÑOL-----Hello everybunny!
Mientras acabamos de trabajar en un encargo secreto y otros encargos pendientes, hemos querido haceros un post un poco diferente pero muy interesante!
Cuando hemos hecho restauraciones de peluches, siempre habéis mostrado mucho apoyo e interés en su proceso. Y hoy os queremos enseñar una restauración, pero de una muñeca de Monster high! Y es que donde nos veis, cris es súper fanática de esa franquicia. Tiene una colección enorme jajaja. Y hace poco, hizo un trade donde le llegó está Elissabat en bastante mal estado.
Así que como proyecto personal, decidió restaurarla. Y hemos pensado que a varios de vosotros os gustaría saber cómo hacerlo. Así que aquí tenéis un pequeño paso a paso de cómo restaurar una muñeca ^^
Como veréis en la foto, la muñeca tenía el pelo escrepado, levantado y enredado . Había perdido toda su forma, en especial, en el flequillo. También tenía el vestido un poco deshilachado, pero eso solo lo cortamos con cuidado para dejarlo más presentable. El trabajo fue en su melena.
Lo primero que hicimos fue quitarle la ropa y cepillar el pelo. Usamos el cepillo original de la muñeca que daña menos el pelo que uno de personas. También podéis usar un cepillo para pelucas
Ya peinada le lavamos el pelo con Fairy fregaplatos, también se puede usar detergente de ropa. Nunca champú o suavizante de personas! Al ser pelo sintético puede quedaros pringoso si lo usáis. Aclaráis y cepillais. Si veis que está muy dañado, podéis dejarlo en remojo en agua tibia con suavizante de ropa. De nuevo, no uséis acondicionador de pelo. El detergente de ropa (y similarmente, el jabón de platos), está hecho para limpiar fibras sintéticas, y el pelo de muñeca está hecho de ellas.
Aclaráis y cepillais. Si veis que está muy dañado, podéis dejarlo en remojo en agua tibia con suavizante de ropa.
Después le cubrimos con papel de aluminio y le echamos agua hirviendo para que tomara forma el pelo y sobretodo el flequillo. Luego le quitamos el papel y terminamos de echarle un poco más de agua. La peinamos y la dejamos secar un poco
Cuando estaba ya más seca, nos dimos cuenta que el flequillo iba a quedar demasiado bajado y pegado a la frente, tapándole los ojos. Así que le hicimos una estructura por debajo de este para levantarlo y que quedase con mejor forma, y echamos más agua hirviendo. Para rizar el pelo también se pueden usar pajitas de plástico sujetas con horquillas, pero aquí ya no se venden esas pajitas así que tuvimos que improvisar jajaja
Y ahora si, dejándolo secar al aire y luego con un secador muy flojo y desde lejos, tenemos el resultado final!
De verdad no esperábamos para nada que fuera a quedar tan bien viendo cómo estaba al principio??? Es increíble lo que hace un poco de agua caliente y peinar con cuidado!
Parece recen sacada de su caja ;3;
Sabiéndo lo bien que va, seguramente vamos a probar a " restaurar" otras muñecas viejas que tenemos. Y os ánimamos a usar este mini tutorial a vosotros y así darle vida a esas cabelleras encrespadas de vuestras colecciones! Sobretodo enseñdnos alguna fotito si lo hacéis
Sabemos que este tutorial es muy diferente de lo que solemos traer siendo una cuenta de peluches, pero nos hace felices compartir aquí en Patreon nuestro viaje como artistas en todas direcciones. Que conozcáis más de nuestro mundo, gustos y proyectos personales. Pero no os preocupéis, que seguiremos trayendo de normal nuestros WIPs de peluches hehehe 😉
Un gran abrazo y os vemos muy pronto con una nueva update de nuestro trabajo!
Files